Azure Firewall을 사용하여 Spoke 간 통신하기
1. 테스트 아키텍처
2. Hub 대역 구성
2.1 리소스 그룹 생성
2.2 가상 네트워크 생성
2.3 Azure Firewall 배포
2.4 방화벽 규칙 생성
2.5 가상 머신 생성
2.6 Private DNS Zone 생성
2.7 가상 네크워크 링크 생성
3. Spoke 1 대역 구성
3.1 리소스 그룹 생성
3.2 가상 네트워크 생성
3.3 Hub - Spoke 1 간 VNet Peering
3.4 경로 테이블 생성
3.5 경로 테이블 구성
3.6 가상 머신 생성
3.7 가상 네크워크 링크 생성
4. Spoke 2 대역 구성
4.1 리소스 그룹 생성
4.2 가상 네트워크 생성
4.3 Hub - Spoke 2 간 VNet Peering
4.4 경로 테이블 생성
4.5 경로 테이블 구성
4.6 Azure Database for MySQL Flexible Server 생성
4.7 가상 네크워크 링크 생성
5. 통신 테스트
5.1 Network Watcher를 통한 Next Hop 확인
5.2 Azure Firewall 진단 설정을 통한 방화벽 규칙 적용 확인
5.3 Spoke 1 대역 VM → Spoke 2 대역 MySQL Server 접근 테스트
1. 테스트 아키텍처
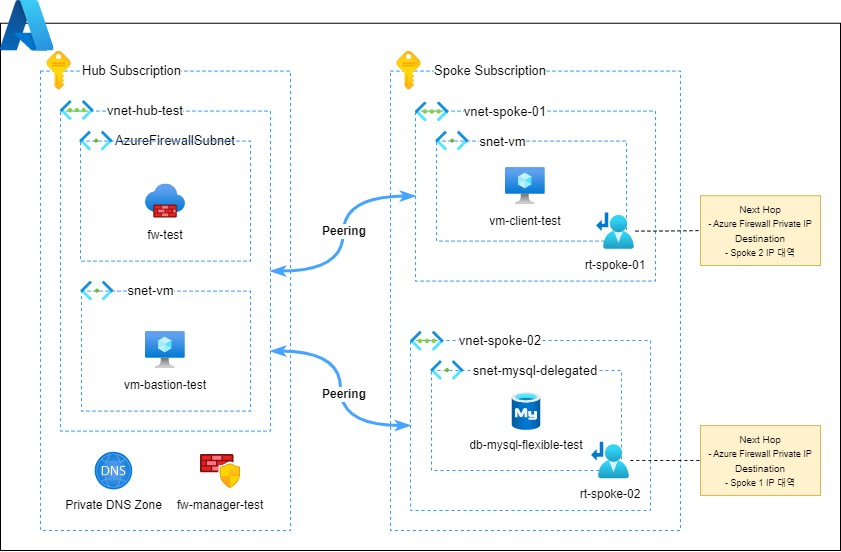
Spoke 1 대역의 VM에서 Azure Firewall을 거쳐 Spoke 2 대역의 MySQL Flexible Server에 접근할 수 있도록 Azure 환경을 구성하는 것이 이번 주제의 목표입니다.
2. Hub 대역 구성
2.1 리소스 그룹 생성
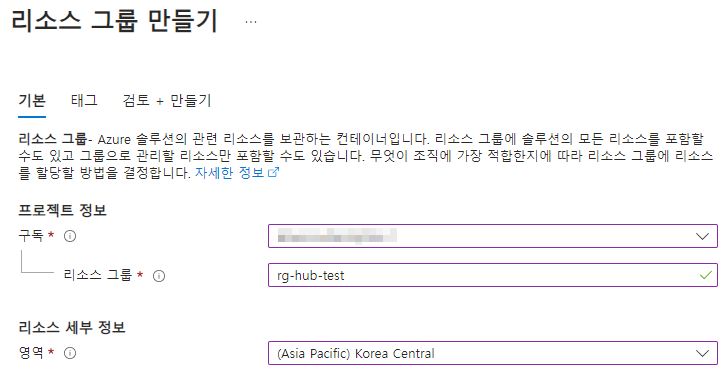
리소스 그룹 : rg-hub-test # 원하는 리소스 그룹 이름 입력영역 : (Asia Pachific) Korea Central
[검토 + 만들기] 탭에서 [만들기]를 클릭하여 Hub 대역 [리소스 그룹]을 생성합니다.
2.2 가상 네트워크 생성
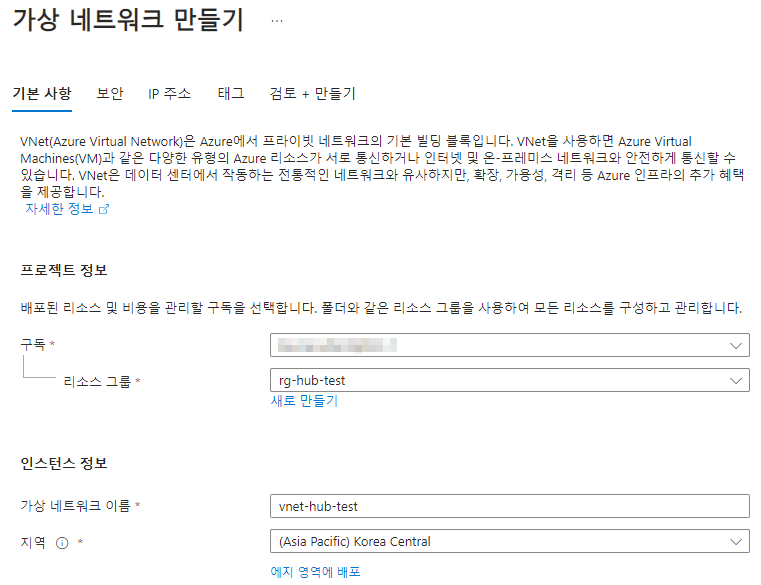
리소스 그룹 : rg-hub-test 가상 네트워크 이름 : vnet-hub-test # hub용 가상 네트워크 이름 입력영역 : (Asia Pachific) Korea Central
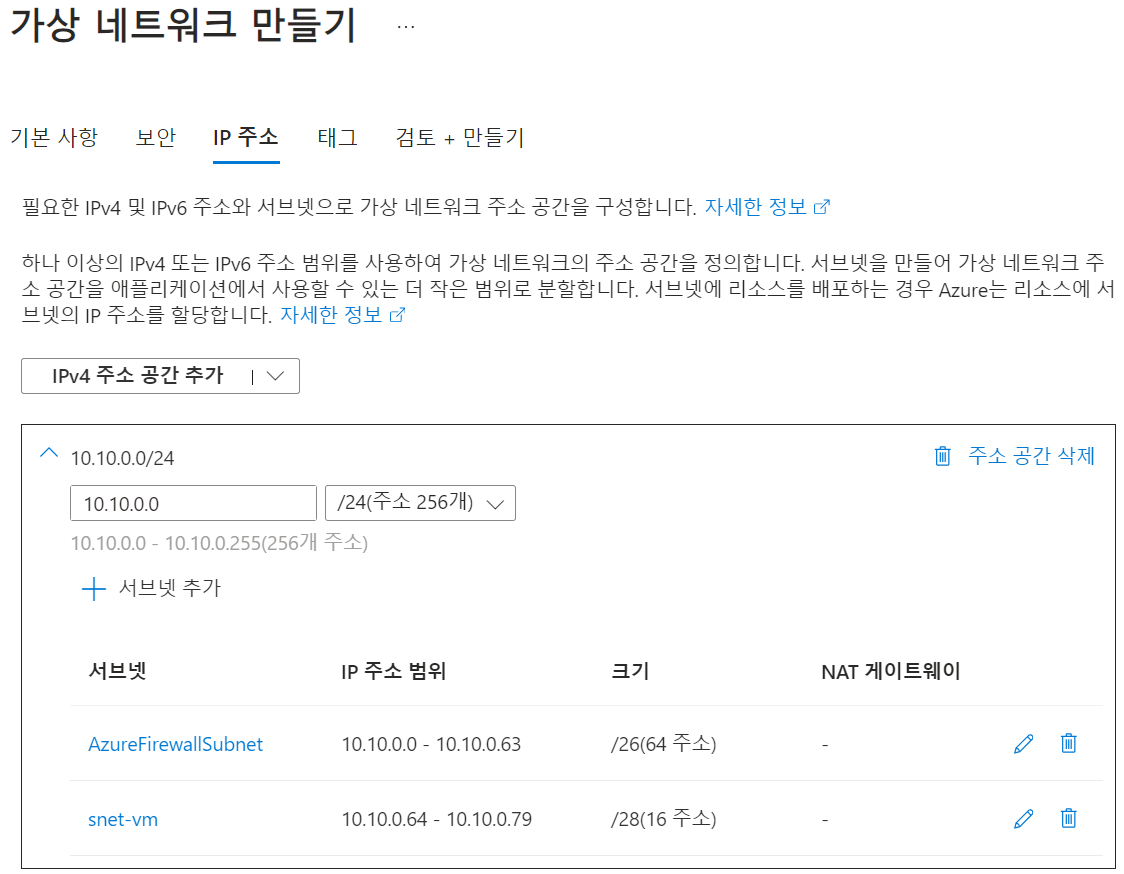
주소 공간 : 10.10.0.0/24 # 가상 네트워크 대역 입력서브넷 : AzureFirewallSubnet, snet-vm 추가 # [+ 서브넷 추가] 버튼을 클릭하여 주소 범위와 크기 입력
[검토 + 만들기] 탭에서 [만들기]를 클릭하여 Hub 대역의 [가상 네트워크]를 생성합니다.
2.3 Azure Firewall 배포
1. [가상 머신]과 Azure Database for MySQL - Flexible Server이 3306 포트를 통해 통신할 수 있도록 규칙 추가 필요2. 방화벽 규칙은 Firewall Manager을 통해 관리됨
[기본 사항] 탭
리소스 그룹 : rg-hub-test이름 : fw-test방화벽 SKU : 표준Firewall policy : fw-policy-test # [Add new] 버튼을 클릭하여 새로운 policy 생성가상 네트워크 선택 # 기존 항목 사용가상 네트워크 : vnet-hub-test # AzureFirewallSubnet이 있는 Hub 네트워크 선택공용 IP 주소 : pip-fw-test # [새로 추가] 버튼을 클릭하여 새로운 공용 IP 생성
[검토 + 만들기] 탭에서 [만들기]를 클릭하여 Hub 대역에 [방화벽]을 생성합니다.
2.4 방화벽 규칙 생성
[방화벽] > [개요]
[설정] > [네트워크 규칙] > [+ 규칙 컬렉션 추가]
1. [규칙]의 상위 개념인 [규칙 컬렉션]을 먼저 생성하여야 합니다.([규칙 컬렉션]을 생성하지 않은 상태로 [+ Add rule]을 클릭하여 [규칙]을 생성할 수 없습니다.)2. 가장 상위 개념인 [규칙 컬렉션 그룹]의 경우, 기본값을 사용하거나 [설정] > [규칙 컬렉션] 탭에서 [+ Add] > [Rule collection group]을 클릭하여 신규로 생성할 수 있습니다.cf) 기본값은 다음과 같이 3개가 존재합니다.(DefaultDnatRuleCollectionGroup, DefaultNetworkRuleCollectionGroup, DefaultApplicationRuleCollectionGroup)3. [규칙 컬렉션 그룹], [규칙 컬렉션]은 모두 우선 순위를 가지며 [규칙]은 상위 개념들의 우선 순위를 따라갑니다.
[규칙 컬렉션] 및 [규칙]을 추가합니다.
이름 : rule-collection-nw # 규칙 컬렉션 이름 입력규칙 컬렉션 형식 : 네트워크 우선 순위 : 100 # 같은 [규칙 컬렉션] 내에서의 우선 순위를 의미함규칙 추가1. spoke1 대역에서 spoke 2 대역의 MySQL Flexible Server에 접근하기 위한 3306 포트 open(원본 : Spoke 1 대역, 대상 : Spoke 2 대역)2. spoke2 대역에서 spoke 1 대역으로 응답 보낼 수 있도록 하기 위한 3306 포트 open(원본 : Spoke 2 대역, 대상 : Spoke 1 대역)
[추가]를 클릭하여 [규칙 컬렉션] 및 [규칙]을 생성합니다.
2.5 가상 머신 생성
Spoke 1 대역에 배포될 가상 머신에 접근하거나 Azure Portal에 로그인하여 Private하게 구성된 리소스들을 조회하기 위한 VM을 생성합니다.
[기본 사항] 탭
리소스 그룹 : rg-hub-test # Hub 대역 리소스 그룹 선택가상 머신 이름 : vm-bastion-test 이미지 : Windows 11 Pro, version 22H2 - X64 Gen2 크기 : Standard_D4s_v5 - 4 vcpu, 16 GiB 메모리관리자 계정- 사용자 이름 : azureuser # 원하는 이름 사용- 암호인바운드 포트 선택 : RDP (3389)라이선싱 : 체크 박스 클릭
[네트워킹] 탭
가상 네트워크 : vnet-hub-test 선택서브넷 : snet-vm 선택공용 IP : pip-vm-bastion # [새로 만들기] 클릭하여 원하는 이름 입력
[검토 + 만들기] 탭에서 [만들기]를 클릭하여 Hub 대역의 bastion용 [가상 머신]을 생성합니다.
2.6 Private DNS Zone 생성
Spoke 2 대역에 배포될 Azure Database for MySQL Flexible Server (VNet Integration)를 Private DNS Zone과 통합하기 위하여 Hub 대역에 Private DNS Zone(private.mysql.database.azure.com)을 생성합니다.
[기본 사항] 탭
리소스 그룹 : rg-hub-test 선택이름 : private.mysql.database.azure.com
[검토 + 만들기] 탭에서 [만들기]를 클릭하여 Hub 대역에 [Private DNS Zone]을 생성합니다.
2.7 가상 네크워크 링크 생성
[설정] > [가상 네트워크 링크] > [+ 추가]
링크 이름 : vnet-link-hub # 원하는 가상 네트워크 링크 이름 입력가상 네트워크 : vnet-hub-test # Hub 대역의 가상 네트워크 선택
3. Spoke 1 대역 구성
3.1 리소스 그룹 생성
[기본] 탭
리소스 그룹 : rg-spoke-test-01 # 원하는 리소스 그룹 이름 입력영역 : (Asia Pachific) Korea Central
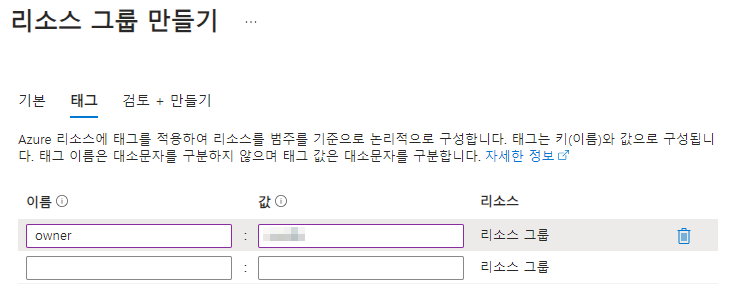
[태그] 탭
[검토 + 만들기] 탭에서 [만들기]를 클릭하여 Spoke 1 대역의 [리소스 그룹]을 생성합니다.
3.2 가상 네트워크 생성
[기본] 탭
리소스 그룹 : rg-spoke-test-01가상 네트워크 이름 : vnet-spoke-01 # spoke 1용 가상 네트워크 이름 입력영역 : (Asia Pachific) Korea Central
[IP 주소] 탭
주소 공간 : 10.20.0.0/26 # 가상 네트워크 대역 입력서브넷 : snet-vm 추가 # [+ 서브넷 추가] 버튼을 클릭하여 주소 범위와 크기 입력
[검토 + 만들기] 탭에서 [만들기]를 클릭하여 Spoke 1 대역의 [가상 네트워크]를 생성합니다.
3.3 Hub - Spoke 1 간 VNet Peering
vnet-spoke-01 > [설정] > [피어링] > [+ 추가]
Hub - Spoke 1 간 VNet Peering을 구성합니다.
[추가] 버튼을 클릭하여 VNet Peering을 생성합니다.
3.4 경로 테이블 생성
Spoke 1 VNet에서 Hub의 Azure Firewall을 통해 Spoke 2 VNet 내 Azure Database for MySQL - Flexible Server에 접근할 수 있도록 사용자 지정 경로를 생성 및 구성합니다.
[기본] 탭
리소스 그룹 : rg-spoke-test-01 이름 : rt-spoke-01게이트웨이 경로 전파 : No # VPN 게이트웨이를 통해 온-프레미스 네트워크에 연결된 가상 네트워크의 서브넷에 경로 테이블을 연결하고 온-프레미스 경로를 서브넷의 네트워크 인터페이스에 전파하지 않으려는 경우 No 옵션 선택
[검토 + 만들기] 탭에서 [만들기]를 클릭하여 Spoke 1 대역의 [경로 테이블]을 생성합니다.
3.5 경로 테이블 구성
경로 구성
rt-spoke-01 > [설정] > [경로] > [+ 추가]
경로 이름 : To-Spoke2 # Spoke 2 대역으로 가기 위해 사용자 지정 경로(UDR) 생성대상 IP 주소/CIDR 범위 : 10.30.0.0/24 # Spoke 2 대역 IP 주소 입력다음 홉 형식 : 가상 어플라이언스 # 방화벽을 거쳐서 Spoke 2 대역으로 이동다음 홉 주소 : # Azure Firewall의 Private IP 주소 입력
[추가] 버튼을 클릭하여 사용자 지정 경로를 생성합니다.
서브넷 연결
rt-spoke-01 > [설정] > [서브넷] > [+ 연결]
가상 네트워크 : vnet-spoke-01 # spoke 1 대역의 VNet 선택서브넷 : snet-vm # 경로 테이블과 연결할 subnet 선택
3.6 가상 머신 생성
Spoke 2 대역에 배포될 Azure Database for MySQL Flexible Server에 접근하기 위한 client VM을 생성합니다.
[기본 사항] 탭
리소스 그룹 : rg-spoke-test-01 # Spoke 1 대역 리소스 그룹 선택가상 머신 이름 : vm-client-test 이미지 : Ubuntu Server 20.04 LTS - x64 Gen2크기 : Standard_D4s_v5 - 4 vcpu, 16 GiB 메모리관리자 계정- 인증 형식 : 암호- 사용자 이름 : azureuser # 원하는 이름 사용- 암호인바운드 포트 선택 : SSH (22)
[네트워킹] 탭
가상 네트워크 : vnet-spoke-01 선택서브넷 : snet-vm 선택공용 IP : 없음 # Hub 대역에 배포한 [가상 머신]을 통해 접속할 것이므로 공용 IP 불필요
[검토 + 만들기] 탭에서 [만들기]를 클릭하여 Spoke 1 대역의 [가상 머신]을 생성합니다.
3.7 가상 네크워크 링크 생성
[설정] > [가상 네트워크 링크] > [+ 추가]
링크 이름 : vnet-link-spoke-01 # 원하는 가상 네트워크 링크 이름 입력가상 네트워크 : vnet-spoke-01 # Spoke 1 대역의 가상 네트워크 선택
4. Spoke 2 대역 구성
4.1 리소스 그룹 생성
[기본] 탭
리소스 그룹 : rg-spoke-test-02 # 원하는 리소스 그룹 이름 입력영역 : (Asia Pachific) Korea Central
[태그] 탭
[검토 + 만들기] 탭에서 [만들기]를 클릭하여 Spoke 2 대역의 [리소스 그룹]을 생성합니다.
4.2 가상 네트워크 생성
[기본] 탭
리소스 그룹 : rg-spoke-test-02가상 네트워크 이름 : vnet-spoke-02 # spoke 2용 가상 네트워크 이름 입력영역 : (Asia Pachific) Korea Central
[IP 주소] 탭
주소 공간 : 10.30.0.0/24 # 가상 네트워크 대역 입력서브넷 : snet-mysql-delegated 추가 # [+ 서브넷 추가] 버튼을 클릭하여 주소 범위와 크기 입력 프라이빗 서브넷 사용 : 체크 X # 위임된 서브넷의 경우 DefaultOutboundConnectivity를 false로 설정해서는 안 됨
[검토 + 만들기] 탭에서 [만들기]를 클릭하여 Spoke 2 대역의 [가상 네트워크]를 생성합니다.
4.3 Hub - Spoke 2 간 VNet Peering
vnet-spoke-02 > [설정] > [피어링] > [+ 추가]
Hub - Spoke 2 간 VNet Peering을 구성합니다.
[추가] 버튼을 클릭하여 VNet Peering을 생성합니다.
4.4 경로 테이블 생성
Spoke 1 대역의 가상 머신이 Azure Database for MySQL - Flexible Server에 접근할 때와 동일한 루트로 통신할 수 있도록 사용자 지정 경로를 구성합니다.
[기본] 탭
리소스 그룹 : rg-spoke-test-02 이름 : rt-spoke-02게이트웨이 경로 전파 : No # VPN 게이트웨이를 통해 온-프레미스 네트워크에 연결된 가상 네트워크의 서브넷에 경로 테이블을 연결하고 온-프레미스 경로를 서브넷의 네트워크 인터페이스에 전파하지 않으려는 경우 No 옵션 선택
[검토 + 만들기] 탭에서 [만들기]를 클릭하여 Spoke 2 대역의 [경로 테이블]을 생성합니다.
4.5 경로 테이블 구성
경로 구성
rt-spoke-02 > [설정] > [경로] > [+ 추가]
경로 이름 : To-Spoke1 # Spoke 1 대역으로 가기 위해 사용자 지정 경로(UDR) 생성대상 IP 주소/CIDR 범위 : 10.20.0.0/26 # Spoke 1 대역 IP 주소 입력다음 홉 형식 : 가상 어플라이언스 # 방화벽을 거쳐서 Spoke 1 대역으로 이동다음 홉 주소 : # Azure Firewall의 Private IP 주소 입력
[추가] 버튼을 클릭하여 사용자 지정 경로를 생성합니다.
서브넷 연결
rt-spoke-02 > [설정] > [서브넷] > [+ 연결]
가상 네트워크 : vnet-spoke-02 # spoke 2 대역의 VNet 선택서브넷 : snet-mysql-delegated # 경로 테이블과 연결할 subnet 선택
4.6 Azure Database for MySQL Flexible Server 생성
VNet Integration?- 가상 네트워크 인프라를 통해서만 서버에 대해 액세스할 수 있도록 합니다. - Azure Database for MySQL - Flexible Server 전용으로 위임된 서브넷이 필요합니다. - 단일 VNet 또는 여러 VNet에 포함될 수 있습니다.
[기본] 탭
리소스 그룹 : rg-spoke-test-02 # spoke 2 대역의 리소스 그룹 선택서버 이름 : db-mysql-flexible-test MySQL 버전 : 8.0 # 기본값 유지인증 방법 : MySQL 인증만- 관리자 사용자 이름 : sqladmin # 원하는 사용자 이름 입력- 암호
[네트워킹] 탭
네트워크 연결 - 연결 방법 : 프라이빗 액세스(VNet 통합)가상 네트워크 : vnet-spoke-02 # Azure Database for MySQL Flexible Server가 생성될 VNet 선택서브넷 : # 위임될 subnet 선택프라이빗 DNS 통합- 구독 : # Hub 대역이 있는 구독 선택- 프라이빗 DNS 영역 : # 기 생성한 프라이빗 DNS 영역 선택
4.7 가상 네크워크 링크 생성
[설정] > [가상 네트워크 링크] > [+ 추가]
링크 이름 : vnet-link-spoke-02 # 원하는 가상 네트워크 링크 이름 입력가상 네트워크 : vnet-spoke-02 # Spoke 1 대역의 가상 네트워크 선택
5. 통신 테스트
5.1 Network Watcher를 통한 Next Hop 확인
[Network Watcher] > [네트워크 진단 도구] > [다음 홉]
리소스 그룹 : rg-spoke-test-01 # Client용 가상 머신이 있는 Spoke 1 대역의 리소스 그룹 선택가상 머신 : vm-client-test 선택대상 IP 주소 : 10.30.0.4 # Azure Database for MySQL Flexible Server의 IP 주소 입력
[다음 홉] 버튼을 클릭하여 조회 시 [다음 홉 형식]은 VirtualAppliance, IP 주소는 방화벽의 Private IP 주소가 출력되는 것을 확인할 수 있습니다.
5.2 Azure Firewall 진단 설정을 통한 방화벽 규칙 적용 확인
[방화벽] > [모니터링] > [진단 설정] > [+ 진단 설정 추가]
[진단 설정] 구성
진단 설정 이름 : Diagnostics-Setting-FW # 원하는 진단 설정 이름 입력범주 : Azure Firewall Network Rule # 현재 방화벽에 Network 규칙만 있으므로 관련된 범주만 선택대상 세부 정보- 스토리지 계정에 보관 # 방화벽 규칙에 의해 트래픽이 허용/거부되는지 확인을 위해 스토리지 계정에 로그 적재스토리지 계정 : # 없는 경우 먼저 생성 필요
[스토리지 계정] > [데이터 스토리지] > [컨테이너] > [insights-logs-azurefirewall] 컨테이너 클릭
조회하고자 하는 로그 파일을 다운로드합니다.
경로 : resourceId=/SUBSCRIPTIONS/{구독 id}/RESOURCEGROUPS/{Resource Group 명}/PROVIDERS/MICROSOFT.NETWORK/AZUREFIREWALLS/{Firewall 명}/년/월/일/시/분/PT1H.json
로그 세부 내용 확인
Action : 해당 트래픽의 허용 여부 Policy : 어떤 방화벽 정책을 사용하는지 RuleCollectionGroup : 트래픽을 허용/거부하는 [규칙]이 어떤 [규칙 컬렉션 그룹]에 속해 있는지RuleCollection : 트래픽을 허용/거부하는 [규칙]이 어떤 [규칙 컬렉션]에 속해 있는지Rule : 어떤 [규칙]에 의해 트래픽이 허용/거부되는지
※ 방화벽 테스트를 위해 Spoke 2 대역에 [가상 머신]을 추가로 생성하였습니다.
5.3 Spoke 1 대역 VM → Spoke 2 대역 MySQL Server 접근 테스트
Hub 대역의 Bastion용 [가상 머신]에 접속합니다.
Spoke 1 대역의 Client용 [가상 머신]에 접속합니다.
Spoke 2 대역의 MySQL Flexible Server 접근을 위한 MySQL Client를 설치합니다. (명령어 하기 박스 참고)
1. sudo apt-get update2. sudo apt-get install mysql-client (Y 입력)3. mysql -V # 입력 시 mysql Ver 8.0.35-0ubuntu0.20.04.1 for Linux on x86_64 ((Ubuntu)) 출력
Azure Database for MySQL Flexible Server 접근
[Azure Database for MySQL Flexible Server] > [설정] > [연결] > [브라우저에서 또는 로컬에서 연결] 클릭 후 명령어를 복사합니다.
Spoke 1 대역의 [가상 머신]에서 해당 명령어를 입력하여 정상 접근을 확인합니다.
'IT이야기 > Azure' 카테고리의 다른 글
| Step-by-Step guide to configure self-service password reset in Azure AD (0) | 2024.10.31 |
|---|---|
| Application Gateway에 SSL 인증서를 적용하여 HTTPS로 Application 접근하기 (1) | 2024.10.18 |
| Azure상에서 IaC로 Infra 구성시, 필수 입력해야 되는 요소 (0) | 2024.10.18 |
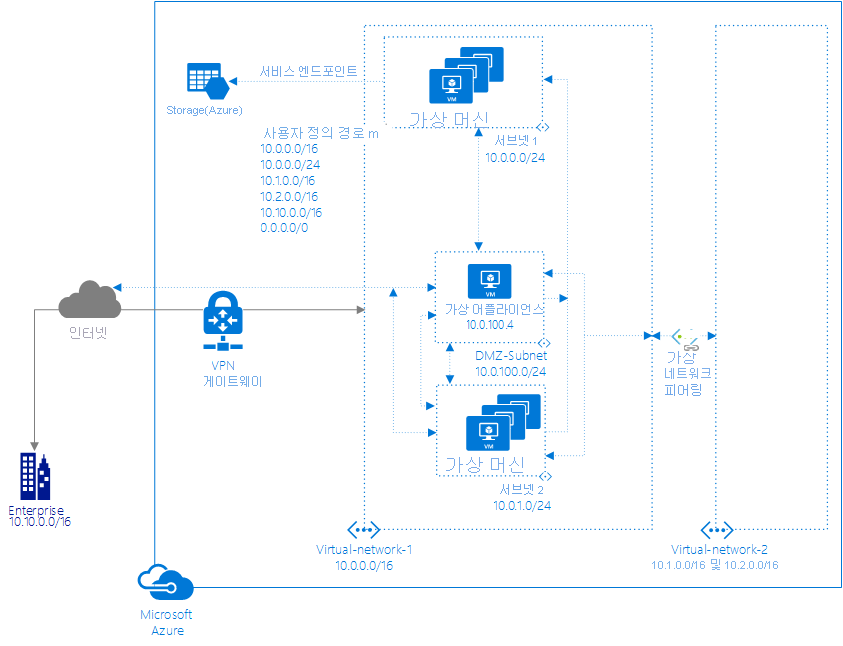
| 가상 네트워크 트래픽 라우팅 (0) | 2024.10.18 |
| 가상 어플라이언스를 사용하여 네트워크 보안 (2) | 2024.10.18 |