728x90
Use Ctrl-F to find a specific code.
Some codes have a recommended action using PowerShell as well as the general action.
Links to other error code pages can be found at System Center 2012 Portal: Virtual Machine Manager (VMM) Error Codes - TechNet Articles - United States (English) - TechNet Wiki (microsoft.com)
If you have additional information about an error, please add it to the "Additional Troubleshooting Information" column.
#000000;padding:0in 5.4pt;background-color:transparent;">
| Code | Message | Recommended Action (in product) | Additional Troubleshooting Information | ||
| 24000 | Error in connecting to the WSUS server %ServerName;, Port %TCPPort;. Detailed error - %DetailedErrorMessage; | Ensure that the server connection information is valid. Then try the operation again. | |||
| 24001 | Update server operation failed with error - %DetailedErrorMessage; | BLANK | |||
| 24002 | Update server is currently processing another configuration request or is synchronizing updates and cannot process current configuration change request. | Try the operation after some time. | |||
| 24003 | VMM can manage only one Update server instance. %ServerName; is already managed by VMM. | BLANK | |||
| 24004 | Update server %ServerName; is a replica downstream WSUS server. Please specify the root or non-replica downstream WSUS server for integration. | Please specify the root or non-replica downstream WSUS server and re try the operation again. | |||
| 24005 | Update Server %ServerName; has unsupported version of Windows Software Update Server (WSUS). | Please specify Update Server with WSUS version 3.0 SP2. | |||
| 24006 | Baseline with name %BaselineName; already exists. | Please make sure the baseline name is unique and retry the operation. | |||
| 24007 | Update (ID - %Id;) is already added to baseline %BaselineName;, it can be added only once to the given baseline | Please make sure the update to be added to the baseline is not already added to the baseline and retry the operation. | |||
| 24008 | Update (ID - %Id;) cannot be removed from the baseline %BaselineName;, it is not added to the baseline. | Please make sure the update to be removed from the baseline is added to the baseline and retry the operation. | |||
| 24009 | Assignment scope (ID - %Id;, ObjectType - %ObjectType;) is already assigned to baseline %BaselineName;. It can be assigned only once to the given baseline. | Please make sure the assignment scope to be assigned to the baseline is not already assigned to the baseline and retry the operation. | |||
| 24010 | Assignment scope (ID - %Id;, ObjectType - %ObjectType;) cannot be removed from the baseline %BaselineName;. It is not assigned to the baseline. | Please make sure the assignment scope to be removed from the baseline is assigned to the baseline and retry the operation. | |||
| 24011 | Software update (%Name; - %Id;) does not have license agreement. | Please ensure the software update has license agreement that needs to be accepted before update can be deployed and retry the operation. | |||
| 24012 | License agreement for software update (%Name; - %Id;) is already accepted. | Please ensure the software update has license agreement that needs to be accepted before update can be deployed and retry the operation. | |||
| 24013 | Unable to find the object requested | Try refreshinglease ensure the software update has license agreement that needs to be accepted before update can be deployed and retry the operation. | |||
| 24014 | License agreement for software update (%Name; - %Id;) needs to be accepted before update can be added to any baseline. | Please ensure the software update license agreement is accepted and retry the operation. | |||
| 24015 | Host - %VMHostName; is a clustered host. Individual cluster nodes cannot be assigned as a baseline scope. | Please use a cluster as baseline assignment scope and retry the operation. | |||
| 24016 | Host - %VMHostName; is not a Hyper-V host. Only Hyper-V hosts can be added as baseline assignment scope. | Please ensure the host is Hyper-V host and retry the operation. | |||
| 24017 | Cluster - %VMHostName; is not a Hyper-V cluster. Only Hyper-V clusters can be add ed as baseline assignment scope. | Please ensure the cluster is Hyper-V cluster and retry the operation. | |||
| 24018 | Baseline %BaselineName; is not assigned to %TargetType; %TargetName;. | Please ensure the baseline is assigned and retry the operation. | |||
| 24019 | %TargetType; %TargetName; has no baselines assigned. | Please ensure at least one baseline is assigned and retry the operation. | |||
| 24020 | No updates were found for compliance scan or remediation operation for %TargetTyp e; %TargetName;. | Please ensure baseline has at least one update added to it and retry the operation. | |||
| 24021 | Compliance scan of %TargetType; %TargetName; succeeded with warning - %DetailedErrorMessage; | Try the operation again. | |||
| 24022 | To enable Update Server, WSUS 3.0 SP2 console needs to be installed on VMM server. | Please install WSUS 3.0 SP2 console on the VMM server and restart VMM service and retry the operation. | |||
| 24023 | Update category - %Name; is not valid. | Ensure update category is valid and retry the operation. | |||
| 24024 | Update classification - %Name; is not valid. | Ensure update classification is valid and retry the operation. | |||
| 24025 | Language code - %Name; is not valid. | Ensure update language code is valid and retry the operation. | |||
| 24026 | Update Remediation of %TargetType; %TargetName; failed. Detailed error - %DetailedErrorMessage; | Try the operation again. | |||
| 24027 | Update Remediation of %TargetType; %TargetName; timed out. | Try the operation again. | |||
| 24028 | Update remediation of %TargetType; %TargetName; succeeded with warning - %DetailedErrorMessage; | Try the operation again. | |||
| 24029 | Update remediation orchestration for host cluster - %HostClusterName; failed as one or more nodes within the cluster are in the maintenance mode. | Please ensure all nodes of the host cluster are out of maintenance m ode or use –BypassMaintenanceModeCheck switch and retry the operation. | |||
| 24030 | Update remediation orchestration is supported only for Hyper-v clusters. Host cluster - %HostClusterName; is not a Hyper-v cluster. | ||||
| 24030 | Please ensure the host cluster is Hyper-V cluster and retry the operation. | ||||
| 24031 | Proxy server credentials configuration from VMM is supported only for Update Server in SSL mode. | Please ensure the Update Server is configured for SSL communication and retry the operation. | |||
| 24032 | Update Server %ServerName; is not configured to use proxy server. None of the proxy server related settings can be configured in this mode. | Please ensure the Update Server is configured to use proxy server and retry the operation. | |||
| 24033 | The host %VMHostName; does not belong to the cluster %HostClusterName;. | Ensure the host belongs to the cluster and then try the operation again. | |||
| 24034 | Software update %Name; is not added to the baseline %BaselineName;. | Ensure the update is added to the baseline and then try the operation again. | |||
| 24035 | Compliance scan failed with error - %DetailedErrorMessage;. | Ensure the WinHTTP proxy settings are correctly configured for the communication with WSUS. If WSUS is configured to use SSL, ensure the WSUS certificate is installed in Trusted Root CA for the machine and then try the operation again. | |||
| 24036 | Compliance state for software update %Name; as part of the baseline %BaselineName ; for %TargetName; is currently unknown. Adding or removing exemption cannot be completed. | Please scan the baseline to determine the compliance state of the update and then try the operation again. | |||
| 24037 | Softwaris currently unknown. Adding or removing exemption cannot be completed. | Ensure the update is not marked exempt and then try the operation again. | |||
| 24038 | Software update %Name; as part of the baseline %BaselineName; for %TargetName; is not "Exempt". Remove exemption cannot be completed. | Ensure the update is marked exempt and then try the operation again. | |||
| 24039 | VMM has changed setting on WSUS server to store the update binaries locally. | Please ensure there is enough disk space to support this setting. | |||
| 24040 | VMM has changed update language setting on WSUS server to %Name;. | N/A | |||
| 24041 | VMM has changed update binaries download setting on WSUS server to download the binaries when approved. | N/A | |||
| 24042 | Baseline name cannot be an empty string. | Please use valid name for baseline and try operation again. | |||
| 24043 | User %User; (User Role - %UserRoleName;) does not have permission to modify/remove the baseline %BaselineName;. | Ensure user has sufficient permissions and then try the operation again. | |||
| 24044 | Compliance scan or update remediation action cannot be completed on %ComputerName ;. | Ensure the specified machine is managed by VMM server and has at least one baseline assigned and then try the operation again. | |||
| 24045 | Error occurred in downloading End User License Agreement for Update %Name;. | Ensure the network connectivity between WSUS and WU/MU and then try the synchronization operation again. | |||
| 24046 | Update remediation operation cannot be performed on the cluster %HostClusterName; since node %VMHostName; is not in valid state. | Ensure all the nodes in the cluster are in valid state and retry the operation again. | |||
| 24046 | Update remediation operation cannot be performed on the cluster %HostClusterName; since node %VMHostName; is not in valid state. | 24047 | VMM agent installed on machine %ComputerName; does not support compliance scan or update remediation operations. | Ensure the machine has latest VMM agent installed and retry the operation. | |
| 24048 | Proxy username for UpdateServer cannot be empty. | Ensure the proxy username is valid and retry the operation. | |||
| 24049 | Credentials cannot be specified when the proxy server access is set to be anonymous. | Please do not specify credentials and retry the operation. | |||
| 24050 | WSUS synchronization with WU/MU failed with error - %DetailedErrorMessage;. | Ensure WSUS can reach WU/MU sites and retry the operation. | |||
| 24051 | License agreement for update %Name; cannot be accepted at this time as the last attempt to download the license agreement has failed. | Synchronize the update server and retry the operation. | |||
| 24052 | VMM can store only %UpdateCount; updates from WSUS in its DB. The total number of updates VMM is trying to import from the latest synchronization and the count of its existing updates in DB exceeds this limit. | Ensure the maximum update count is set correctly and retry the operation. | |||
| 24053 | VMM target group %TargetGroupName; cannot be found on update server %ComputerName ;. Please remove the update server from VMM management and re-add it to VMM management. | Please remove the update server from VMM management and re-add it to VMM management. | 24053 | ||
| 24054 | Error occurred in removing VMM target group %TargetGroupName; on update server %ComputerName;. Please remove the specified target group manually from WSUS console. | Please remove the specified target group manually from WSUS console. | |||
| 24055 | Configuration properties of update server %ComputerName; cannot be changed from V MM as this is a downstream WSUS server. | Please ensure the configuration property changes are made for root WSUS server. | |||
| 24056 | Update server %ComputerName; is configured to prevent any configuration property changes from VMM. | Please ensure the specified update server is configured to allow such changes and retry the operation. | |||
| 24300 | Object import failed. Schema validation failed with error: "%ActualException;" | Fix validation error then try operation again | |||
| 24301 | Virtual machine %VMName; has unsupported virtual system type "%Name;" | Fix validation error then try operation again | |||
| 24302 | Unknown resource type "%Name;" was found. | Fix validation error then try operation again | |||
| 24303 | Duplicate element with %Name; property "%Value;" | Fix validation error then try operation again | |||
| 24304 | Unknown processor type %Name; | Fix validation error then try operation again | |||
| 24305 | Cannot find virtual hard disk "%Name;" (family name:"%FamilyName;", release:"%Release;"). Disk binding (%BusType;, %Bus;, %Lun;) will not be created for virtual machine %VMName;. | Fix validation error then try operation again | |||
| 24306 | Cannot find ISO resource "%Name;" (family name:"%FamilyName;", release:"%Release; "). ISO will be removed from DVD drive with binding (%BusType;, %Bus;, %Lun;) on virtual machine %VMName;. | ||||
| Fix validation error then try operation again | |||||
| 24307 | Value "%Value;" of element "%Name;" has invalid format. | Fix validation error then try operation again | |||
| 24308 | Required element "%Name;" is missing. | Fix validation error then try operation again | |||
| 24309 | Value "%Value;" of element "%Name;" is invalid. The value should be between %MinLimit; and %MaxLimit;. | Fix validation error then try operation again | |||
| 24310 | Value "%Value;" of element "%Name;" is invalid. Value length should be between %MinLimit; and %MaxLimit;. | Fix validation error then try operation again | |||
| 24311 | Cannot find virtual floppy disk resource "%Name;" (family name:"%FamilyName;", release:"%Release;"). Virtual floppy disk will be removed from the floppy drive on virtual machine %VMName;. | Fix validation error then try operation again | |||
| 24312 | Logical network "%LogicalNetworkName;" cannot be found. Network adapter "%Name;" will be disconnected on virtual machine %VMName;. | Fix validation error then try operation again | |||
| 24313 | Object import failed. Operation failed with error: "%ActualException;" | Fix validation error then try operatip> | Fix validation error then try operation again | ||
| 24314 | Failed to export object "%Name;". Operation failed with error: "%ActualException; " | Fix validation error then try operation again | |||
| 24315 | Failed to write to file "%FileName;". Operation failed with error: "%ActualException;" | Fix the error then try operation again | |||
| 24316 | Required attribute "%Name;" is missing. | Fix validation error then try operation again | |||
| 24317 | Unknown disk format found: "%Name;" | Fix validation error then try operation again | |||
| 24318 | Cannot find custom resource "%Name;" (family name:"%FamilyName;", release:"%Release;"). Custom resource will be removed from script command %Command; on virtual machine %VMName;. | Fix validation error then try operation again | |||
| 24319 | Cannot find custom resource "%Name;" (family name:"%FamilyName;", release:"%Release;"). Custom resource will be removed from script command %Command; in application deployment %ObjectName; on virtual machine %VMName;. | Fix validation error then try operation again | |||
| 24320 | Cannot find application package "%Name;" (family name:"%FamilyName;", release:"%Release;"). Application deployment %ObjectName; will be removed from virtual machine %VMName;. | Fix validation error then try operation again | |||
| 24321 | Cannot find answer file "%Name;" (family name:"%FamilyName;", release:"%Release;" ). Answer file will be removed from virtual machine %VMName;. | Fix validation error then try operation again | |||
| 24322 | Virtual Machine %VMName; refers to virtual hard disks with different virtualization platforms. | Fix validation error then try operation again | |||
| 24323 | Virtual Machine %VMName; refers to virtual hard disks with different virtualization platforms. | Custom property %Name; is missing and will be created | No action is needed | ||
| 24324 | Custom property %Name; is missing member type "Service Template". "Service Template" will be added to the member list. | No action is needed | |||
| 24325 | Custom property %Name; is missing member type "Template". "Template" will be added to the member list. | No action is needed | |||
| 24326 | Service Template "%Name;", release "%Release;" already exists. | Use -Overwrite option to overwrite existing service template. | |||
| 24327 | VM Template "%Name;" already exists. | Use -Overwrite option to overwrite existing template. | |||
| 24328 | Cannot export object "%Name;". File "%FileName;" already exists. | Use -Overwrite option to overwrite existing file. | |||
| 24329 | Import operation failed. File "%FileName;" is not a valid template package. | Fix the problem, then try operation again, | |||
| 24330 | Import operation failed. File "%FileName;" is not a valid template package. | Package data cannot be decrypted with the password provided. | Check the password, then try operation again, | ||
| 24331 | Password can only be specified for encrypted packages | Remove -Password parameter, then try operation again, | |||
| 24332 | A password must be provided when importing settings in encrypted packages. | Provide a -Password parameter, then try operation again, | |||
| 24333 | Cannot find element %Name;. | Fix validation error, then try operation again, | |||
| 24334 | Cannot decode value "%Value;". Base64 encoding is expected. | Fix validation error, then try operation again, | |||
| 24335 | Invalid encryption algorithm was specified: "%Name;" | Fix validation error, then try operation again, | |||
| 24336 | Run As account "%Name;" cannot be located for application deployment "%ObjectName ;" | Run As account reference will be replaced with mandatory service setting. | |||
| 24337 | Run As account "%Name;" cannot be found. Run As account reference will be removed from script command "%ObjectName;" | Fix validation error then try operation again | |||
| 24338 | Path %SharePath; is not on a library share that is managed by VMM Server. | Provide a path on a library share. | |||
| 24339 | Cannot find VIP template "%Name;". VIP template reference will be removed from computer tier template %TemplateName;. | Fix validation error then try operation again | |||
| 24340 | Local Administrator Run As account "%Name;" cannot be found. Run As account reference will be removed from VM template %TemplateName;" | Fix validation error then try operation again | Fix validation error then try operation again | ||
| 24341 | Domain user Run As account "%Name;" cannot be found. Run As account reference will be removed from VM template %TemplateName;" | Fix validation error then try operation again | |||
| 24342 | User with Security Identifier "%SecurityIdentifier;" is not found. Reference to this user will be removed from object %Name;. | Fix validation error then try operation again | |||
| 24343 | Security Identifier "%SecurityIdentifier;" doesn't belong to user "%UserName;". Reference to this user will be removed from object %Name;. | Fix validation error then try operation again | |||
| 24344 | User role %UserRoleName; is not found for user %UserName;. Reference to the user will be removed from object %Name;. | Fix validation error then try operation again | |||
| 24345 | User %UserName; doesn't exist. Reference to the user will be removed from object %Name;. | Fix validation error then try operation again | |||
| 24346 | VIP template "%Name;" is found, but has different properties. | Check VIP template properties in the package, create new VIP template if needed. | |||
| 24347 24346 |
VIP template "%Name;" is found, but has different properties. | Specified library object cannot be modified or deleted. | Make sure that you have necessary permissions to modify or delete th e object. | ||
| 24348 | Cannot import package %FilePath;. The package is either corrupted or has an incorrect file type. Operation failed with error: "%ActualException;" | Fix validation error then try operation again | |||
| 24349 | Template package %FilePath; is invalid | Check the contents of the file then try operation again | |||
| 24350 | Agent Service Run As account %RunAsAccountName; cannot be located for SQL Server deployment %Name; on template %TemplateName; | Run As account reference will be replaced with mandatory service setting. | |||
| 24351 | Deployment Run As account %RunAsAccountName; cannot be located for SQL Server deployment %Name; on template %TemplateName; | Run As account reference will be removed. | |||
| 24352 | Reporting Service Run As account %RunAsAccountName; cannot be located for SQL Server deployment %Name; on template %TemplateName; | Run As account reference will be removed. | |||
| 24353 | SQL Server Service Run As account %RunAsAccountName; cannot be located for SQL Server deployment %Name; on template %TemplateName; | Run As account reference will be replaced with mandatory service setting. | |||
| 24354 | SA Run As account %RunAsAccountName; cannot be located for SQL Server deployment %Name; on template %TemplateName; | Run As account reference will be removed. | |||
| 24355 | Cannot find SQL Server Configuration file "%Name;" (family name:"%FamilyName;", release:"%Release;"). Answer file will be removed from SQL Server deployment %ObjectName; on template %TemplateName;. | Fix validation error then try operation again | |||
| 24356 | User role %UserRoleName; is not found. Reference to the user role will be removed from object %Name;. | Fix validation error then try operation again | |||
| 24356 | 24357 | Run As account "%Name;" cannot be found. Run As account reference will be removed from SQL Server script command in application deployment "%ObjectName;" in Template "%TemplateName;". | Fix validation error then try operation again | ||
| 24358 | Cannot find SQL Server script file "%Name;" release "%Release;". SQL Server script command "%CommandName;" in application deployment "%ObjectName;" in Template "%TemplateName;" will be removed. | Fix validation error then try operation again | |||
| 24359 | Storage classification "%Name;" cannot be found. Storage classification reference will be removed from disk (%BusType;, %Bus;, %Lun;) on virtual machine %VMName;. | Fix validation error then try operation again | |||
| 24360 | Capability Profile "%Name;" release "%Release;" cannot be found. Capability Profile reference will be removed from object "%ObjectName;" | Fix validation error then try operation again | |||
| 24361 | Release parameter cannot be empty. | Please ensure release parameter is valid and try the operation again. | |||
| 24362 | Password parameter is used to encrypt private settings and can only be specified together with SettingsIncludePrivate parameter. | Specify SettingsIncludePrivate parameter and try the operation again. | |||
| 24363 | VMM agent on library spt private settings and can only be specified together with SettingsIncludePrivate parameter. | Specify SettingsIncludePrivate parameter and try the operation again. | |||
| Ensure VMM agent on library server is in OK state and try the operation again. | |||||
| 24364 | Run the client (Cmdlet/Admin Console) with elevated administrator privileges. | ||||
| 24365 | Failed to Create BITS job on the client. | Restart BITS service and try the operation again. | |||
| 24366 | The BITS client job failed to succeed for %ResourceName; when attempting %CmdletName; resource with following error: %DetailedErrorMessage; | Restart BITS service and try the operation again. Also make sure that the client has permissions on the source and the destination. | |||
| 24367 | VMM server sent an invalid SSL cert for the HTTPS transfer to Library server. | Check the presence of library server certificate on VMM server's Trusted People store. | |||
| 24368 | Path %FolderPath; must be a valid directory accessible to client. | Check the path specified and make sure that client has permissions to access it. | |||
| 24370 | Resource %ResourceName; is on a library server that requires Encryption. | Try the operation with Encryption option as the server only supports this mode | |||
| 24371 | Resource "%Name;" already exists at %FolderPath;. | Use -Overwrite option to overwrite existing resource. | |||
| 24372 | Connected role %UserRoleName; doesn't have access to %FolderPath;. | Contact Administrator to get access to the desired path or use the R /W path to which the role has access to. | |||
| 24373 | Connected Administrator role did not specify a valid library Path for importing resource. | Administrator roles must specify a valid path when importing resources into library. | |||
| 24374 | Addition of default resources to library share (%SharePath;) failed. DetailedErrorMessage: %DetailedErrorMessage; | Fix the problem,ify a valid path when import then try operation again. | |||
| 24375 | Error occurred in communicating with the VMM agent on machine %ComputerName;. | Ensure the agent is in responding state, then try operation again. | |||
| 24376 | The client imported a resource %ResourceName; that library server agent doesn't recognize. | The client should only import known resource types into the VMM library | |||
| 24377 | User tried to specify both of IncludeAllLibraryResources and IncludeLibraryResources. Only one of these parameters is allowed at a time. | Specify either one of IncludeAllLibraryResources or IncludeLibraryResources. | |||
| 24378 | User tried to specify local file mapping for %ResourceName; package. | Specify either one of IncludeAllLibraryResources or IncludeLibraryResources. | |||
| 24379 | The cmdlet stopped as the pipeline execution was terminated. | Try running the cmdlet again. | |||
| 24380 | SA Run As account %RunAsAccountName; cannot be located for SQL Server deployment %Name; on template %TemplateName; | Run As account reference will be replaced with mandatory service setting. | |||
| 24381 | SA Run As account %RunAsAccountName; cannot be located for SQL Server deployment %Name; on template %TemplateName; | Run As account reference will be replaced with mandatory service setting. | The transfer did not succeed. The failure could be due to timeout on the server, client cancelling the job, or client cmdlet failure. | Try running the cmdlet again. | |
| 24382 | Service Template "%Name;", release "%Release;" cannot be overwritten as it is not accessible under user role %UserRoleName; | Use different name/release combination | |||
| 24383 | Template "%Name;" cannot be overwritten as it is not accessible under user role % UserRoleName; | Use different name. | |||
| 24384 | To change identity properties of the library resources, all the specified resources must belong to the same namespace. | Ensure all the specified library resources belong to same namespace and try the operation again. | |||
| 24385 | Library resource %Name; is not valid for deployment. | Ensure the object resides on library share under VMM management and try the operation again. | |||
| 24386 | For setting identity properties on a group of objects, all objects must be of same object type. | Ensure all objects are of same object type and try the operation again. | |||
| 24387 | Multiple library resources were discovered during import of "%SharePath;" folder. This could be an issue if it occurred during importing a Service Template. | Ensure that importing multiple resources was the intent. If this occurred during Service template import, check the Imported template before deploying it. | |||
| 24388 | Run As account %RunAsAccountName; specified for service setting %Name; cannot be found. | Run As account reference will be removed. | |||
| 24389 | Invalid operation on object %Name; as it does not reside on any of the VMM manage d library servers. | Ensure the object is a valid library object and try the operation again. | |||
| 24390 | Template uses unsupported XSD schema version "%XSDVersion;" | Upgrade Virtual Machine Manager and export template again or change template XML to conform to the schema. | |||
| 24391 | The list of resources being imported is empty. | Try specifying a non-empty resource list to be exported. | |||
| 24392 | Unable to add default resources to library share (%SharePath;) on cluster library server %Name; as VMM agent is not installed on the current active node. | Ensure that VMM agent is installed on the current active node of cluster library server and then try the operation again. | |||
| 24393 | VHDs %Name; cannot be marked equivalent with family name %FamilyName; and release %Release; because they have different VHD formats. | Ensure that the VHDs have the same VHD format before marking them as equivalent. | |||
| 24394 | VHDs %Name; cannot be marked equivalent of VHD %ObjectName; (Family name: %Family Name;, Release: %Release;) because they have different VHD formats. | Ensure that the VHDs have the same VHD format before marking them as equivalent. | |||
| 24700 | The day of the week entered is invalid. Valid values are “Monday”, “Tuesday”, “Wednesday”, “Thursday”, “Friday”, “Saturday”, and “Sunday”. | Refer to PowerShell help on this cmdlet for more details. | |||
| 24701 | The numeric form for the day of the week is invalid. This must be between 1 and 7 representing Monday through Sunday respectively. | Refer to PowerShell help on this cmdlet for more details. | |||
| 24702 | Unable to find the specified servicing window. The servicing window name may be incorrect, or the servicing window may have been renamed or deleted. | Verify that the servicing window name is correct and try the operation again. | |||
| 24703 | A servicing window named %Name; already exists. | Provide a unique servicing window name and try the operation again. | |||
| 24704 | Unable to find the specified servicing window subscription. The subscription, the servicing window or the subscribed object may have been deleted. | Verify that the servicing window is correct and try the operation again. | |||
| 24705 | This object is already associated with this servicing window. | Select a different servicing window to associate this object with an d try the operation again. |
728x90
'IT이야기 > Hyper-V' 카테고리의 다른 글
| SCVMM 오류 12711. 클러스터 리소스를 찾을 수 없습니다(0x138F). (0) | 2022.12.07 |
|---|---|
| Hyper-V 인증서는 30일 이내에 만료됩니다. (0) | 2022.12.07 |
| PowerShell, Hyper-V : Set VM IP from the host (0) | 2022.11.29 |
| PowerShell, Hyper-V: List clustered VMs with mounted ISO, then dismount them all. (0) | 2022.11.29 |
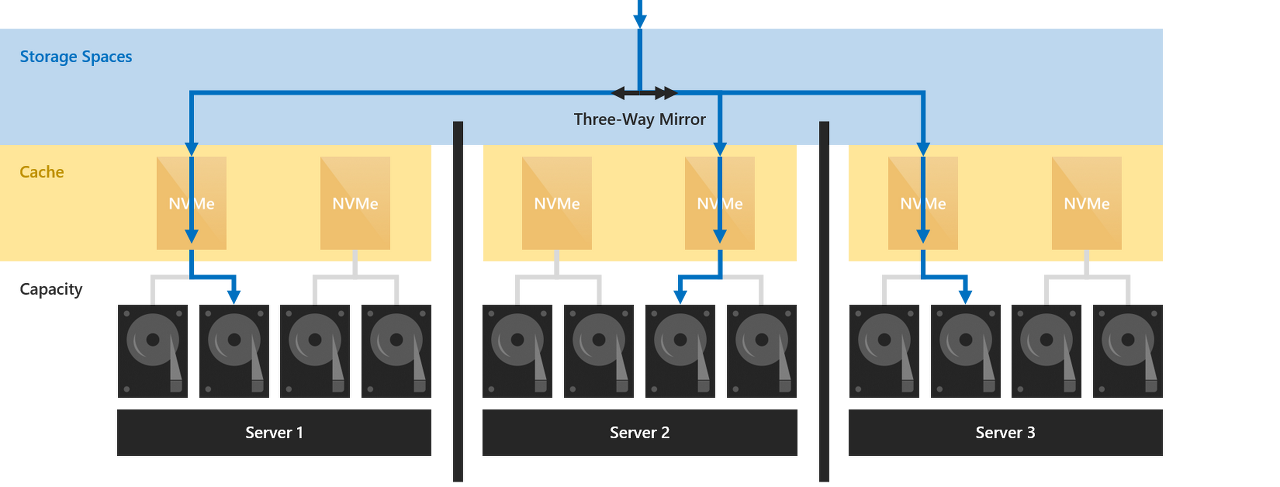
| Windows Storage spaces S2D(3Node) (0) | 2022.11.29 |