소개:
현재의 원격 작업 추세로 인해 원격 세션의 보안 및 규정 준수를 보장하는 것이 조직의 최우선 과제가 되었습니다. Azure Virtual Desktop은 원격 세션에서 새로운 수준의 보안 및 가시성을 제공하는 새로운 워터마크 기능을 통해 이러한 과제에 한 걸음 더 다가섰습니다. 이 블로그 게시물에서는 워터마킹 기능이 무엇인지, 그 이점, 설정 방법, 작업 방식을 혁신할 수 있는 방법에 대해 자세히 살펴보겠습니다.
워터마킹 기능이란 무엇입니까?
워터마크 기능은 Azure Virtual Desktop에 새로 추가된 기능으로, 연결 ID가 있는 QR 코드를 포함하여 원격 세션에 워터마크를 추가할 수 있습니다. 이렇게 하면 관리자가 특정 연결 및 사용자에 대한 무단 화면 캡처를 추적할 수 있으므로 추가 보안 계층이 제공됩니다.
워터마킹 기능이 중요한 이유는 무엇입니까?
워터마킹 기능은 기존 화면 캡처 보호의 한계를 해결하고 원격 세션에서 새로운 수준의 보안 및 규정 준수를 제공합니다. 이 기능을 통해 조직은 기밀 정보를 보호하고 무단 액세스 또는 데이터 유출을 방지할 수 있습니다.
필수 구성 요소:
AVD 워터마킹을 사용하려면 먼저 다음이 필요합니다.
- Windows 데스크톱 클라이언트 버전 1.2.3317 이상, Windows 10 이상.
- Azure Virtual Desktop Insights는 사용자 환경에 맞게 구성됩니다.
- Azure Virtual Desktop에 대한 관리 템플릿입니다.
워터마킹 기능을 설정하는 방법
워터마킹 기능을 설정하는 것은 간단하고 간단합니다. 따라야 할 단계는 다음과 같습니다.
2.정책 설정 "Enable watermarking(워터마크 사용)"을 Enabled(사용)로 설정
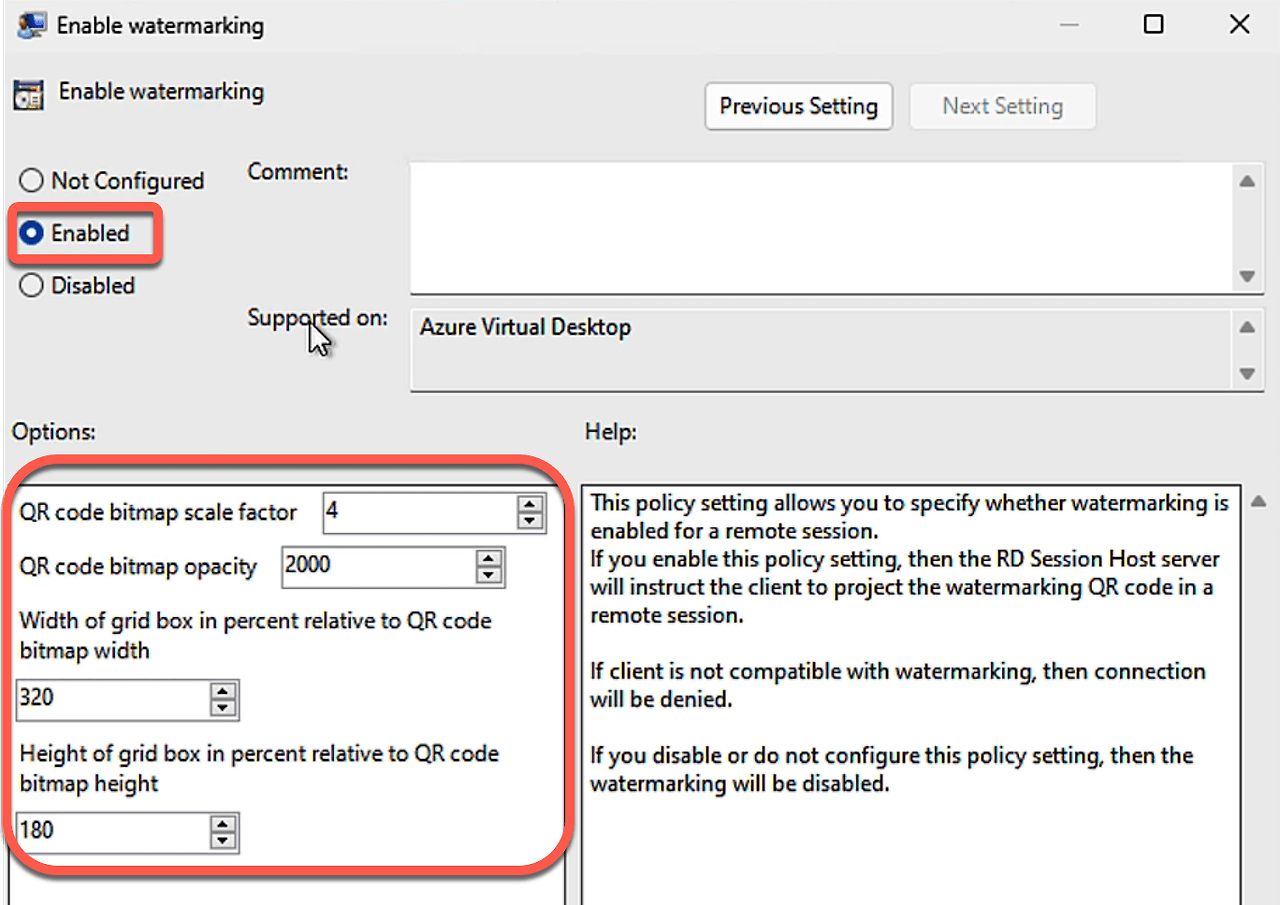
3.세션 호스트에 정책 설정을 적용합니다.
4.그룹 정책 업데이트 또는 Intune 디바이스 동기화를 실행하여 클라이언트에 정책을 푸시합니다.
5.QR 코드가 표시되고 QR 기능의 유효성을 검사해야 하는 원격 세션에 연결합니다.
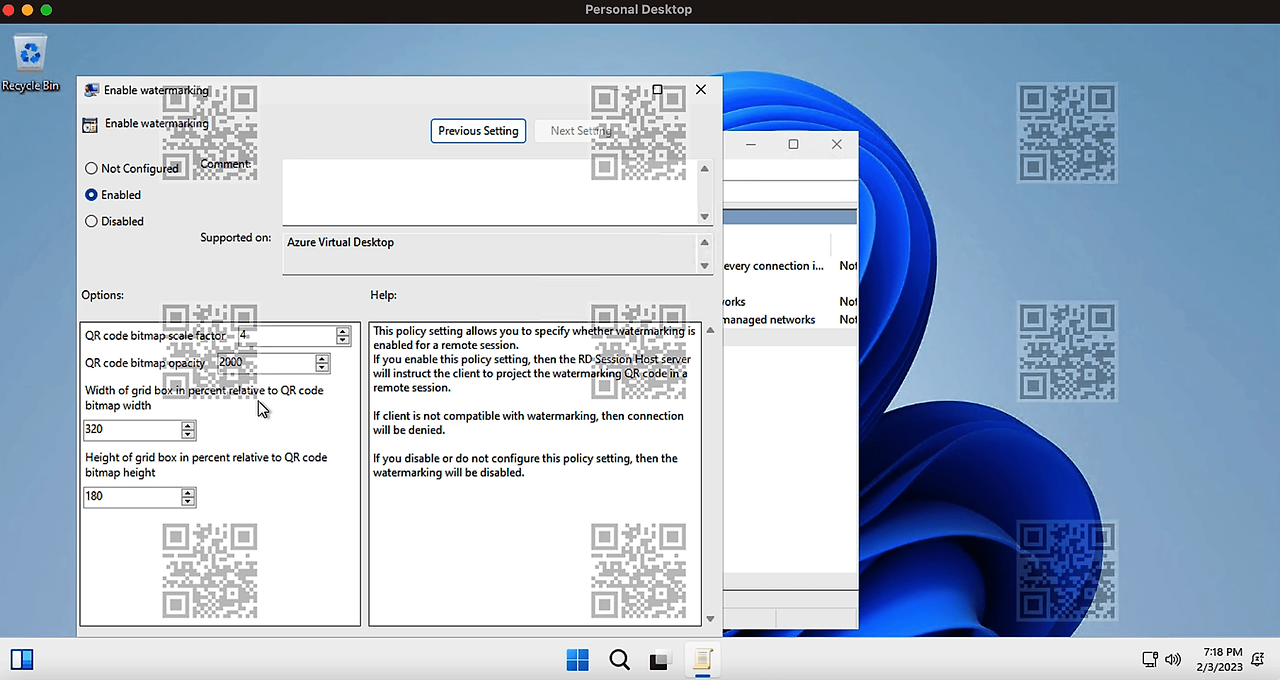
7.QR 코드를 사용하여 세션 정보를 찾습니다.
8.연결 진단을 위해 Azure Virtual Desktop Insights에 연결합니다.
9.Azure Log Analytics를 사용하여 세션 세부 정보를 가져옵니다.
QR 및 AVD Insights를 사용한 연결 진단:
- 이 링크를 사용하여 Azure Virtual Desktop Insights를 엽니다 https://aka.ms/avdi
- 관련 호스트 풀 및 시간 범위를 선택한 다음, 연결 진단 탭을 선택합니다.
- Success rate of (re)establishing a connection (% of connections) 섹션에서
- 첫 번째 시도, 연결 ID, 사용자 및 시도를 보여주는 모든 연결 목록이 있습니다.
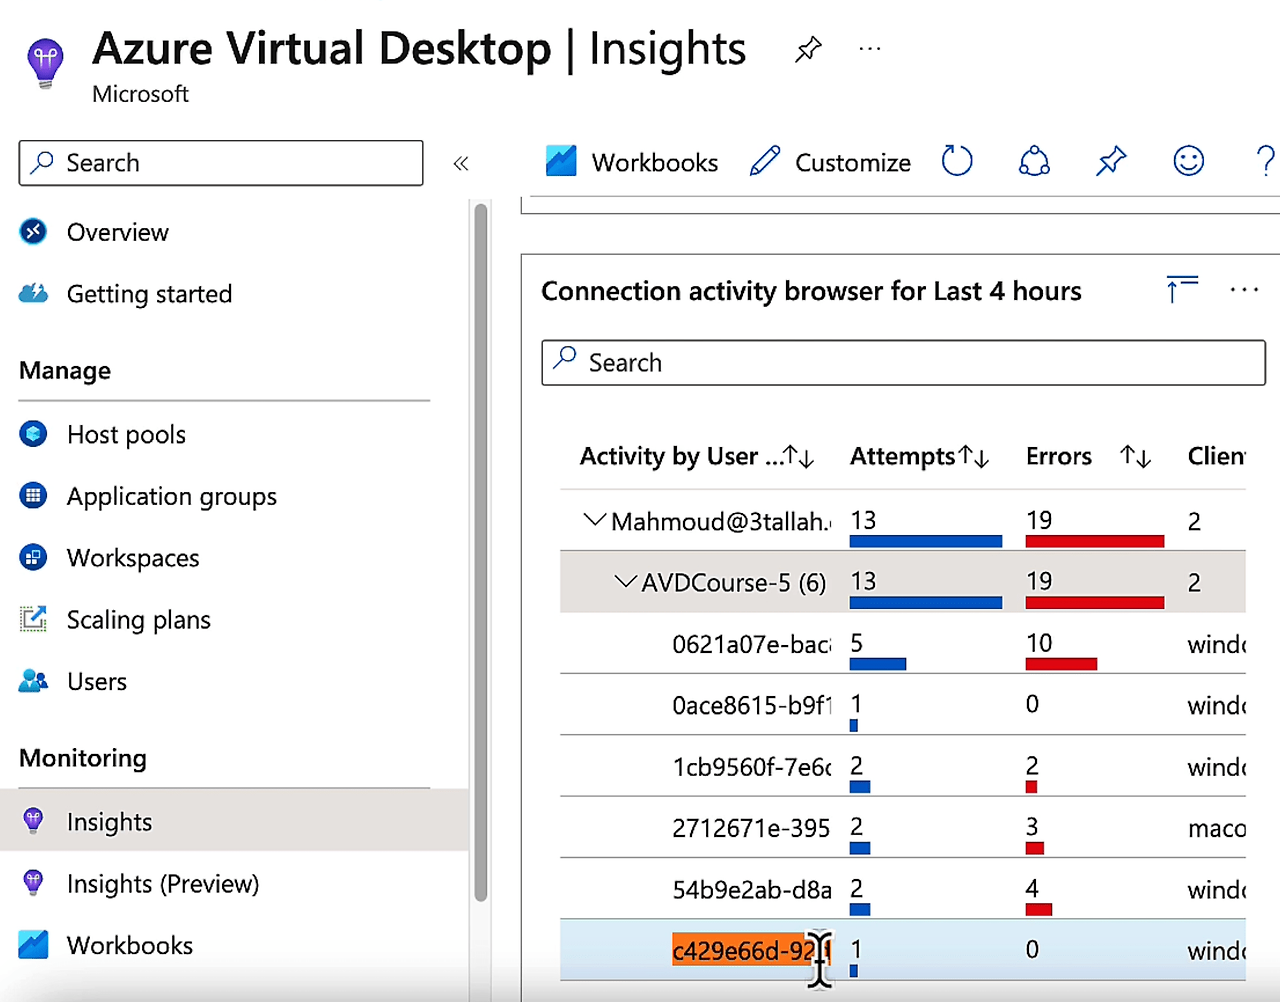
- 이 목록의 QR 코드에서 연결 ID를 찾거나 Excel로 내보낼 수 있습니다.
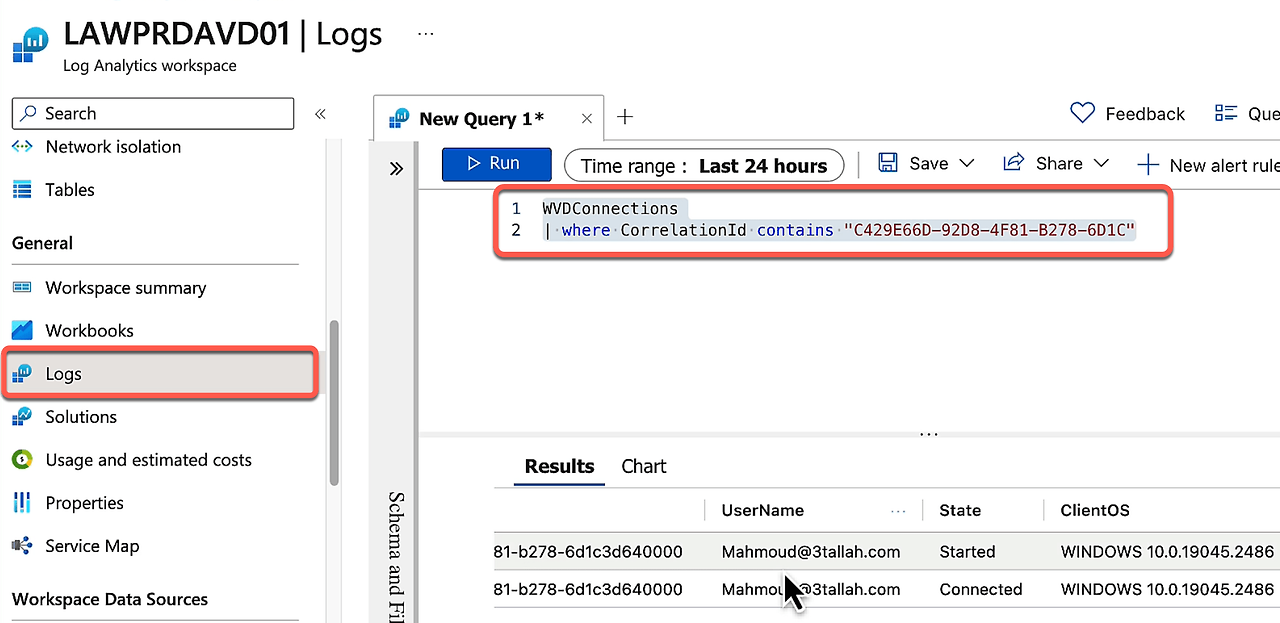
Azure Log Analytics를 사용하여 세션 세부 정보를 가져옵니다.
- Azure Virtual Desktop 환경에 연결된 Log Analytics 작업 영역을 엽니다.
- 새 쿼리를 시작한 다음, 다음 쿼리를 실행하여 특정 연결 ID(Log Analytics에서 CorrelationId로 표시됨)에 대한 세션 정보를 가져오고 <연결 ID>를 QR 코드의 전체 또는 부분 값으로 바꿉니다.
특정 연결 ID에 대한 세션 정보를 가져오려면:
WVDConnections
|where CorrelationId contains == “<connection ID>”
워터마킹 기능이 작업 방식을 혁신하는 방법
워터마킹 기능은 원격 작업에 새로운 차원의 가시성과 제어 기능을 제공할 수 있습니다. 이 기능을 통해 조직은 다음을 수행할 수 있습니다.
1.특정 연결 및 사용자에 대한 무단 화면 캡처를 추적합니다.
2.원격 세션의 보안 및 규정 준수를 보장합니다.
3.원격 근무 관리를 간소화합니다.
4.원격 세션에서 가시성과 제어를 극대화합니다.
결론:
결론적으로 Azure Virtual Desktop의 워터마크 기능은 원격 인력 관리를 위한 게임 체인저입니다. 원격 세션에서 새로운 차원의 보안과 가시성을 제공하고 조직이 원격 작업 관리를 간소화할 수 있도록 합니다. 이 흥미로운 새로운 기능을 놓치지 마세요 – 지금 설정하고 원격 작업을 한 단계 업그레이드하세요!
'IT이야기 > Azure' 카테고리의 다른 글
| The 7 R Considerations for Migration – Modernization process (4) | 2024.12.03 |
|---|---|
| Azure Virtual Desktop에 대한 Zero Trust 보안 모델 구현 (1) | 2024.12.03 |
| Create New Azure VM with PowerShell (0) | 2024.12.03 |
| Configure Custom URL redirection for Windows Virtual Desktop – AVD (0) | 2024.12.02 |
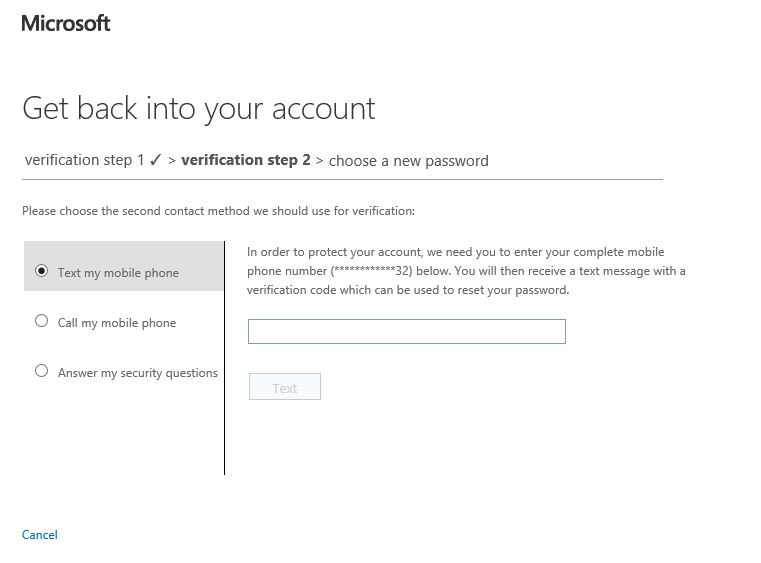
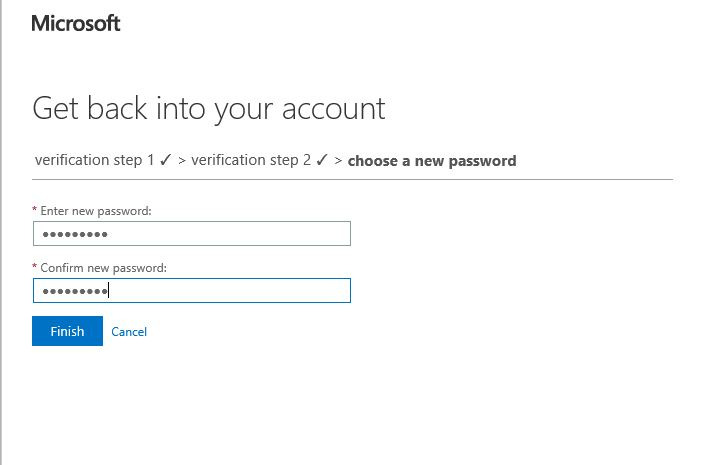
| Step-by-Step guide to configure self-service password reset in Azure AD (0) | 2024.10.31 |