The value of business data grows to the extent that companies simply cannot ignore the importance of a safe data storage. Modern technologies offer a variety of methods how to warrant a highly-available and fault-tolerant storage. One of the techniques includes synchronous mirroring – an approach when a source storage has an exact replica (one or more). At the same time, the data is considered written only when the primary storage receives a signal that all secondary copies have been created. This document suggests taking a look at two-way and three-way synchronous mirroring to better understand the benefits each of them has behind.
Cost-efficiency
2-way synchronous mirroring
This configuration requires storage redundancy on the nodes. The use of RAID10* is recommended. 2-node HA ensures the synchronous mirroring of data between two storage nodes. Taking into account that each storage node has only 50% of usable capacity with RAID10, synchronous mirroring makes the further dividing of those 50% by half resulting in the underutilization of storage capacity – only 25% is used.
* RAID10 use is recommended for a HDD setup. In case of RAID5 use in a HDD setup, there arises the risk of disk failure while rebuilding RAID5. RAID6 in a HDD setup gives low write performance. At the same time, RAID5 and RAID6 configurations can be used for SSD setups due to a high tolerance to physical failures and faster performance of the latter.
With 2-way synchronous mirroring, usable capacity is 25% – ¼ of storage space
3-way synchronous mirroring
Non-redundant RAID0 configuration provides the highest level of performance, therefore, RAID0 can be used for performance. Synchronous mirroring between 3 storage nodes with RAID0 configured on each, results in 33% usable capacity and thus provides a higher level of storage utilization compared to 2-way synchronous mirroring. While it looks like this configuration does not require storage redundancy on nodes (since 3-way synchronous mirroring already ensures the required level of data protection), you should evaluate the potential risks of disks failing and potential data loss probability (if disks failed on all 3 nodes). Assuming the above, please make sure that the data is protected by backup applications according to the 3-2-1 backup rule.
With 3-way synchronous mirroring, usable capacity is 33% – 1/3 of storage space
As a result, 3-way synchronous mirroring increases the storage utilization rate. The cost-efficiency of this configuration differs depending on the medium type – spindle or flash. The difference is shown on the charts below.
Increased reliability
2-way synchronous mirroring
2-way synchronous mirroring provides 99.99% uptime. The outage of one storage node results in a single point of failure and immediately brings the system to a degraded performance mode. Cache is flushed and turned from write-back to write-through mode on the running node. A number of MPIO paths is reduced twofold because one node is down. Consequently, the storage performance falls.
With 2-way synchronous mirroring, there is a risk of downtime
3-way synchronous mirroring
3-way synchronous mirroring provides 99.9999% uptime. No single point of failure occurs when one node of a 3-node storage cluster goes down. In such a situation, storage performance falls by up to 33% because the system loses 1/3 of the MPIO paths. Performance-critical applications usually can continue running in an ordinary way. The 3-node HA configuration tolerates a double fault and retains the availability of service.
With 3-way synchronous mirroring, constant system uptime is ensured
Higher performance
Higher storage performance is influenced by a number of factors, which include I/O policy, RAID level and cache policy. The effect of these factors is given below:
MPIO paths
2-way synchronous mirroring
With Round Robin/List Queue Depth policy used, I/Os are processed up to two times faster comparing to a single-node configuration.
3-way synchronous mirroring
Owing to the Round Robin/List Queue Depth policy, the I/Os throughput rises by a factor of 3 compared to single-node storage.
As a result, performance is increased by up to 50% compared to a 2-node configuration.
RAID10 vs RAID0
2-way synchronous mirroring
This configuration strongly requires extra redundancy for data protection on the storage nodes themselves. This redundancy can be provided through the use of RAID. RAID10* is recommended for a HDD setup as it ensures mirroring between the disk stripes and makes fast reads and writes. However, storage utilization is considerably low because the same data is mirrored and stored on two stripes of RAID.
* Use of RAID5, RAID6 for a HDD setup is possible but not recommended because of the high probability of a disk failure while rebuilding RAID5, and the low write performance of RAID6. At the same time, RAID5 and RAID6 configurations can be used for SSD setups due to a high tolerance to physical failures and faster performance of the latter.
3-way synchronous mirroring
RAID0 can be used for performance. Both reads and writes are faster here as the system reads the data from all disks simultaneously. With RAID0 you should evaluate the potential risks of disks failing and potential data loss probability (if disks failed on all 3 nodes).
Cache policy
2-way synchronous mirroring
If one node fails, the cache is flushed and turned from write-back to write-through mode and the system immediately switches to a degraded performance mode on reads.
With 2-way synchronous mirroring,cacheis flushed and turned to write-through mode causing critical performance degradation
3-way synchronous mirroring
If one node goes down, the system downgrades from a 3 to 2-node cluster and continuous operation with minimal performance degradation (about 33%) due to the absence of one node and because a number of MPIO paths is reduced.
With 3-way synchronous mirroring, cache policy remains write-back that results in minor performance degradation
Important note:Even the highest possible level of redundancy and reliability does not ensure 100% protection against data loss, e.g. due to malicious actions or disaster. So, nothing compares to a good old backup that substantially increases the chances your data is in place.
Conclusion
With synchronous mirroring admins can decide on either two-way mirroring – to ensure basic data protection and high availability, or three-way mirroring – to increase overall system reliability and to also “play games with” cost-efficiency and performance.
In this article, I’ll show you how to use the SCCM feature update option to perform a Windows 10 22H2 upgrade. We will use Windows Servicing in SCCM to upgrade Windows 10 devices to version 22H2 via the enablement package.
Windows 10, version 22H2, also known as theWindows 10 2022 Update, is available for eligible devices runningWindows 10, versions 20H2and newer. Microsoft released Windows 10, version 22H2 (KB5015684) on 18th October 2022, and it is an enablement package.
For home users running Windows 10 version 20H2 and later, the recommended way to get the Windows 10 22H2 is via Windows Update. Go toStart>Settings>Windows Updateand runCheck for Updates. Select theFeature update to Windows 10, version 22H2and install it.
When you want to upgrade multiple Windows 10 devices to version 22H2, Configuration Manager is the best tool. It simplifies the way youdeploy and manage updatesand saves a lot of time. With Configuration Manager, you can select the “Feature Update to Windows 10 Version 22H2 via Enablement Package” and deploy it to a set of devices.
Ways to upgrade to Windows 10 22H2
There are multiple ways that you can use to upgrade to Windows 10 version 22H2.
Get the Windows 10 22H2 update via Windows Update.
Use Servicing Plans to upgrade eligible Windows 10 devices to version 22H2.
Upgrade Windows 10 21H2 to Windows 10 22H2 using ConfigMgr Windows Servicing feature.
Deploy the Windows 10 22H2 update using the SCCM task sequence.
Using the Intune to upgrade to Windows 10 22H2 upgrade for WUfB managed devices.
We will use the Configuration Manager feature update option to deploy the Windows 10 22H2 enablement package out of all the above methods. This is the easiest and quickest way I can think of to update Windows 10 to version 22H2.
Can I use SCCM Servicing Plans to Upgrade to Windows 10 version 22H2?
Yes, you can use the Servicing Plans in SCCM to upgrade the computers running Windows 10 to version 22H2. WithConfiguration manager servicing plansyou can ensure that all the Windows 10 systems are kept up-to-date when new builds are released. Servicing plans are ADR that can help you to upgrade Windows 10 to version 22H2. Take a look at detailed guide onWindows 10 Servicing Plans in SCCM.
If you are unsure whether to upgrade to Windows 10 22H2 using a Servicing Plan or a feature update deployment, I would advise choosing the latter. There are only a few steps involved in deploying a Windows 10 22H2 feature update, making it much simpler than a servicing plan. You get to make the final decision.
Windows 10 22H2 is an enablement package and this is good news for admins. The enablement package is a great option for installing a scoped feature update like Windows 10, version 22H2. You can upgrade from version 2004, 20H2, 21H1, or 21H2 to version 22H2 with a single restart, reducing update downtime. Since Windows 10 22H2 is an enablement package, the devices currently on Windows 10, version 20H2 or newer will have a fast installation experience because the update will install like a monthly update.
Prerequisites
With Configuration Manager, you need few things to be configured before you deploy the feature updates to computers. If you have deployed the feature updates before, it means most of the prerequisites are already taken care of. If your SCCM setup is new, you may have to configure them once before deploying the upgrades.
Listed below are all the prerequisites required for Windows 10 22H2 upgrade using SCCM.
Let’s look at steps for downloading Windows 10 22H2 enablement package using SCCM. First of all ensure you have synchronized the updates in Configuration Manager. You can either download the feature first and deploy or directly deploy the feature update. I prefer to download it first, let the content get distributed to distribution points and then deploy it.
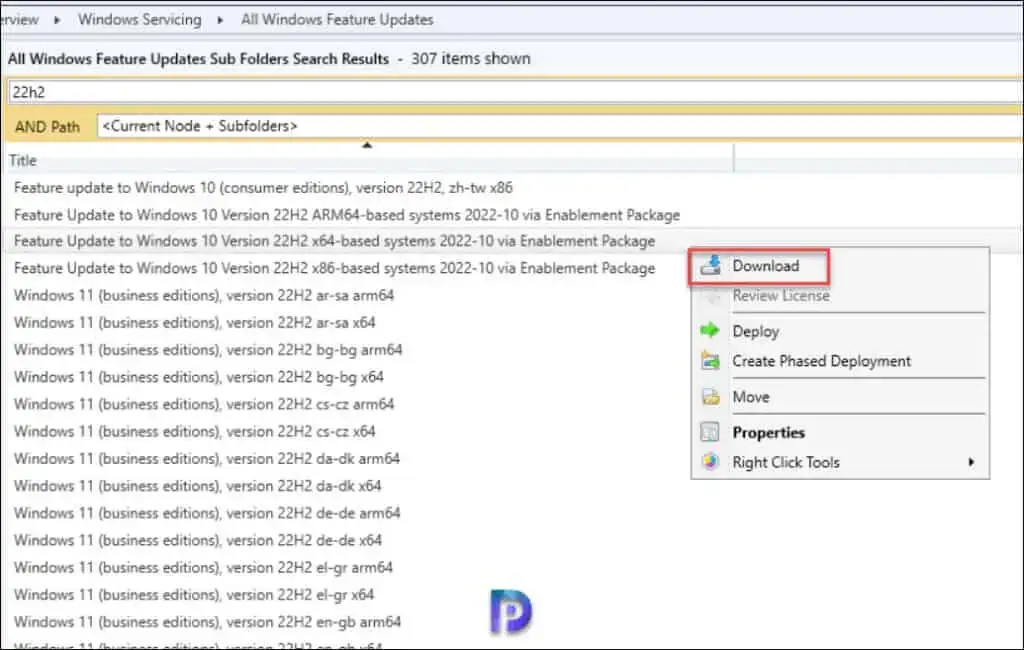
Go toSoftware Library>Overview>Windows 10 Servicing>All Windows 10 Updates. Look for the update “Feature Update to Windows 10 Version 22H2 x64-based systems 2022-10 via Enablement Package“. You can also search the updates with article ID 5015684.
Download Windows 10 22H2 Enablement Package
If you have got both x64-based systems and x86-based systems, you must download Feature Update to Windows 10 Version 22H2 x64-based and x86-based. In my lab, all my Windows 10 VMs are running Windows 10 64-bit OS, and therefore I am going to download onlyFeature Update to Windows 10 Version 22H2 x64-based systems 2022-10 via Enablement Package.
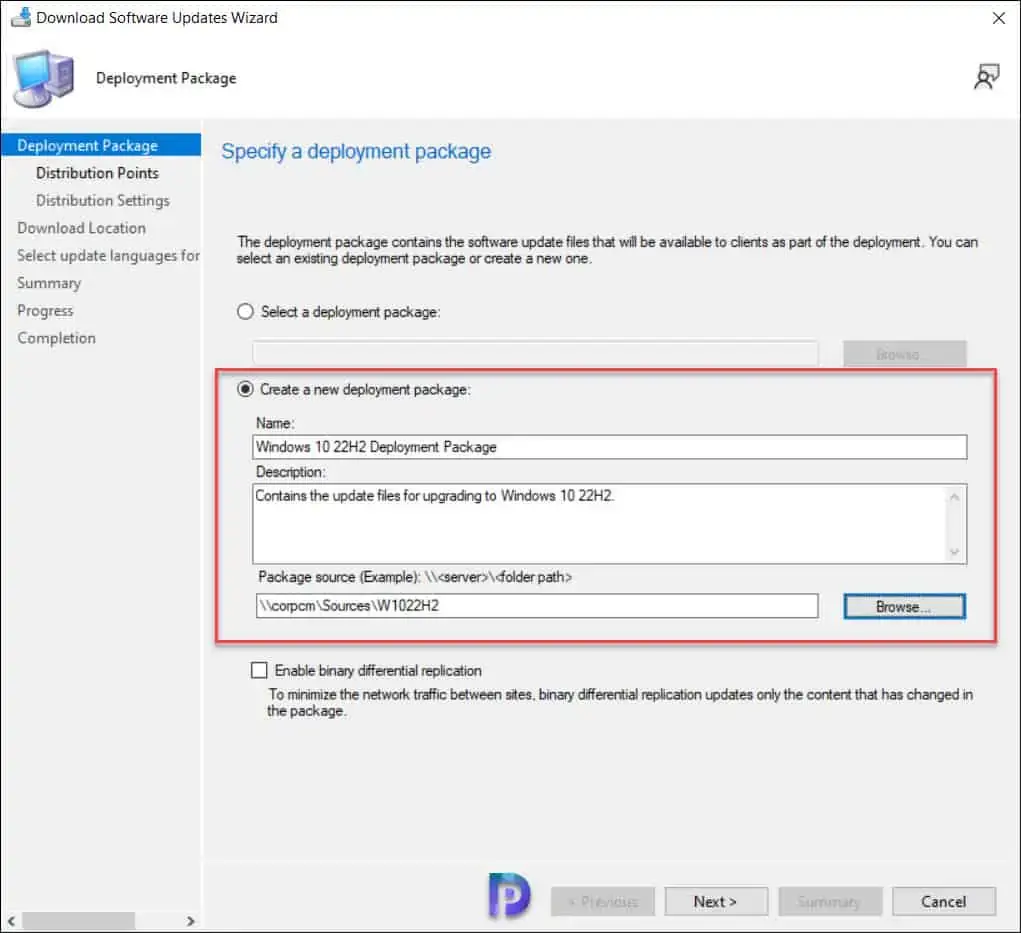
Create Deployment Package
On theDeployment packagewindow, specify the deployment package for Windows 10 22H2 upgrade files. This deployment package that you create will contain the software update files that will be deployed to the clients.
SelectCreate a new deployment packageand specify the package name as “Windows 10 22H2 Deployment Package.” Add a brief description and specify the package source – a shared folder where you want to download the updates.Enabling the binary differential replicationis optional. ClickNext.
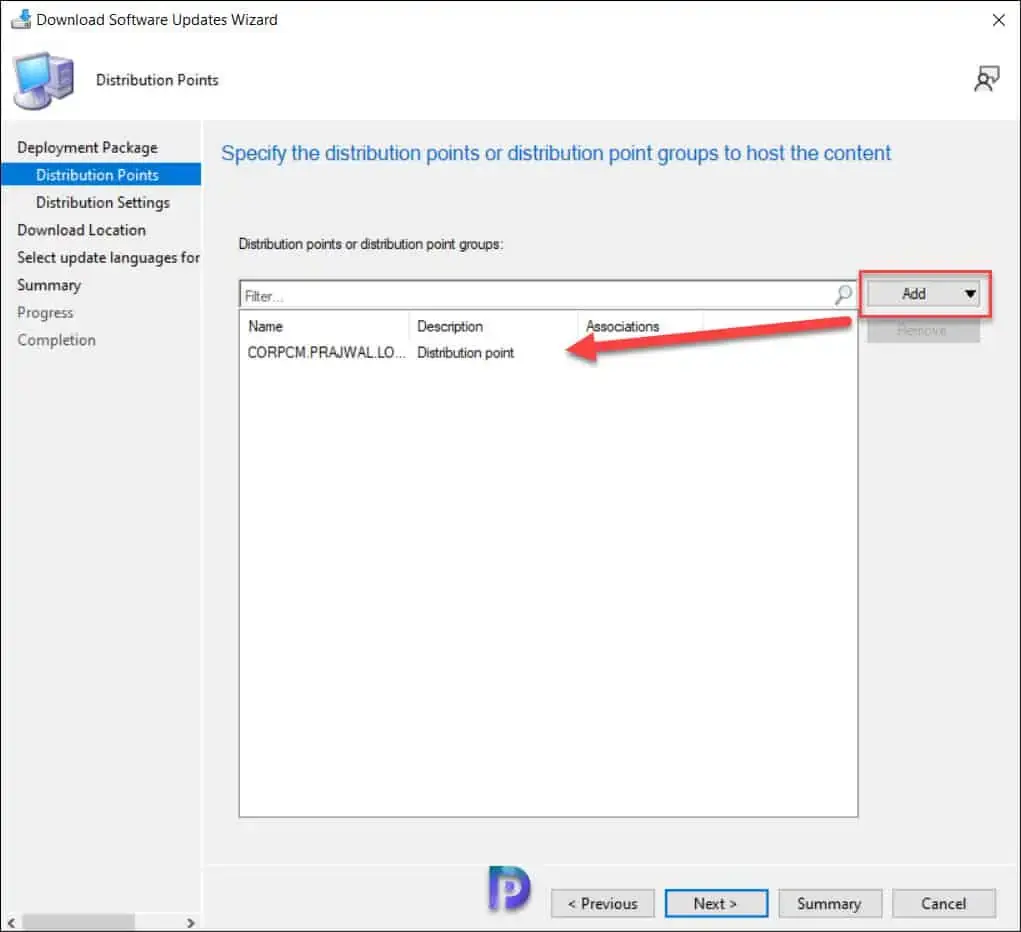
Download Windows 10 22H2 Enablement Package
Click onAddbutton and select thedistribution point serversto which you would like to distribute the Windows 10 22H2 upgrade files. ClickNext.
Download Windows 10 22H2 Enablement Package
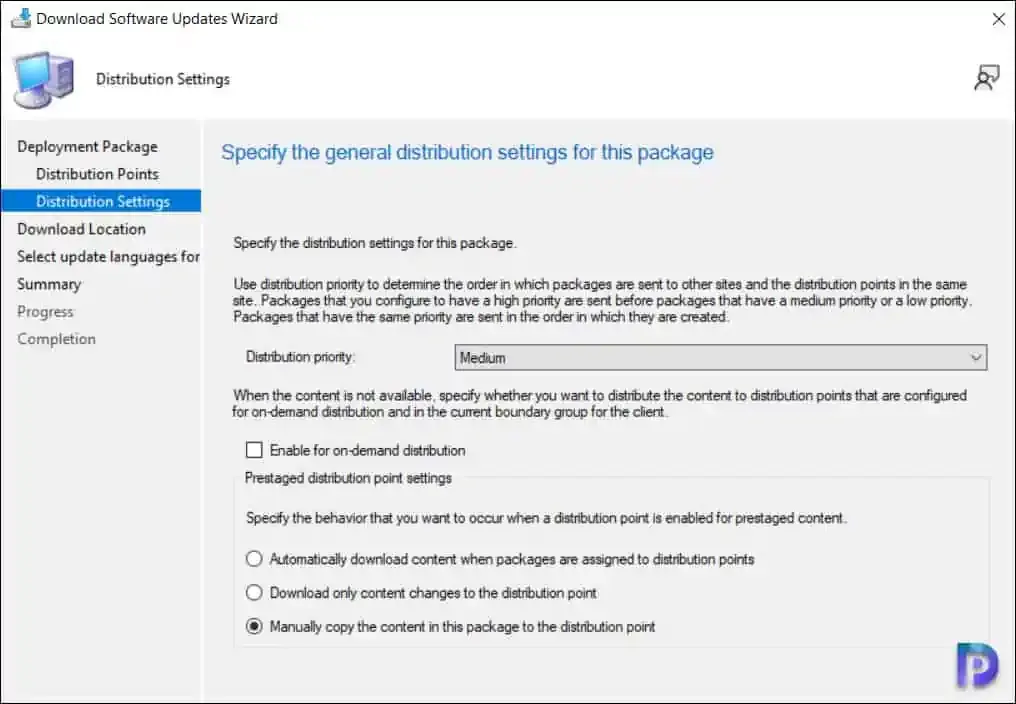
On theDistribution Settingspage, you can specify the general distribution settings for the deployment package. ClickNext.
Specify the Deployment Package Distribution Settings
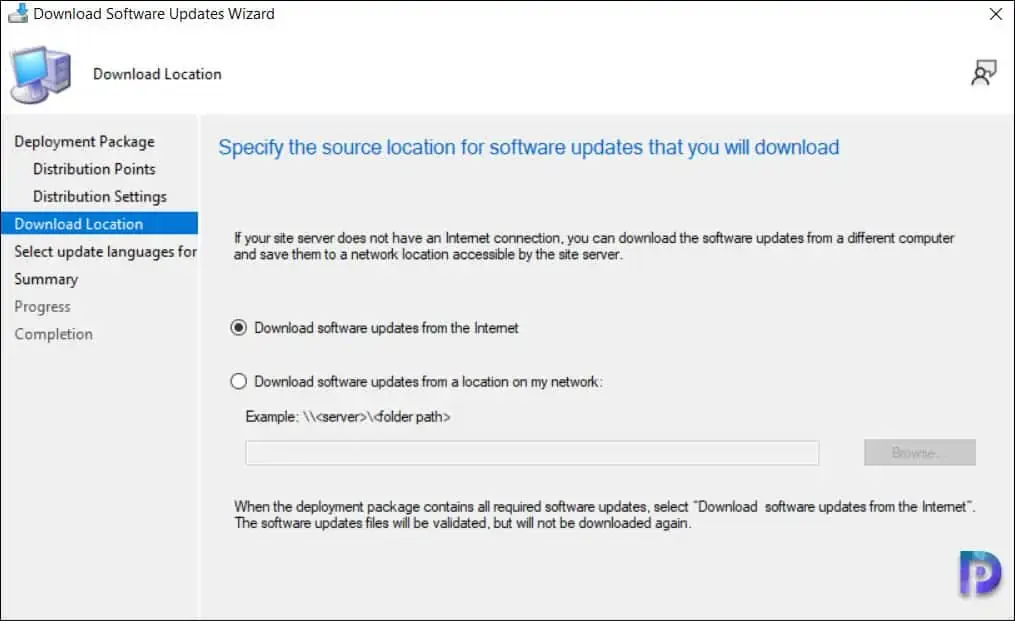
The download location lets you select an option to download the updates from. For example, you can download the software updates directly from internet or choose to download the software updates from the location on network. Select the option “Download software updates from the internet“. ClickNext.
Choose the Download Location for Updates
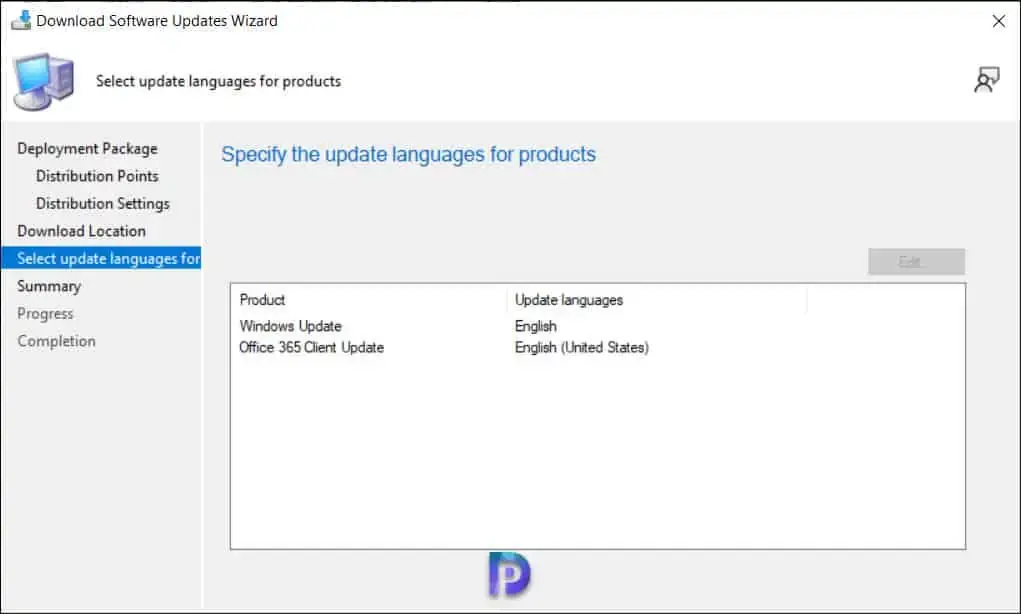
Specify the update language for the products. The default language is English US. ClickNext.
Select Update Languages for Products
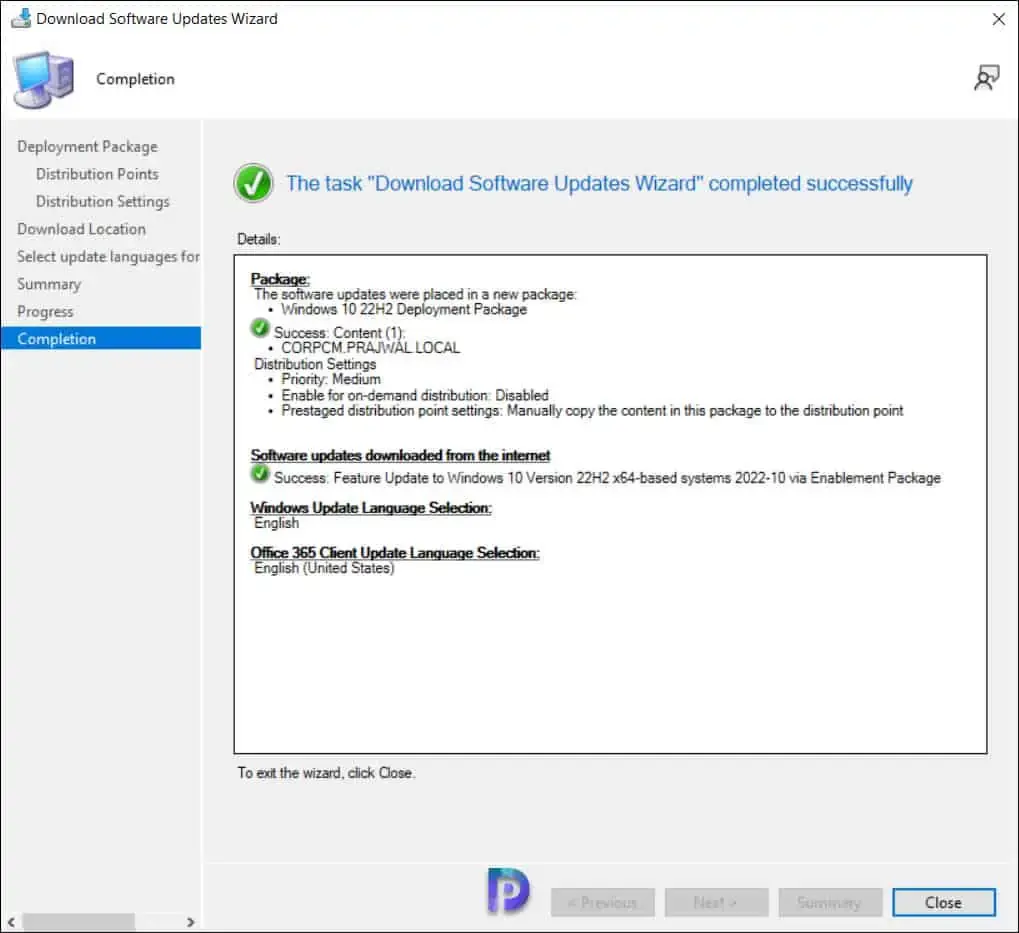
Review the Windows 10 22H2 deployment package settings and close the Download software updates wizard.
Close Download Software Updates Wizard
Note: In case you encounter issues while downloading the Windows 10 22H2 enablement package update, review thePatchDownloader.loglocated in the%temp%folder. This log file will log all the errors that occur during the download of Windows 10 feature updates.
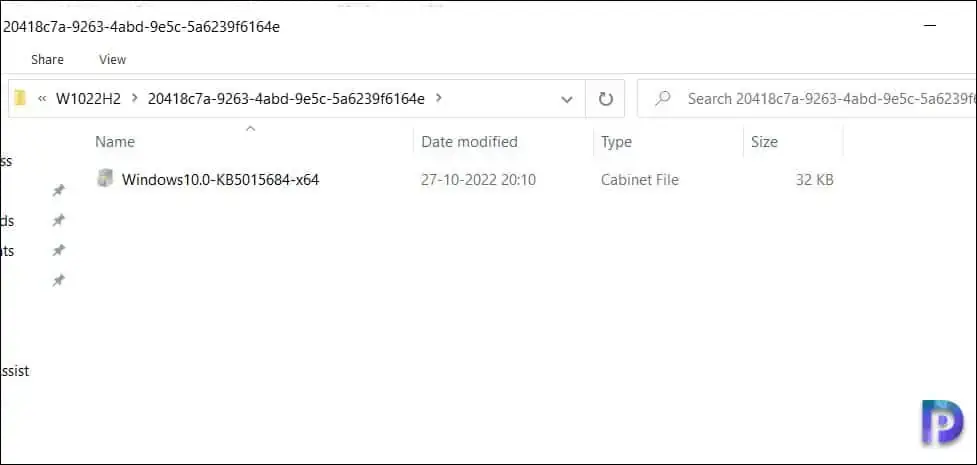
In the above step, the files required to upgrade Windows 10 to version 22H2 are downloaded to the specified location. If you browse to the downloaded location, you will notice that Windows 10 22H2 enablement package contains only one update which isWindows10.0-KB5015684-x64. The size of the Windows 10 22H2 enablement package is32 KB. This one file is sufficient to upgrade Windows 10 computers to version 22H2.
Windows 10 22H2 Enablement Package
Deploy Windows 10 22H2 Feature Update using SCCM
In this step, using the Windows Servicing, we will perform the Windows 10 22H2 feature update deployment using Configuration Manager. You can deploy the feature update to a single client or to multiple devices using device collection.
If you are deploying the Windows 10 22H2 update for the first time, I suggest testing the upgrade on a Pilot device collection. A few devices that are intended to test the upgrade to 22H2 should be included in this device collection. Use the following guide tocreate a device collection for Windows 10 computers in SCCM.
Use the following steps to deploy the Windows 10 22H2 feature update using SCCM:
In the ConfigMgr console, navigate to Software Library\Overview\Windows Servicing\All Windows Feature Updates.
Right-click Feature Update to Windows 10 Version 22H2 x64-based systems 2022-10 via Enablement Package update, and select Deploy.
Deploy Windows 10 22H2 Feature Update using SCCM
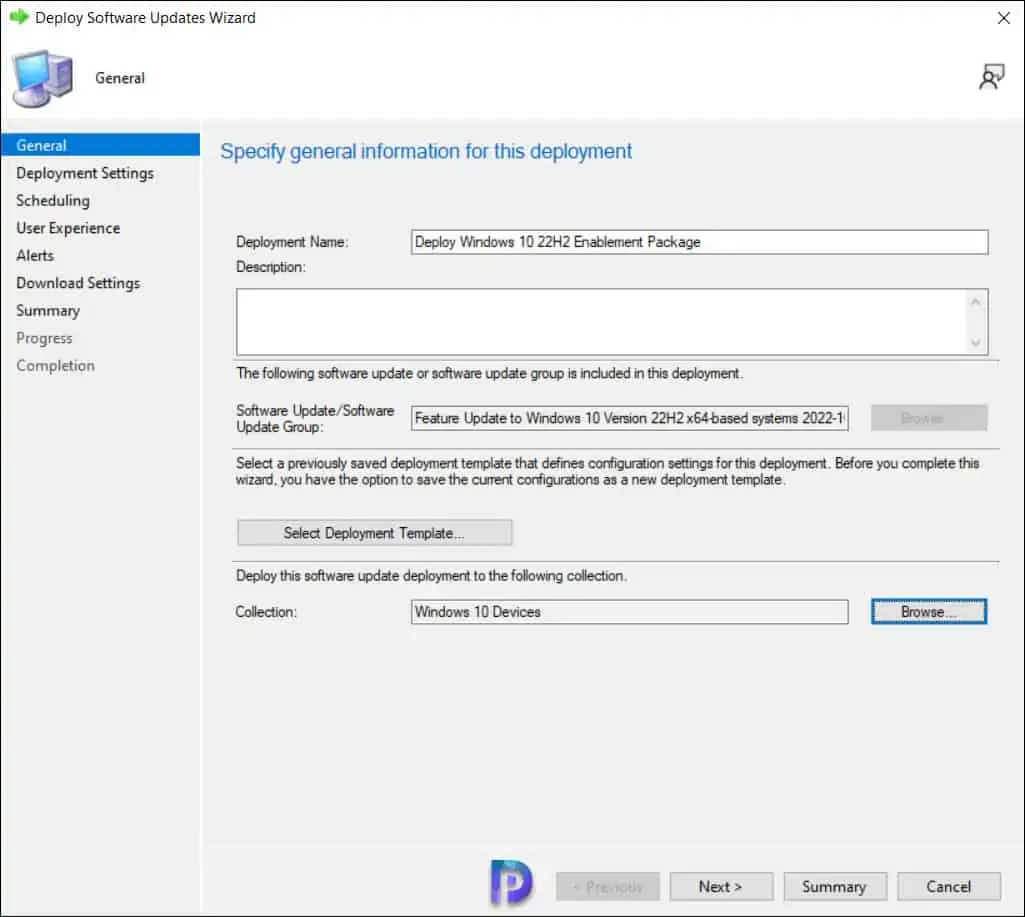
On the General page, enter the details for Windows 10 22H2 feature update deployment.
Deployment Name: Enter a suitable name such as Deploy Windows 10 22H2 Enablement Package.
Description: Although it’s optional, you may add a brief description.
Software Update Group: This is created automatically and is visible under Software Update Groups in Configuration Manager console.
Collection: Click Browse and select a device collection consisting of few pilot devices selected for testing Windows 10 2022 upgrade.
Click the Next button to continue.
Deploy Windows 10 22H2 Feature Update using SCCM
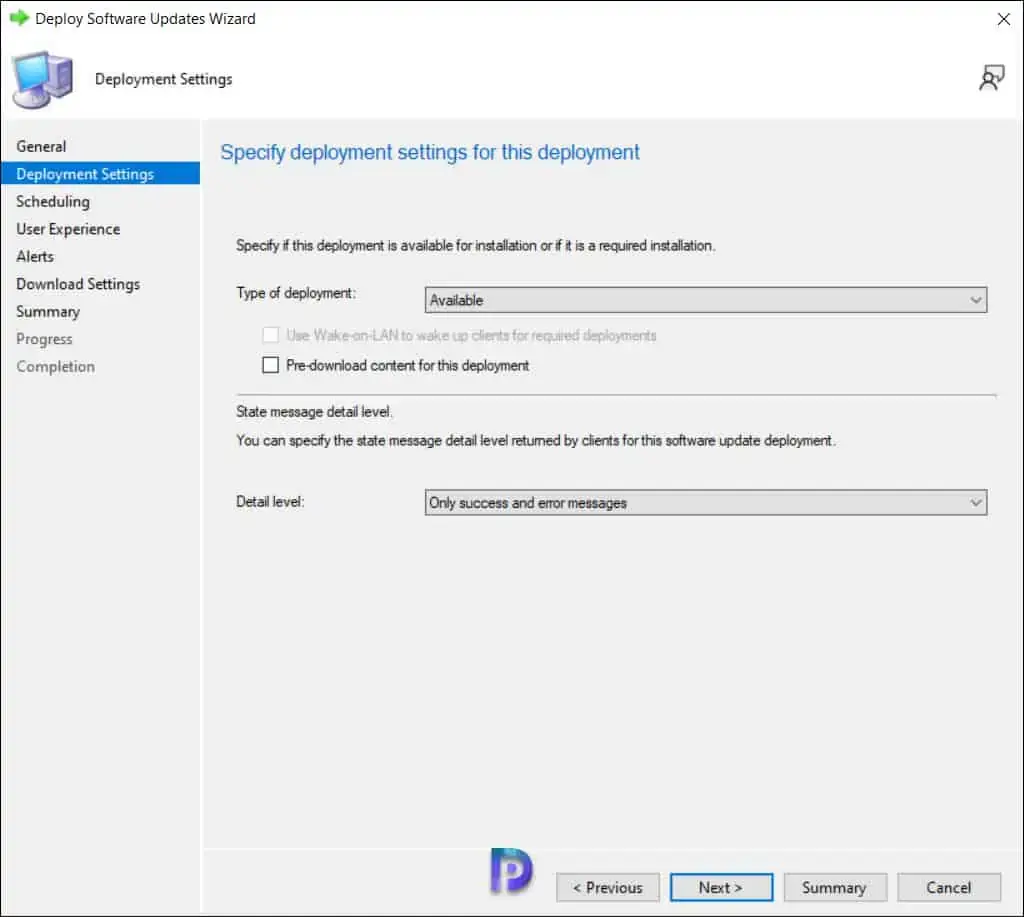
On the Deployment Settings page, specify the type of deployment. Choose whether you want to make the Windows 10 22H2 upgrade available for users in the Software Center or deploy it as required. Read more about SCCM Available vs. Required to know the differences. Click Next.
Deploy Windows 10 22H2 Feature Update using SCCM
The Scheduling page lets you configure schedule details for the deployment. Configure the following settings:
Schedule Evaluation | Time Based on: Select Client Local Time.
Software Available Time: As soon as possible.
If you want to make the Windows 10 22H2 upgrade available at a specific date and time, select Specific time and define them. Define the deadline installation to ensure the upgrade happens in the defined period.
Click Next to continue.
Deploy Windows 10 22H2 Feature Update using SCCM
Specify the following user experience settings for the deployment.
User Notifications: Display in Software Center and show all notifications
Commit changes at the deadline or during a maintenance window (requires restarts): Yes
If any update in this deployment requires a system restart, run updates deployment evaluation cycle after restart: No.
Click Next.
Deploy Windows 10 22H2 Feature Update using SCCM
On theDownload settingspage, specify the download settings for the current deployment:
Client Computers can use distribution points from neighbor boundary: No
Download and install software updates from the fallback content source location: Yes
Click Next to continue.
Deploy Windows 10 22H2 Feature Update using SCCM
Review the deployment settings of Windows 10 22H2 on Summary page and click Next. On the Completion window, click Close.
Deploy Windows 10 22H2 Feature Update using SCCM
Windows 10 22H2 Servicing: End-User Experience for Upgrade
After you have deployed Windows 10 22H2 enablement package update using Windows Servicing, it’s time to test the upgrade installation on end computers. The end-user experience is similar to other feature upgrades.
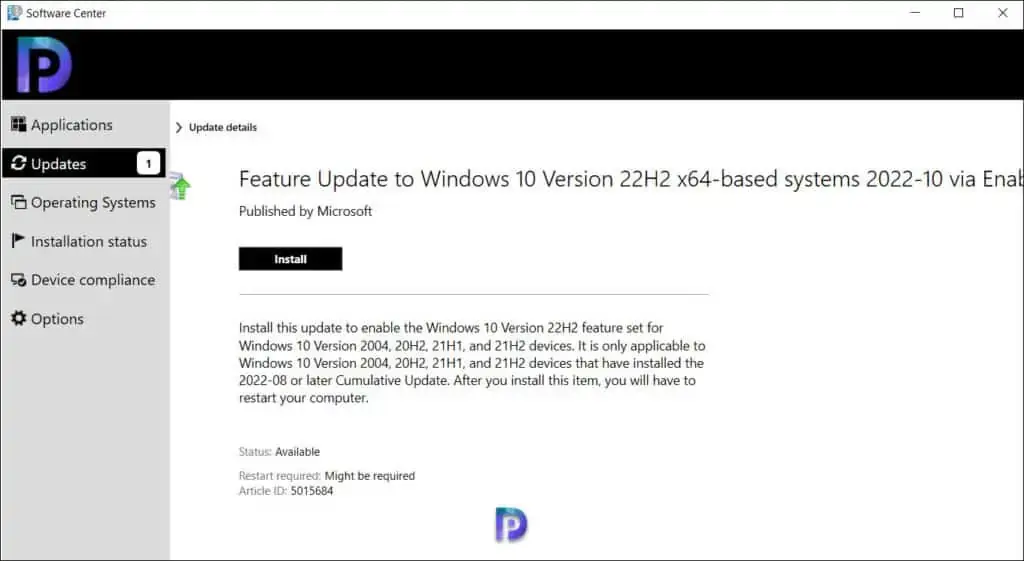
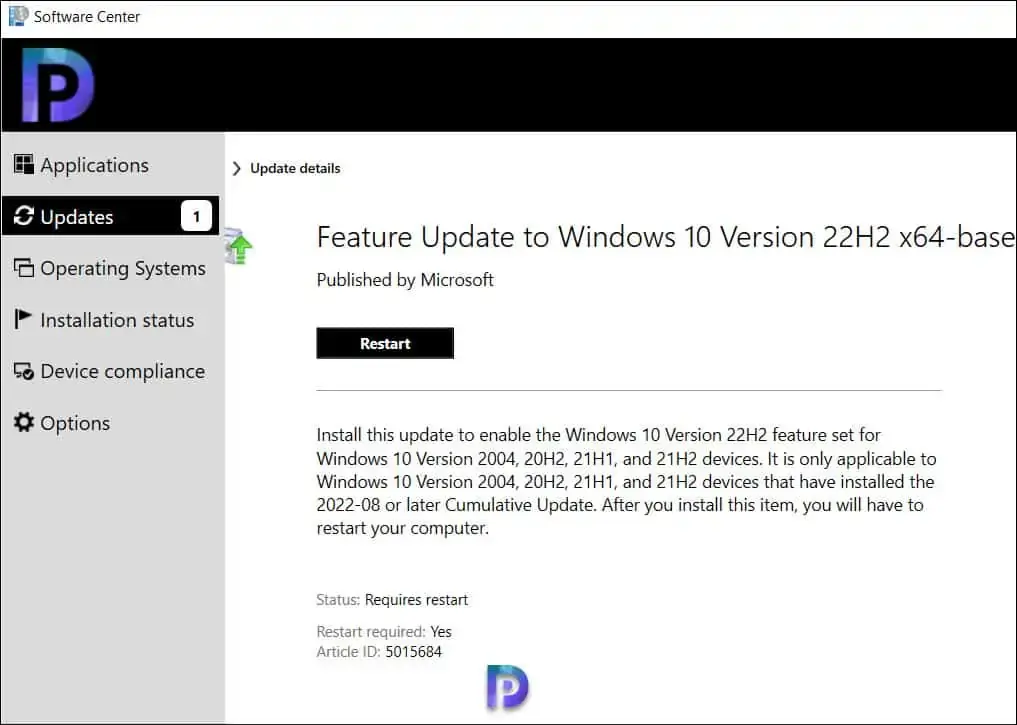
On the client computer, first launch the Software Center. Once the Software Center has been opened, selectFeature Update to Windows 10 Version 22H2 x64-based systems 2022-10 via Enablement Packageupdate by clicking the Updates tab. Click on theInstallbutton.
Windows 10 22H2 Upgrade Servicing: End-User Experience
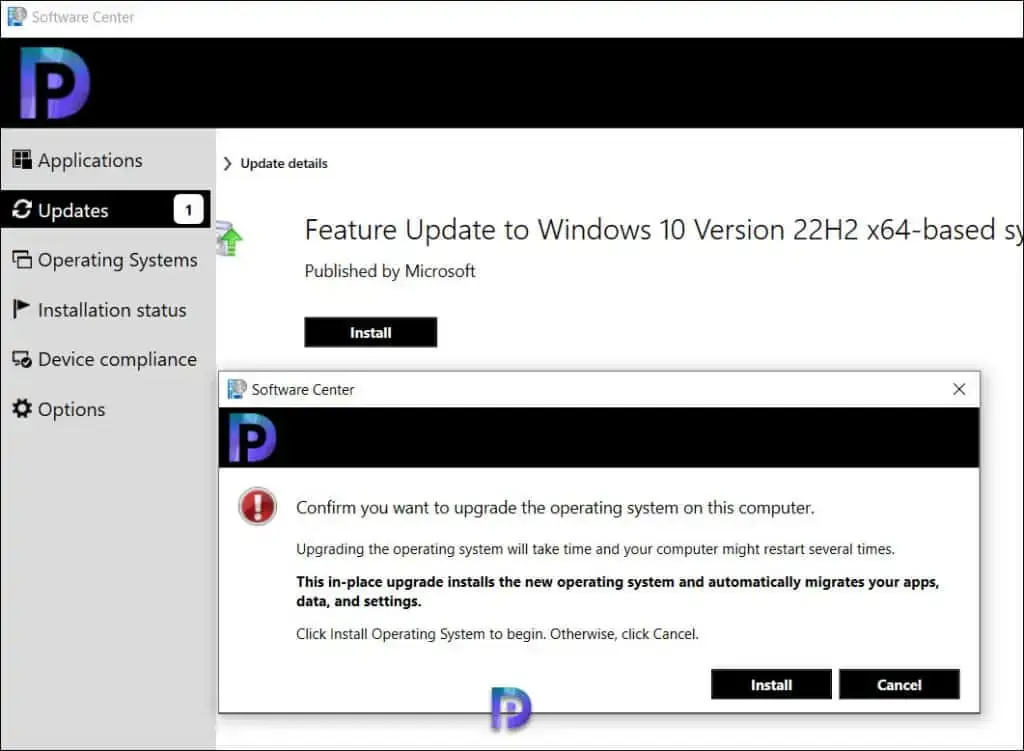
Confirm you want to upgrade the operating system on this computer. It will take only few minutes to upgrade the operating system as this is an enablement package. Note that this is an in-place upgrade to version 22H2, and the setup automatically migrates your apps, data, and settings. Click on the Install button to begin the Windows 10 22H2 upgrade.
Windows 10 22H2 Upgrade Servicing: End-User Experience
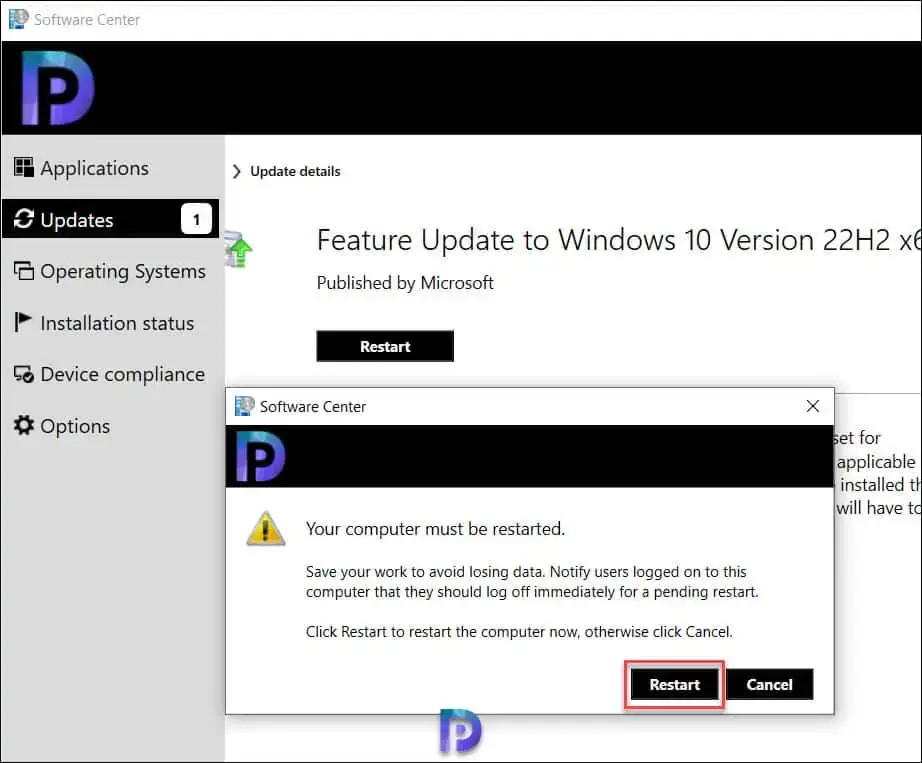
TheFeature Update to Windows 10 Version 22H2 x64-based systems 2022-10 via Enablement Packageis installed in less than 2 minutes. Click onRestart.
Restart the Computer to Complete Windows 10 22H2 Upgrade
On the confirmation box, clickRestart.
Restart the Computer to Complete Windows 10 22H2 Upgrade
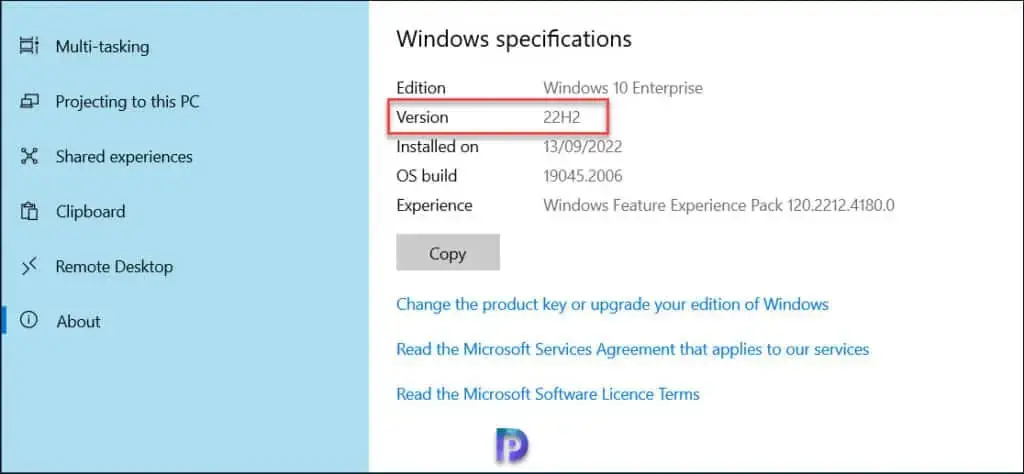
The Windows 10 22H2 upgrade is complete. Log in to the Windows 10 computers and click Start > About My PC. Under Windows Specifications, you will find the build number and version of Windows 10. In the below screenshot, we see the Windows version is “22H2” and the OS build number is19045.2006.
Verify the Windows 10 22H2 Version and Build Number
How to Change Configuration Manager(SCCM) Console Language
This post explains how to change or modify the default Configuration Manager (SCCM) console language. It also covers on how to change console language back to English.
By default the SCCM console picks the system language. However sometimes the technical support members will need the console in English or probably some other language.
During site server installation, the Configuration Manager console installation files and supported language packs are copied to the \Tools\ConsoleSetup. This is a sub-folder within the Configuration Manager installation path on the site server.
When you start the Configuration Manager console installation from this folder on the site server, it copies the Configuration Manager console and supported language pack files to the computer.
When a language pack is available for the current language setting on the computer, the Configuration Manager console opens in that language.
However if the associated language pack isn’t available for the Configuration Manager console, the console opens inEnglish (United States).
About Configuration Manager Console
The Configuration Manager console is a tool that allows managing the Configuration Manager environment. By default the SCCM console is always installed on every site server.
It allows you to perform functions such as deploy applications, configure the settings, device management, and create packages and collections.
The Configuration Manager Console is a single management console for your PCs, Macs and Unix/Linux servers, as well as for mobile devices running Android, Windows or iOS.
For more information on ConfigMgr console deployment, refer below posts.
In order to modify the language of Configuration Manager console
You must to be administrator of the computer on which you perform the below changes.
Have access to the installation files. (Download package language folder)
Change SCCM Console language to English
The below steps will now help you to change the SCCM console language from French language to English.
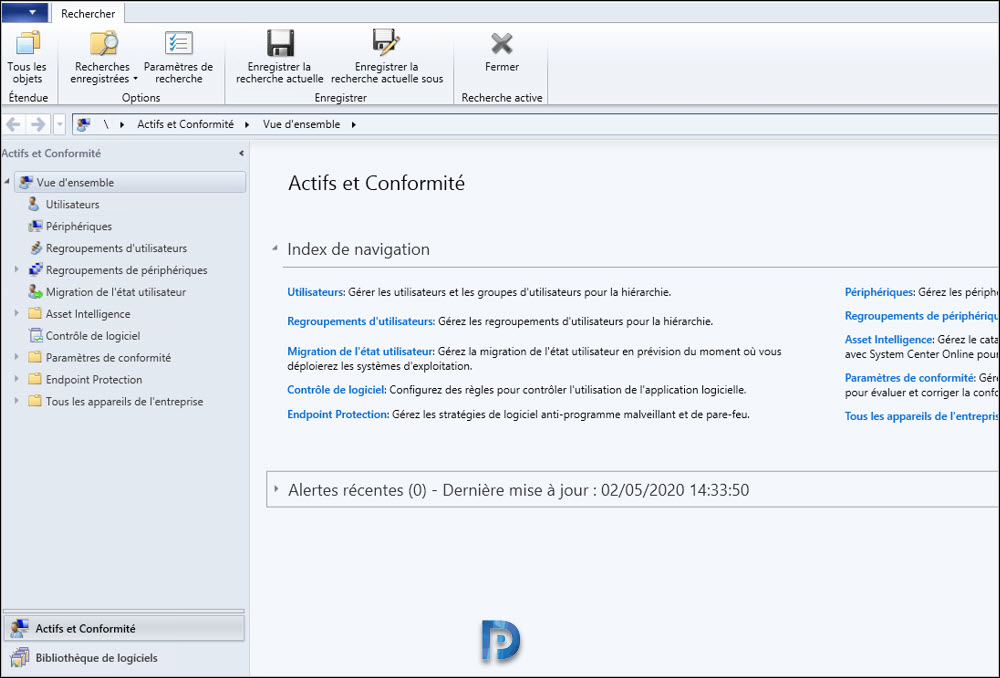
In this example, by default SCCM Console is displayed in the system language which is French.
The English language file is by installed by default when you install Windows 10.
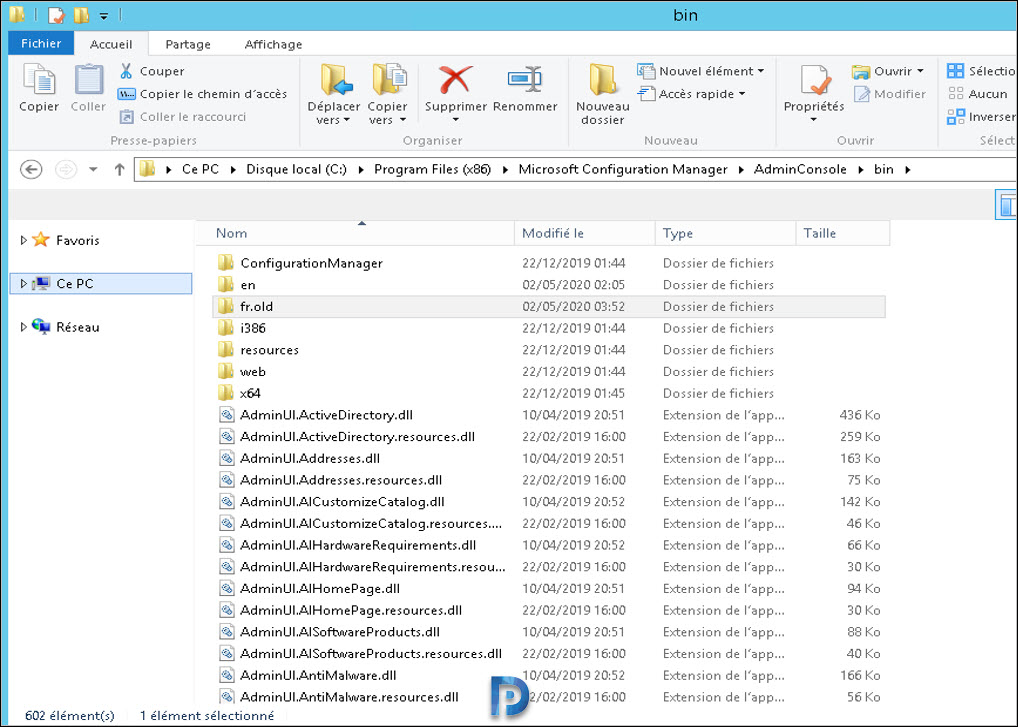
First of all close the Configuration Manager console, and go to your console installation directory. %program files (x86)%\ Microsoft Configuration Manager\AdminConsole\bin.
Since our current console language is French, rename the fr folder to fr.old.
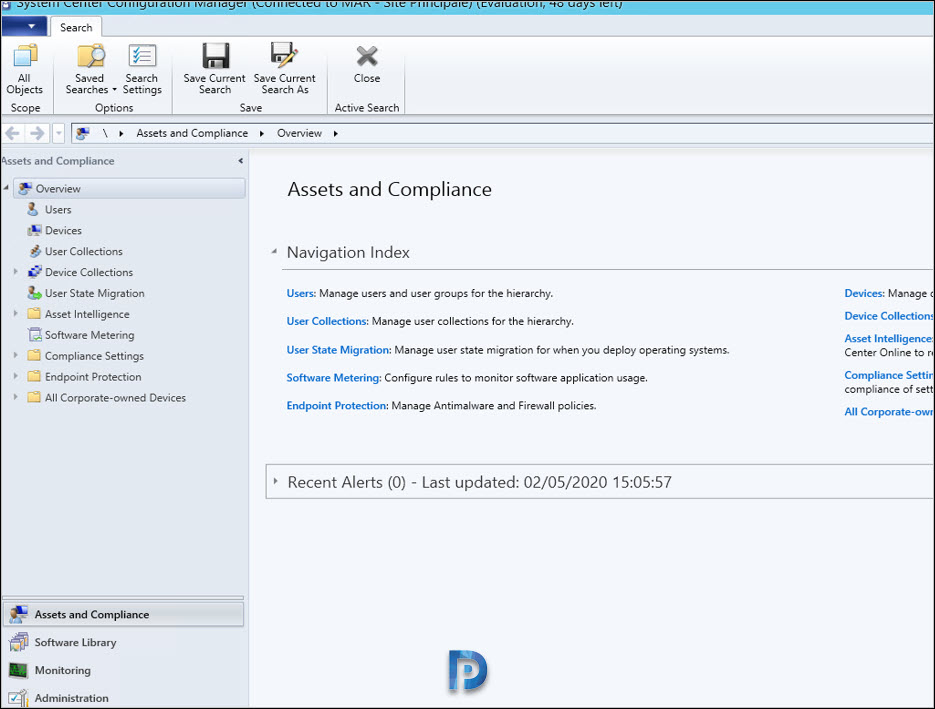
Now launch Configuration Manager console. Notice that the console language is English. We changed the SCCM console language from French to English with simple file rename.
Modify SCCM Console language from English to other language
We will now look at the steps to modify our SCCM console language from English to some other language.
To choose another language other than English, you require the files for your language. You then change the system language.
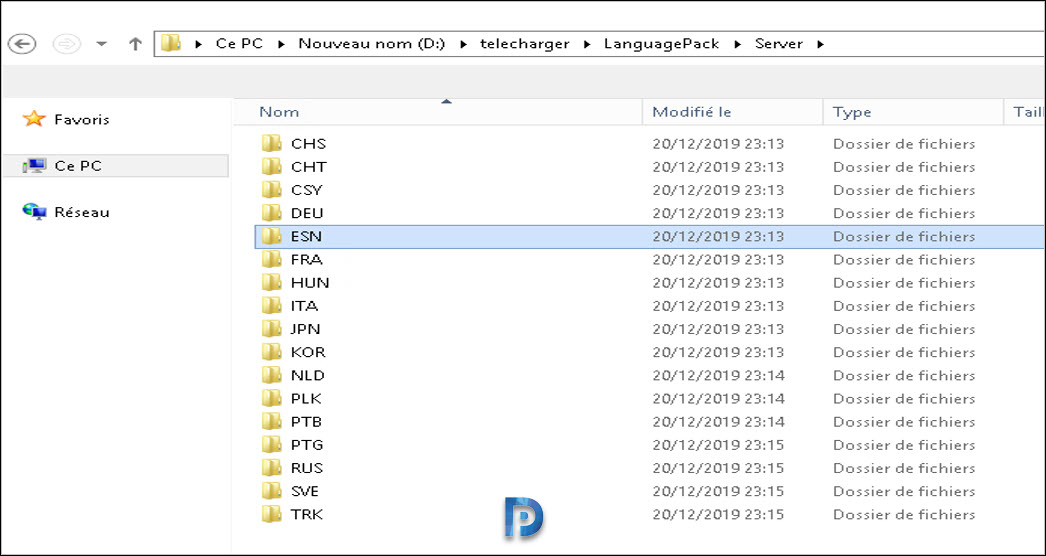
Go to download folder. Select Server folder and your language. (in my example ESN for Spain).
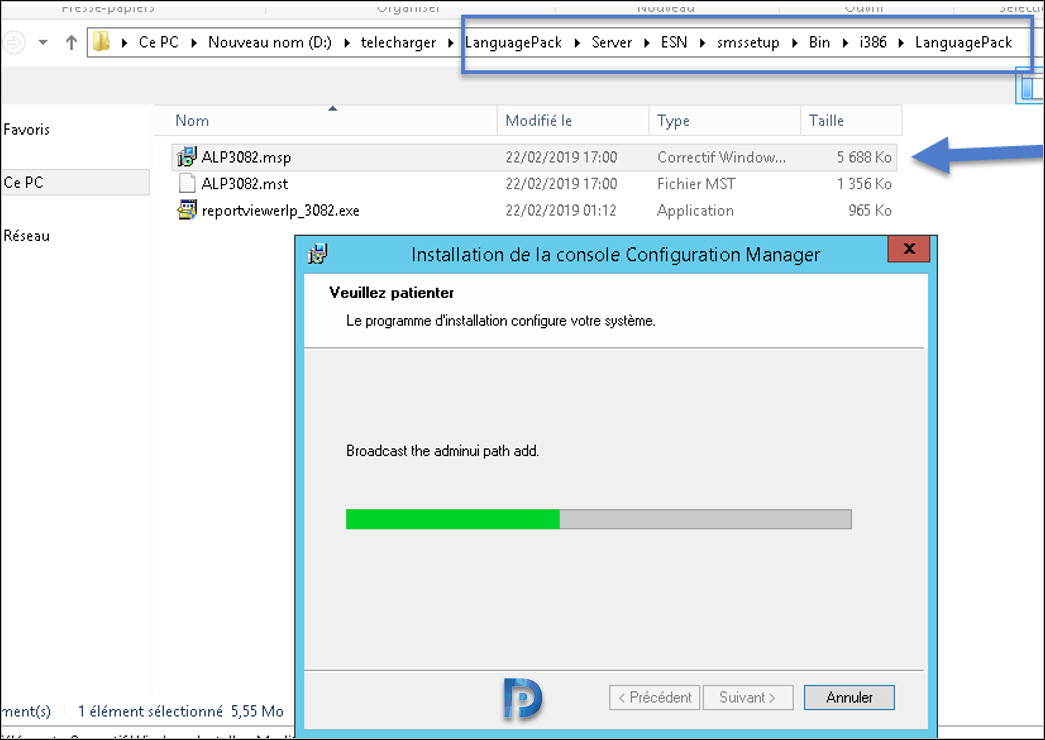
Run the file ALPxxxx.msp. Wait while the installation is done.
Go to Configuration Manager console installation directory and open the bin folder. We see a new folder es in the bin directory.
Now change your Windows 10 OS system language.
Right click Start and clickSettings.
Click onTime & Languageand then clickLanguage.
Under the Preferred languages section, clickAdd a preferred language.
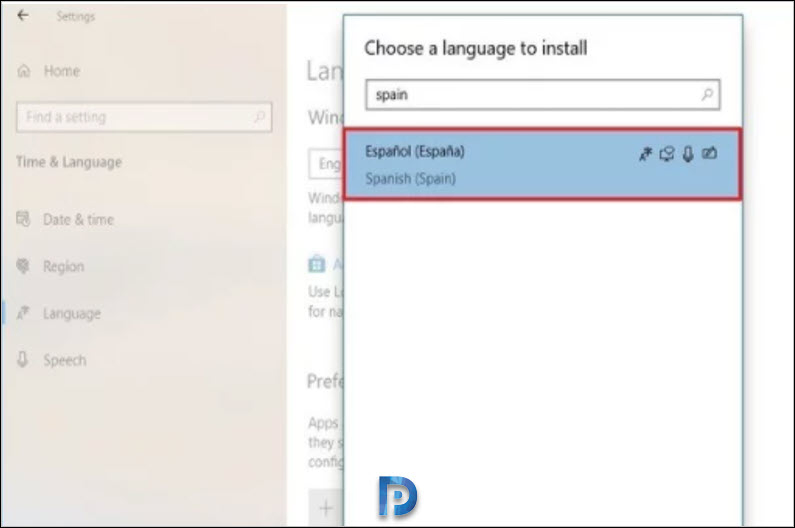
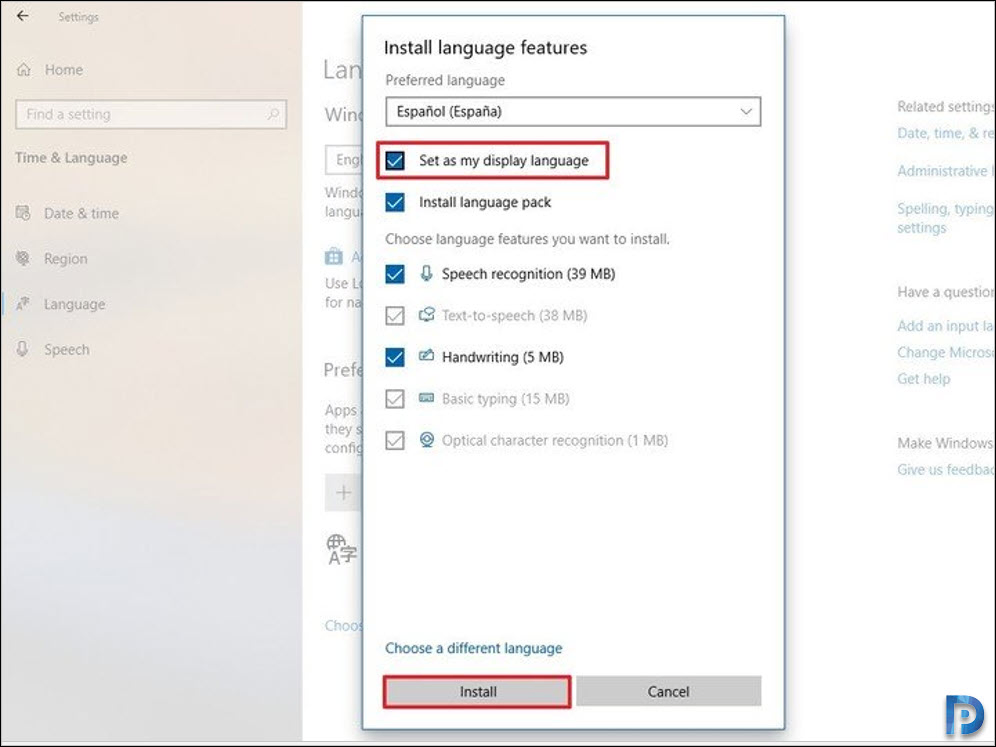
Search for the language you want on Windows 10. Select the language package from the list.
Ensure you set the new language as display language. ClickInstall.
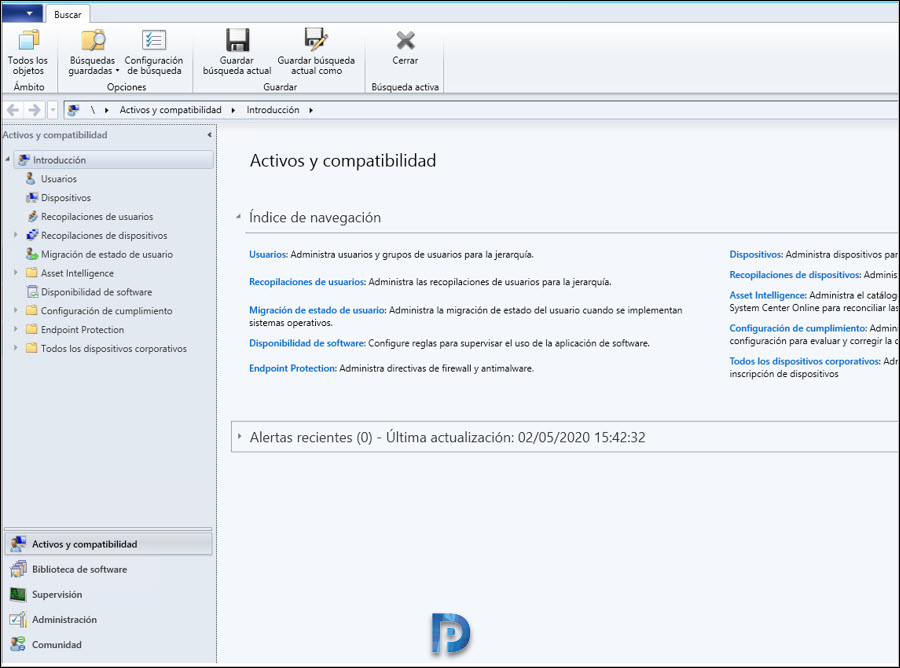
Now launch Configuration Manager console. Notice that the new console language is now Spanish.
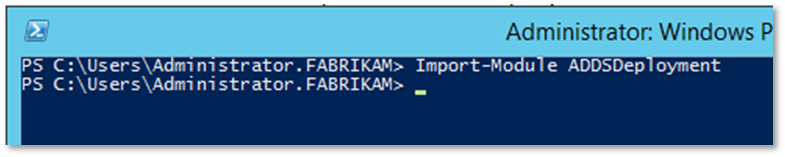
I am writing this blog and others to explain how things work and some ways deployment and operational tasks can be handled. In other words, these postings are for demonstration purposes only. Since I am not familiar with your organization or environment I do not know if these steps are applicable to your environment or are even safe to perform in your environment. It is recommended that you contact Microsoft Support prior to making changes in your environment to ensure that these steps are applicable to your environment, and are safe to perform in your environment. By writing this blog I am in no way recommending that you perform these steps in your own environment. If you choose to follow the steps outlined in this or other blog postings on this site, you are assuming the risk for your actions.
Repadmin is a tool for checking replication status and troubleshooting replication issue. Below is a table highlighting commonly used syntax of the repadmin tool.
Syntax
Usage
Repadmin /replsummary
Thereplsummaryoperation quickly and concisely summarizes the replication state and relative health of a forest.
Repadmin /replsummary /bysrc /bydest /sort: delta
Thereplsummaryoperation quickly and concisely summarizes the replication state and relative health of a forest.
Repadmin /showrepl <DC Name>
Displays the replication partners for each directory partition on the specified domain controller. Helps the administrator build a visual representation of the replication topology and see the role of each domain controller in the replication process.
Repadmin /showutdvec
Displays the highest Update Sequence Number (USN) for the specified domain controller. This information shows how up-to-date a replica is with its replication partners.
Repadmin /showobjmeta <DC> <DN of object>
Displays the replication metadata for a specified object stored in Active Directory, such as attribute ID, version number, originating and local Update Sequence Number (USN), and originating server’s GUID and Date and Time stamp. By comparing the replication metadata for the same object on different domain controllers, an administrator can determine whether replication has taken place.
Repadmin /showconn
Displays the connection objects for a specified domain controller. Default is local site.
Replicates a single object between any two domain controllers that have partitions in common. The two domain controllers do not have a replication agreement. Replication agreements can be shown by using the Repadmin/showreplcommand.
Starts a replication event for the specified directory partition between the source and destination domain controllers. The source UUID can be determined when viewing the replication partners by using the Repadmin showrepl operation.
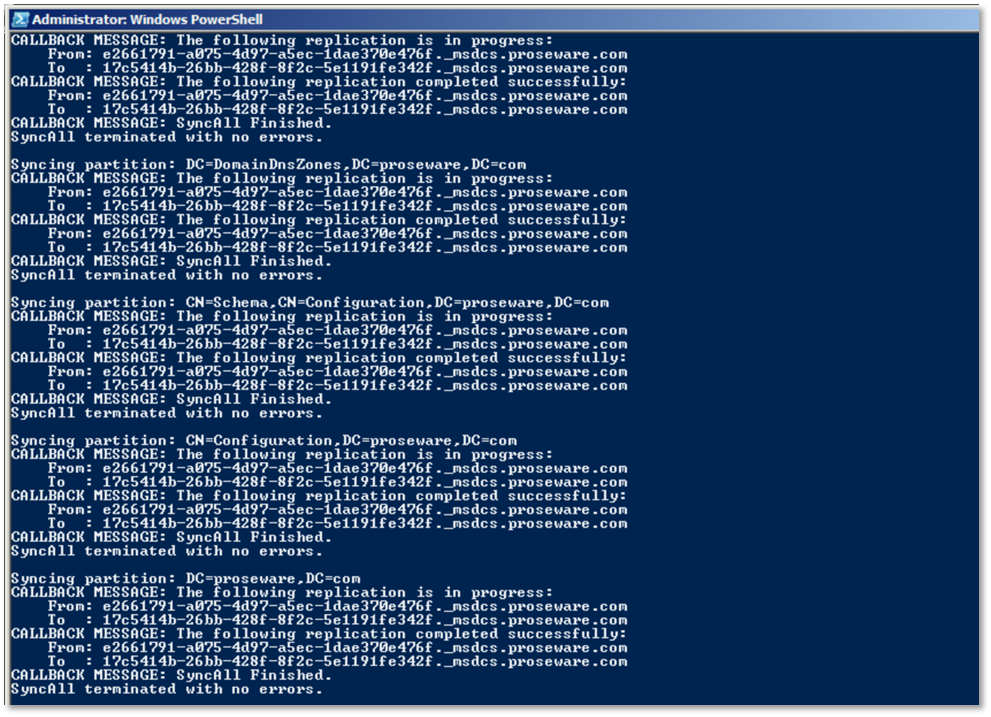
Repadmin /syncall <DC>
Synchronizes a specified domain controller with all replication partners.
Repadmin /queue
Displays tasks waiting in the replication queue.
Repadmin /showmsg <Error>
Displays the error message for a given error number.
Repadmin /viewlist <DC_List>
Displays a list of domain controllers.
Repadmin /showctx <DC_List>
Displays a list of computers that have opened sessions with a specified domain controller.
Repadmin /showcert
Displays the server certificates loaded on a specified domain controller.
Repadmin /removelingeringobjects <Dest_DC_List> <Source DC GUID> <NC> [/ADVISORY_MODE]
Uses an authoritative domain controller to compare the directory of a domain controller (destination) that is suspected of having lingering objects against the directory of a domain controller (source) that is designated as a reference source for up-to-date values for the domain of the destination. When the advisory mode parameter is used, this command provides a list of found lingering objects. When the advisory mode parameter is not used, this command removes lingering objects from the destination domain controller.
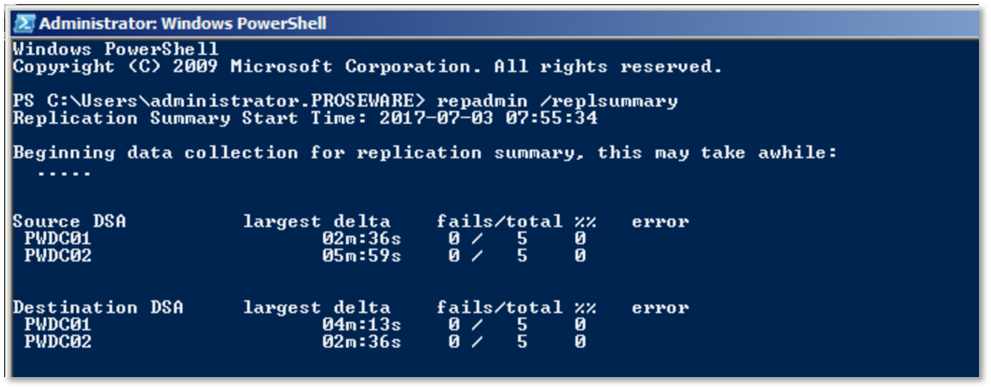
As seen in the screenshot belowrepadmin /replsummarywill give statistics for replication with replication partners. The output also lists any errors that were encountered with replication. This is useful for getting an overview of any replication issues the DC is having.
You can also sort the output. In the example below, the output is sorted by the largest delta since last replication.
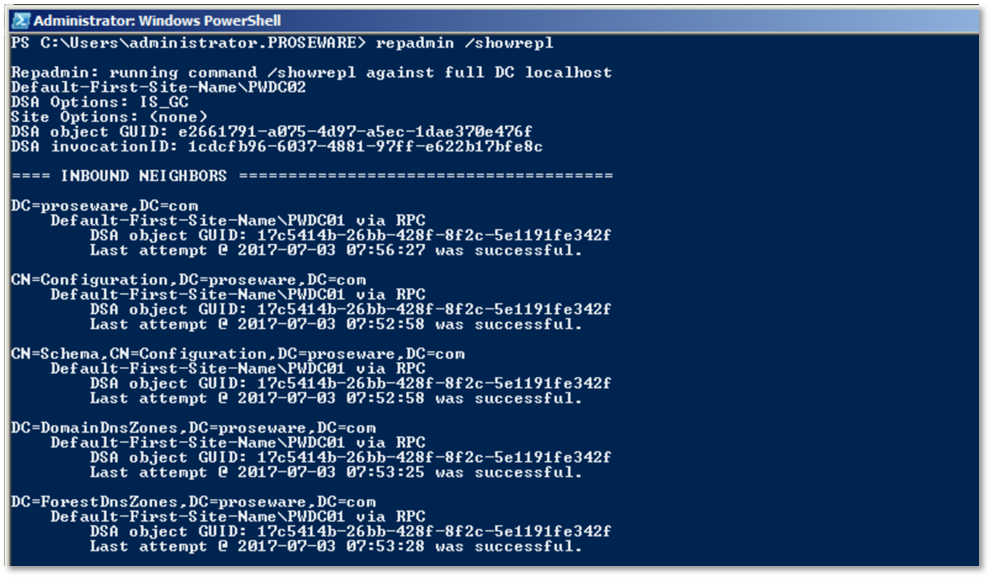
As seen belowrepadmin /showreplshows the replication status with all of the DCs replication partners and is sorted by the Naming Context that is being replicated.
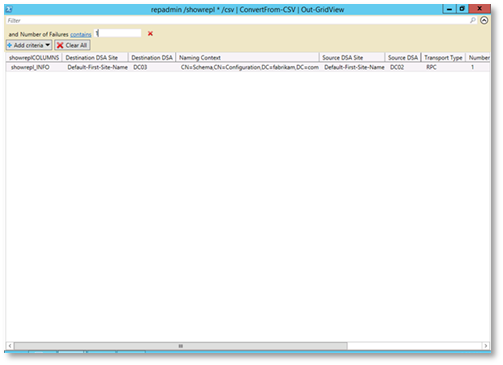
One trick that can be used to get a more manageable output is to use repadmin to send its output to a CSV and the use PowerShell to convert the CSV to a GridView. The command to do this isrepadmin /showrepl * /csv | ConvertFrom-CSV | Out-GridView
The resulting output is in a manageable GUI.
In GridView you can sort and filter. Below is an example of filtering onNumber of Failures, so that I can easily see what failed.
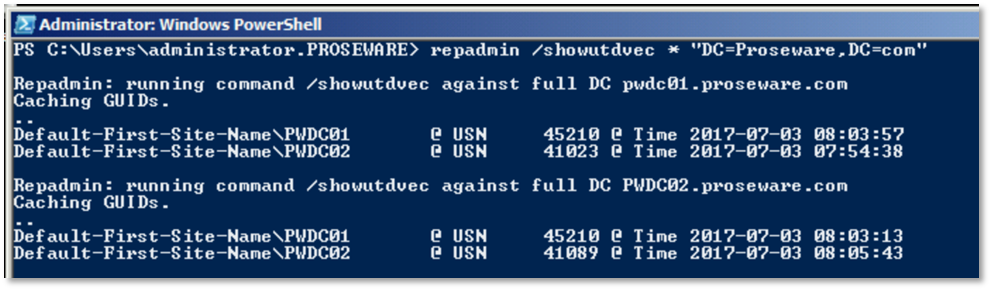
Replications changes are tracked through incrementing numbers called USNs. There are times where you will want to know what knowledge each DC has about other DCs current state. The up-to-dateness vector is the knowledge that a DC as about the current state of other DCs. This information can be useful when trying to troubleshoot replication issues such as USN Rollback. USN Rollback is when a DC is restored from an unsupported method such as a snapshot. In that case the up-to-dateness vector would be much larger than the actual USN of the DC. Since, there is going to be some delay in replication you will notice some differences but the numbers should be relatively close. For example, if you compare the up-to-dateness vector for DC01 across DCs you will notice the following: for itself DC01 has USN of 17347, DC02 has a USN of 17346 for DC01, and DC03 has a USN of 17346 for DC01. So, we can see the numbers are relatively close and that DC01 potentially has one change that it needs to replicate to DC02 and DC03.
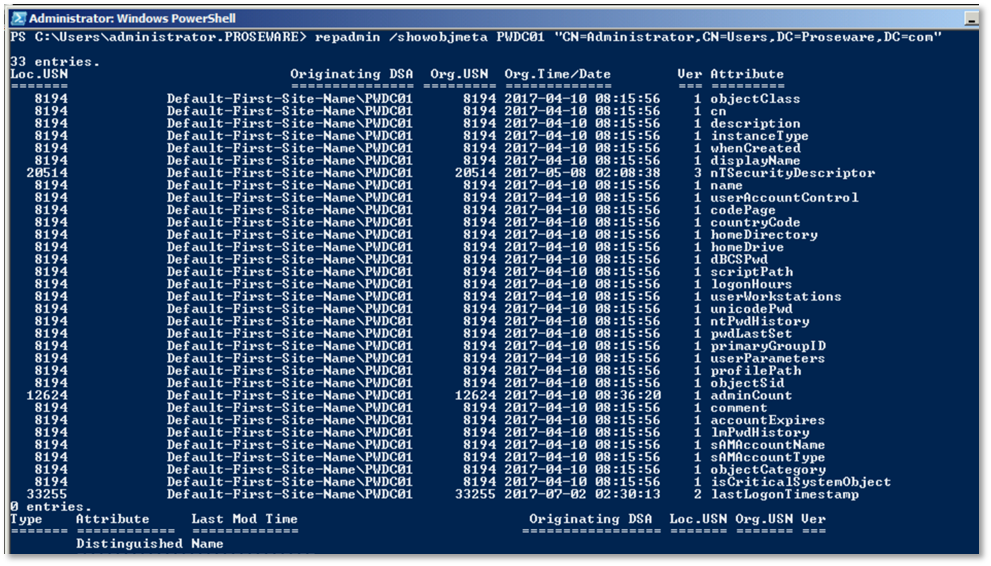
The /showobjmeta switch shows detailed information for attributes of an object. It is most commonly used when comparing the output of the command from 2 DCs to see if they are in sync and the current status of the attributes. Differences can be used to identify replication problems.
Repadmin /syncall is used to force replication between domain controllers. You can easily view options for the /syncall switch with the following command:repadmin /syncall /?
A normal use ofrepadmin /syncallis with the/AePswitch
PowerShell is an object oriented scripting language that allows enterprises to automate IT tasks.
Below is a conversion table that shows the PowerShell command that can be used in place of the Repadmin command. So, why would you choose to use PowerShell? The output of PowerShell commands are objects those objects can be filtered with properties, piped through other PowerShell commands and manipulated to many useful things including great control in how the data is presented to the user.
Command
PowerShell Cmdlet
Repadmin /FailCache
Get-ADReplicationFailure
Repadmin /Queue
Get-ADReplicationQueueOperation
Repadmin /ReplSingleObj
Sync-ADObject
Repadmin /ShowConn
Get-ADReplicationConnection
Repadmin /ShowObjMeta
Get-ADReplicationAttributeMetadata
Repadmin /ReplSummary
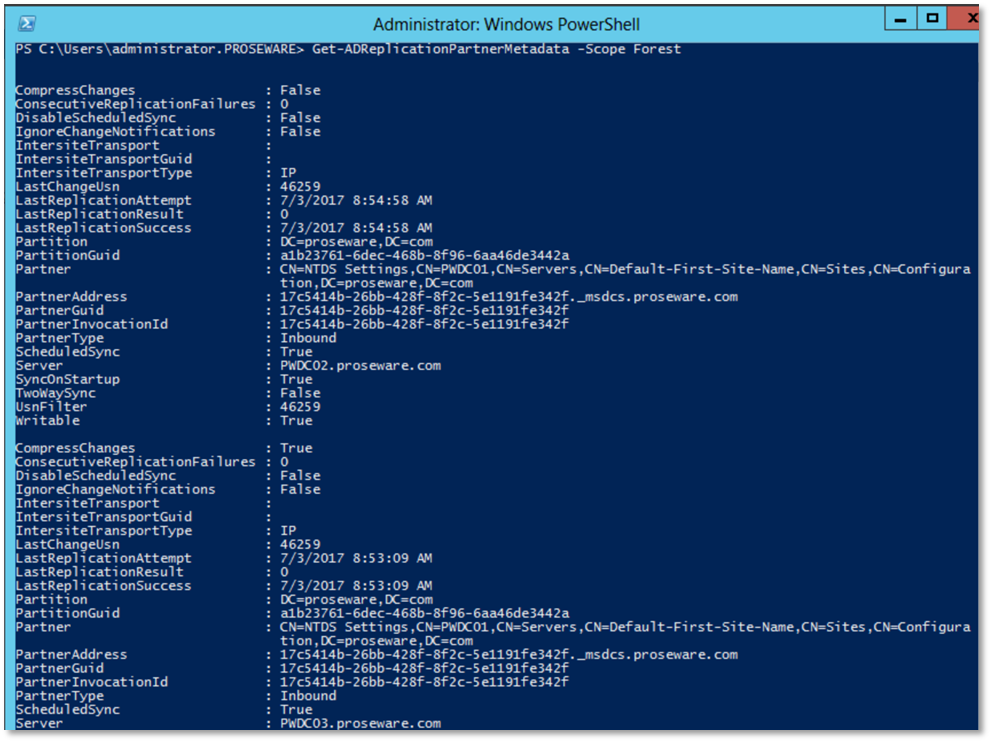
Get-ADReplicationPartnerMetadata
Repadmin /Showutdvec
Get-ADReplicationUpToDatenessVectorTable
Repadmin /SiteOptions
Set-ADReplicationSite
Repadmin /ShowAttr
Get-ADObject
Repadmin /Set Attr
Set-ADObject
Get-ADReplicationParnerMetadatais very similar to runningrepadmin /showrepl. Without passing the output through another cmdlet the formatting is a bit different then to what you get with repadmin.
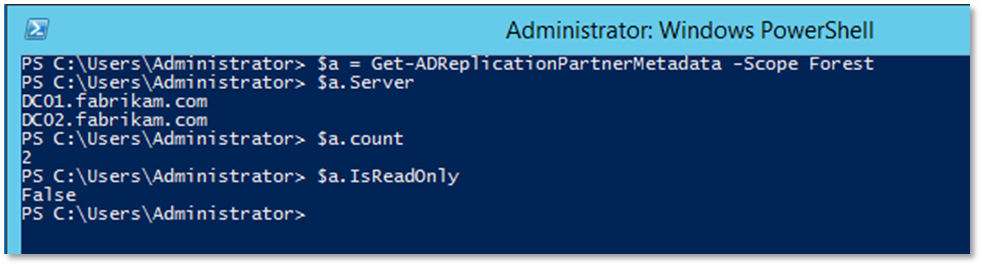
However, the advantage is that the output of the command are objects. You can constrain your views to certain properties.
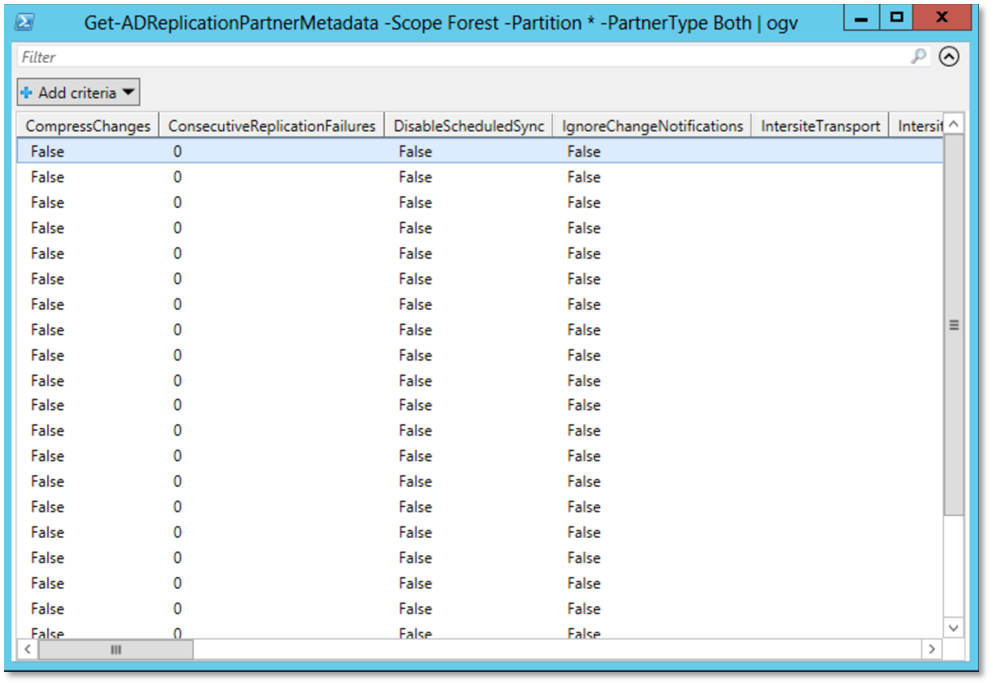
The other advantage is that you can pass objects through other cmdlets. As seen here I am passing the output ofGet-ADReplicationPartnerMetadatathroughOutput-GridView.
Once in GridView you have the ability to sort and filter the data.
Here is another example of the usefulness of using PowerShell overrepadmin. In this example I take the output ofGet-ADReplicationPartnerMetadatathen passing it throughSelect-Objectso that we can then limit what objects are presented in GridView.
These issues are caused by lingering objects. Lingering objects can be caused when a domain controller is taken offline for an extended period of time, does not replicate for longer than the tombstone lifetime, or is restored from a backup that is older than the tombstone lifetime.
When an object is deleted it is put in a tombstone state. After the tombstone lifetime passes (typically 180 days), DC run garbage collection and those tombstone objects are deleted. If a DC was offline for the entire TSL and then were brought back online they may have objects that have since been deleted, tombstoned, and garbage collected. Any objects that were deleted will still exist on that DC. These objects go unnoticed until a change is made to that object then the DC attempts to replicate that object, and at that point that is where it is either re-introduced into the environment or if strict replication consistency is enabled, blocked.
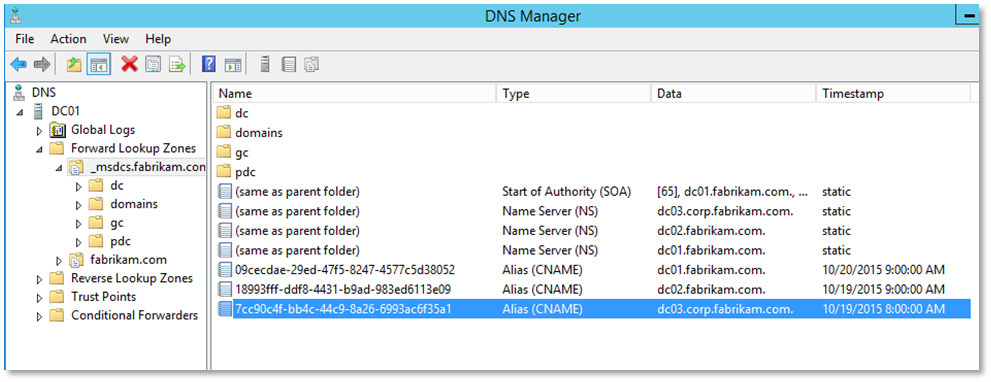
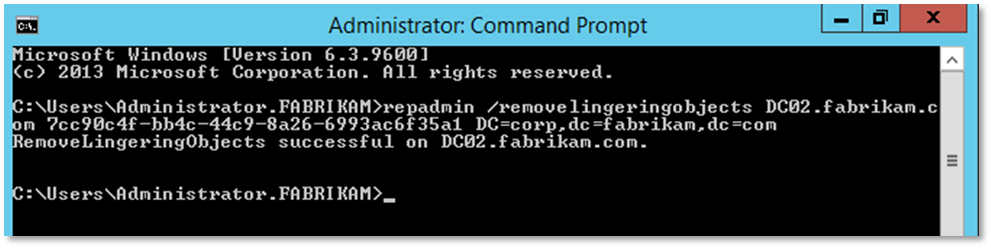
One way to remove lingering objects is to userrepadminwith the/removelingeringobjectsswitch. First you must identify a clean source of the partition. The syntax of the command isrepadmin /removelingeringobjects<Dest DC Name> <Source DC Guid> <Naming Context>. So, in other words you need to identify the source DCs guid and the Naming Context you want to clean. The naming context will be available in the Event 1388 or 1988 you receive in the event long. Once you find a clean source you can obtain the guid by opening DNS Manager and opening up the _msdcs Zone and obtaining the CName record for the DC in question.
Below is an example of running therepadmin /removelingeringobjectscommand
You will receive an Event1937when the removal of lingering objects begins.
You will then receive an Event1939when removal completes.
2.2.2.2 Repadmin /rehost
An alternative to usingrepadmin /removelingeringobjectscommand is to unhost the partition so that the domain controller no longer has that partition and then rehosting the entire partition with a good source.
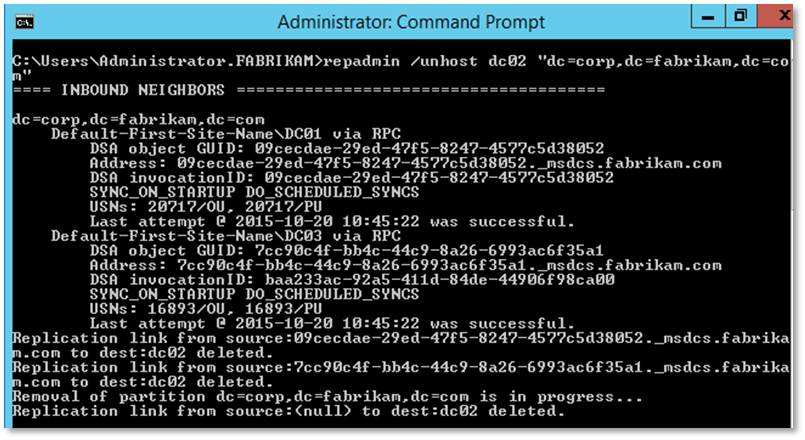
The repadmin syntax for unhosting the partition isrepadmin /unhost<DC Name> <Partition Name>
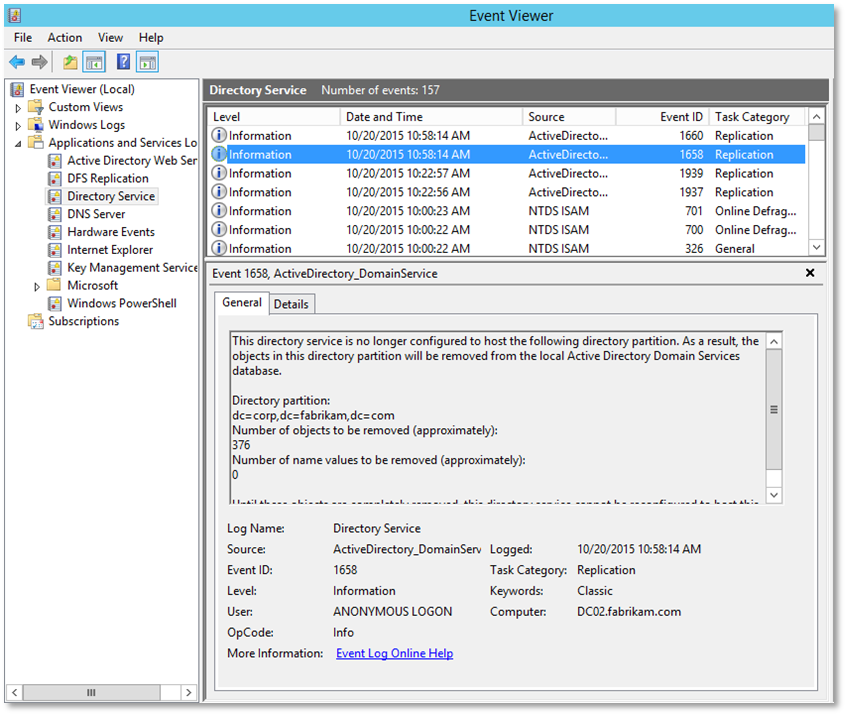
You will receive an event an event 1658 when the removal begins.
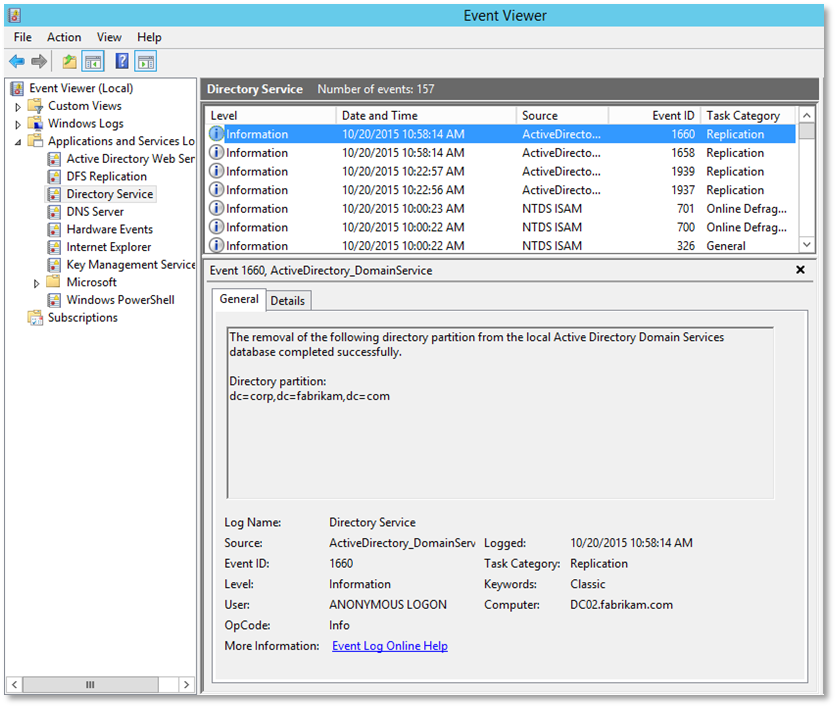
You will receive an event 1660 when the removal completes
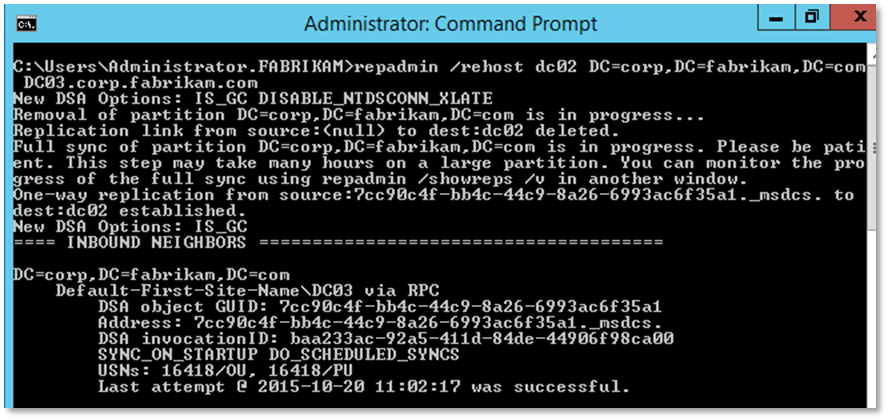
The syntax for rehosting the partition is:repadmin /rehost<Dest DC Name> <Partition> <Source DC Name>
Review event log for any 1988 or 1388 errors. If found use the previous section to remove the lingering objects from the domain controller.
Option 1: Re-hosting the partition that has not replicated
If the partition is a GC partition consider unhosting and rehosting the partition. Instructions for unhosting and rehosting are in the previous section calledRepadmin /rehost
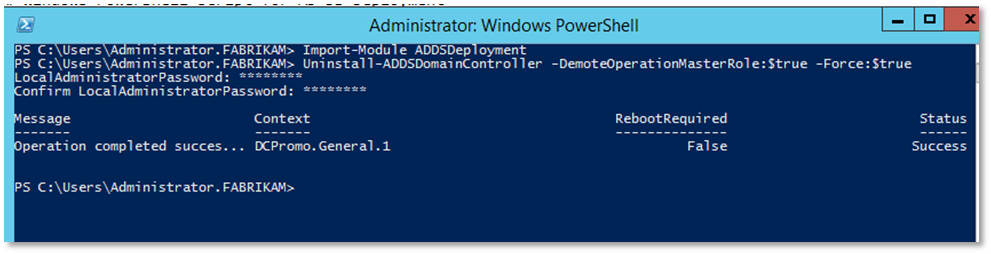
Option 2: Removing and then re-adding the domain controller to Active Directory
Another option is removing the DC from Active Directory and Re-promoting the Domain Controller
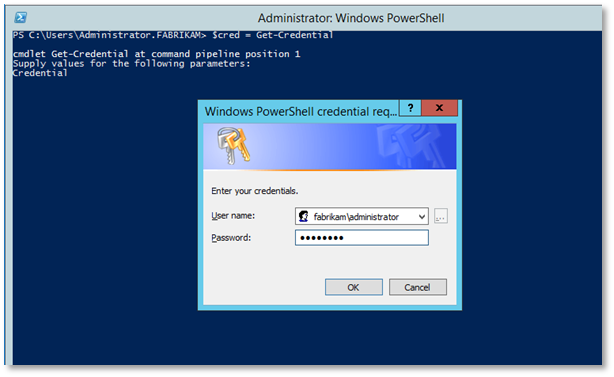
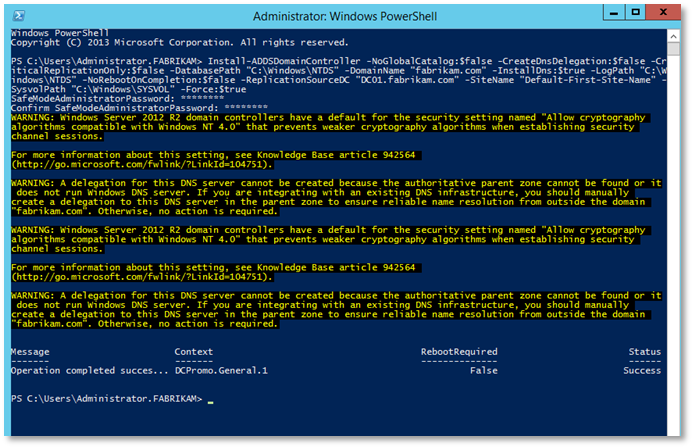
Step 4: Next you will need to run the Install –ADDSDomainController cmdlet. Below is a sample that you can use. You will need to modify the template to meet the requirements of your environment.
Option 3: Enabling Replication with Divergent and Corrupt Partner
Due to the risk of adding lingering objects to Active Directory the final consideration should be enabling the following setting: Allow Replication With Divergent and Corrupt Partner.
Step 1: To enable this setting run the following command on the domain controller:
repadmin /regkey <hostname> +allowDivergent
Step 2: Let replication complete
Step 3: Disable the setting with the following command: repadmin /regkey <hostname> -allowDivergent
Event 1311 is caused when there is not complete connectivity between domain controllers. There are a number of reasons there may not be complete connectivity.
The Inter-Site Topology Generator (ITSG) is responsible for building the replication topology. So to determine what the scope of the connectivity issues it is important to identify the ISTGs that are logging 1311.
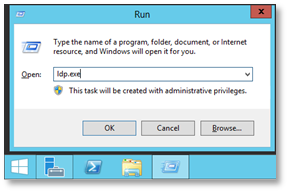
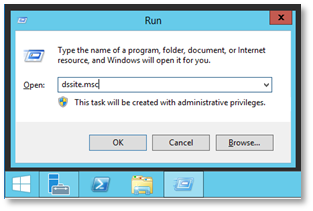
To find the ISTGs in your environment you need to use ldp.exe
Below are the steps for locating the ISTGs:
Step 1: Launchldp.exe
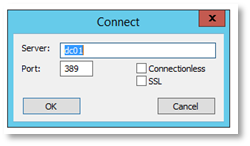
Step 2: When LDP opens, selectConnectionand thenConnect…
Step 3: In theConnectdialog box, enter the name of a Domain Controller for theServeryou want to connect to and then clickOK
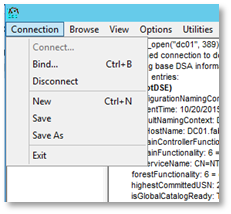
Step 4: Click onConnectionand then clickBind…
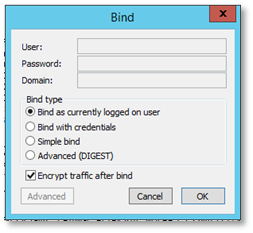
Step 5: In theBinddialog box, clickOK
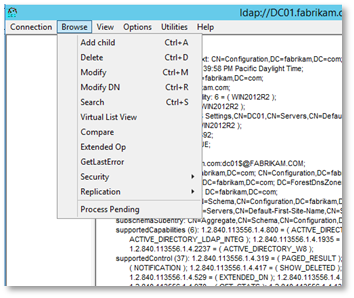
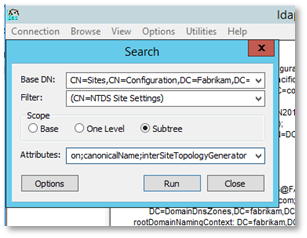
Step 6: Select theBrowsemenu and then selectSearch
Step 7: In the search enter the following:
Base DN:CN=Sites,CN=Configuration,<DN of Forest Root> (example: CN=Sites,CN=Configuration,DC=fabrikam,DC=com)
Filter:(CN=NTDS Site Settings)
Scope:Subtree
Attributes: Append the following to the attributes that are already listed:;interSiteTopologyGenerator
Step 8: ClickRun
Step 9: For each site you will then need to look for interSiteTopologyGenerator to determine the ITSG for each site.
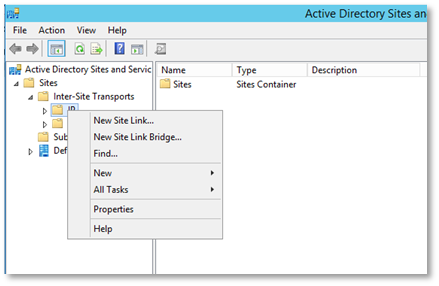
By default, Bridge All Site Links (BASL) is enabled in Active Directory. If your environment is not fully routed, then you will want to disable BASL. By fully routed we mean each site can contact every other site. If BASL is configured on a network which is not fully routed, the KCC will generate site bridges that cannot actually be reached. To determine if BASL is enabled launchActive Directory Sites and Services(dssite.msc).
ExpandSites, thenInter-site Transports.
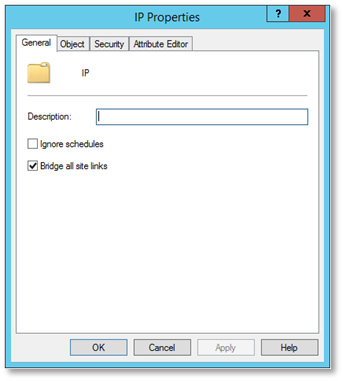
Right-click onIPand selectPropertiesfrom the context menu
If Bridge all site links is enabled, there will be a check box next to it. To disable BASL, uncheck the checkbox and click OK.
If you disable BASL you can still bridge site links. You would do that if you wanted two spoke sites to communicate directly if they could not communicate with the hub site. In a hub and spoke configuration the cost of crossing to site links (bridging a site link) will typically be a higher then just connecting directly to the hub site. So, ordinarily you would not have to worry about the Site Link Bridge being used instead of a direct site link. That being said, there are not a whole lot of scenarios where you would need to create Site Link bridges.
The following steps will allow you to bridge two site links.
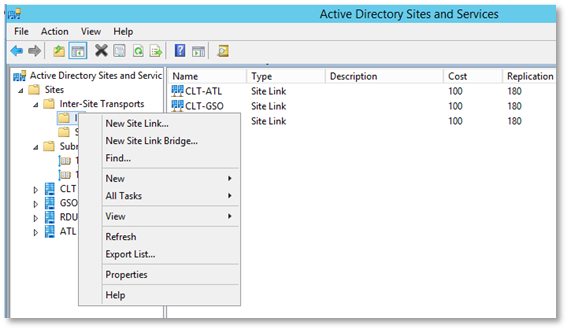
Step 1: Open the Active Directory Sites and Services MMC.
Step 2: ExpandSitesand then expandInter-site Transports
Step 3: Select New Site Link Bridge… from the context menu
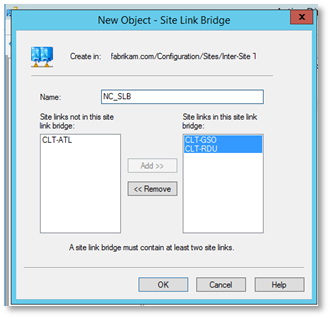
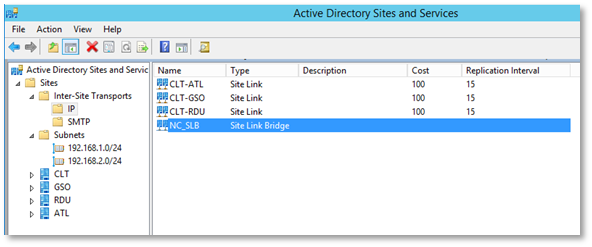
Add at least two sites to theSite Link Bridge, give it aName, and clickOK
Step 1: Run the following command in a PowerShell Console:Get-ADObject –LDAPFilter ‘(objectClass=site)’ –SearchBase (Get-ADRootDSE).ConfigurationNamingContext –Property Name | Format-Table Name
Step 2: In another PowerShell Console run:Get-ADObject –LDAPFilter ‘(objectClass=sitelink)’ –SearchBase (Get-ADRootDSE).ConfigurationNamingContext –Property Name, Cost, Description, Sitelist | Format-List Name, Sitelist
Step 3: Verify that each site that was listed inStep 1exists in one of the site lists returned inStep 2
If not all sites are contained in a site link that you need to determine what site link that site needs to be added to or if a new site link needs to be created.
And that is all I have for replication troubleshooting for today.
$Source=$Source.tolower() # $Filelist=Get-Childitem "$Source" –Recurse -- 대상 폴더안의 파일 및 폴더 전체를 리스트함. $Filelist=Get-Childitem 파일명 $Total=$Filelist.count $Position=0
foreach ($File in $Filelist) { $Filename=$File.Fullname.tolower().replace($Source,'') #$Filename= 파일명 $DestinationFile=($Destination+$Filename) Write-Progress -Activity "Copying data from '$source' to '$Destination'" -Status "Copying File $Filename" -PercentComplete (($Position/$total)*100) Copy-Item $File.FullName -Destination $DestinationFile $Position++ } }
$src="c:\temp" $dest="C:\Temp\download"
Copy-WithProgress -Source $src -Destination $dest
#복사 완료 후 제거 Remove-Item c:\temp\sw_dvd5_office_professional_plus_2016_64bit_korean_mlf.iso -Force