🔍 개요
Azure OpenAI 서비스와 API Management를 함께 사용하면 프롬프트와 응답에 대한 상세한 로깅과 모니터링이 가능합니다.
2025년 5월 업데이트로 스트리밍 지원을 포함한 포괄적인 LLM 로깅 기능이 가능하게 되었습니다.
📖 참고: Azure API Management에서 Azure OpenAI에 대한 LLM 로깅 지원 - 5월 업데이트
본 가이드에서는 프롬프트와 응답에 대한 로깅에 초점을 맞춰 작성되었습니다.
API Management를 이용한 고급 정책 설정, 캐싱 전략, 멀티 리전 배포 등의 추가 기능은 추후 다뤄볼 예정입니다.
1. 아키텍처 구성
기본 아키텍처
2. 시나리오 전체 흐름
이 가이드에서 구현할 전체 과정을 미리 확인하여 체계적으로 작업을 진행하겠습니다.
각 단계는 순차적으로 진행되며, 이전 단계가 완료되어야 다음 단계로 진행할 수 있습니다. 예상 소요 시간은 약 45-60분입니다.
- Azure 구독 및 소유자 권한
- Azure CLI
- Python 3.11+
📋 1단계: Azure OpenAI 리소스 및 모델 배포 (10분)
   - OpenAI 서비스 생성
   - GPT 모델 배포 (예: gpt-4o-deployment)

📋 2단계: API Management 서비스 생성 (15분)
   - APIM 인스턴스 구성
   - Azure OpenAI API 템플릿으로 API 생성

📋 3단계: Managed Identity 권한 설정 확인 (5분)
   - 시스템 할당 관리 ID 확인
   - Azure OpenAI 리소스 IAM 역할 부여 확인

📋 4단계: LLM 로깅 활성화 (20분: Log Analytics 초기 테이블 생성 시간 필요)
   - 진단 설정으로 Log Analytics 연결
   - API별 LLM 로깅 활성화

📋 5단계: 연결 및 기능 테스트 (5분)
   - 테스트 기능으로 APIM ↔ OpenAI 연결 확인
   - Log Analytics에서 로그 생성 확인

📋 6단계: 외부 애플리케이션 테스트 (10분)
   - Python 클라이언트로 APIM 경유 호출
   - 토큰 사용량 및 로그 추적 분석

📋 7단계: 보안 정책 검증 (10분)
   - IP 제한 정책 구현 및 테스트
   - 차단 로그 분석 및 검증
3. Azure OpenAI 리소스 생성
리소스 생성
- 리소스 그룹은 기존 리소스 그룹을 사용하거나 신규로 생성해도 무방합니다.
- Azure OpenAI는 한국에서 가까운 "japaneast"로 생성
최근 Korea Central도 지원되니 원하는 모델과 배포 유형의 지역 지원 여부를 확인하세요
1. Azure Portal에서 '리소스 만들기' 선택
2. 'Azure OpenAI' 검색 후 선택
3. 기본 설정:
   - 구독: 본인의 구독 선택
   - 리소스 그룹: 새로 만들거나 기존 선택
   - 지역: East US, West Europe 등 OpenAI 지원 지역
   - 이름: 고유한 리소스 이름 (예: myopenai-resource)
   - 가격 책정 계층: Standard (S0)
4. '검토 + 만들기' → '만들기'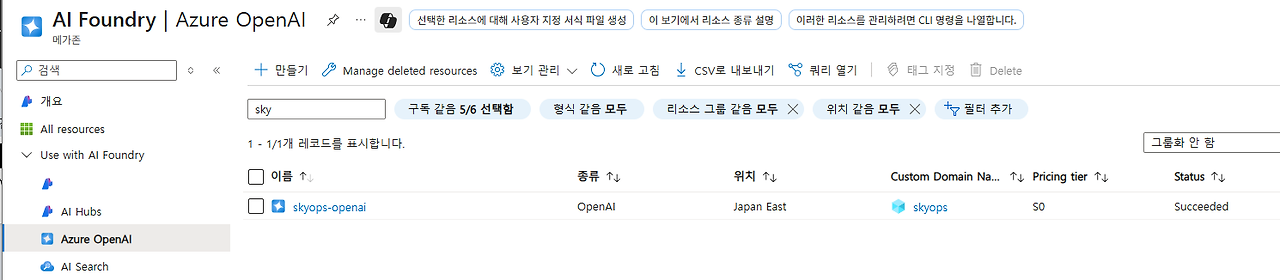
모델 배포
- Azure OpenAI 리소스가 생성되면 사용할 모델을 배포해야 합니다.
1. 생성된 Azure OpenAI 리소스로 이동
2. 상단에 'Go to Azure AI Foundry portal' 클릭
3. 왼쪽 블레이드 메뉴에서 '배포' - ' + 모델 배포' 클릭
4. 모델 설정:
   - 모델: gpt-4o
   - 모델 버전: 최신 버전 (예: 2024-11-20)
   - 배포 이름: gpt-4o-deployment (기억하기 쉬운 이름)
   - 배포 유형: 표준
5. '만들기' 클릭- Standard: 일반적인 용도, 예측 가능한 워크로드
- GlobalStandard: 글로벌 배포, 높은 가용성 필요시
- ProvisionedManaged: 대용량 처리, 일정한 성능 보장 필요시

4. API Management 리소스 생성
리소스 생성
1. Azure Portal에서 '리소스 만들기' 선택
2. 'API Management' 검색 후 선택
3. 기본 설정:
   - 구독: 본인의 구독 선택
   - 리소스 그룹: 새로 만들거나 기존 선택
   - 지역: Korea Central
   - 조직 이름: 회사명 입력
   - 관리자 이메일: 본인 이메일
   - 가격 책정 계층: Developer (개발/테스트용)
4. '검토 + 만들기' → '만들기'

⏱️ 배포 시간: 약 30분 소요Developer SKU는 개발/테스트 전용입니다. 운영 환경에서는 SLA가 보장되는 Basic 이상의 SKU를 사용하세요.
📖 SKU 상세 비교: Azure API Management v2 service tiers overview

5. Azure OpenAI와 API Management 연결
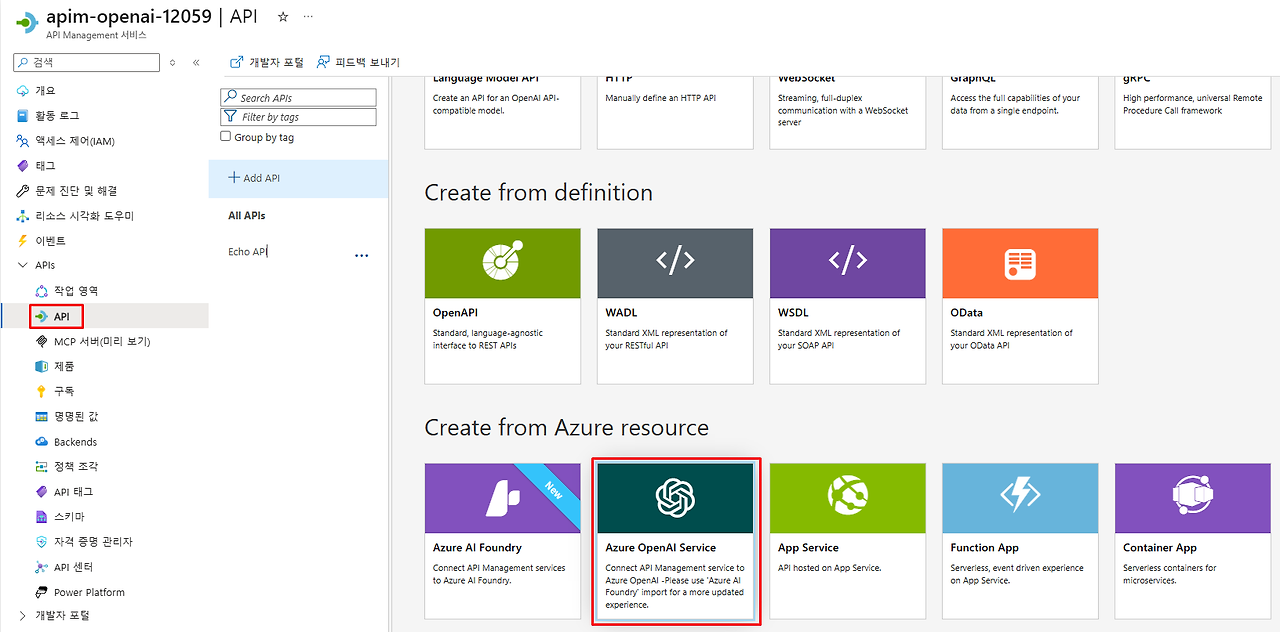
템플릿을 활용하여 Azure OpenAI API 생성
API Management에서 Azure OpenAI API를 생성하는 방식은 2가지가 있습니다:
- OpenAPI 사양 직접 가져오기: 복잡하고 수동 설정 필요
- Azure OpenAI 템플릿 사용: 자동 설정으로 구성이 간단
본 가이드에서는 구성이 비교적 간단한 템플릿 방식으로 진행합니다.
1. API Management 인스턴스 → 'APIs' 메뉴 선택
2. '+ Add API' 클릭
3. **'Azure OpenAI'** 템플릿 선택 (Microsoft에서 제공하는 공식 템플릿)
1단계: API 템플릿 선택
2단계: OpenAI 인스턴스 및 설정 구성

3단계: 기본 설정 확인 후 생성
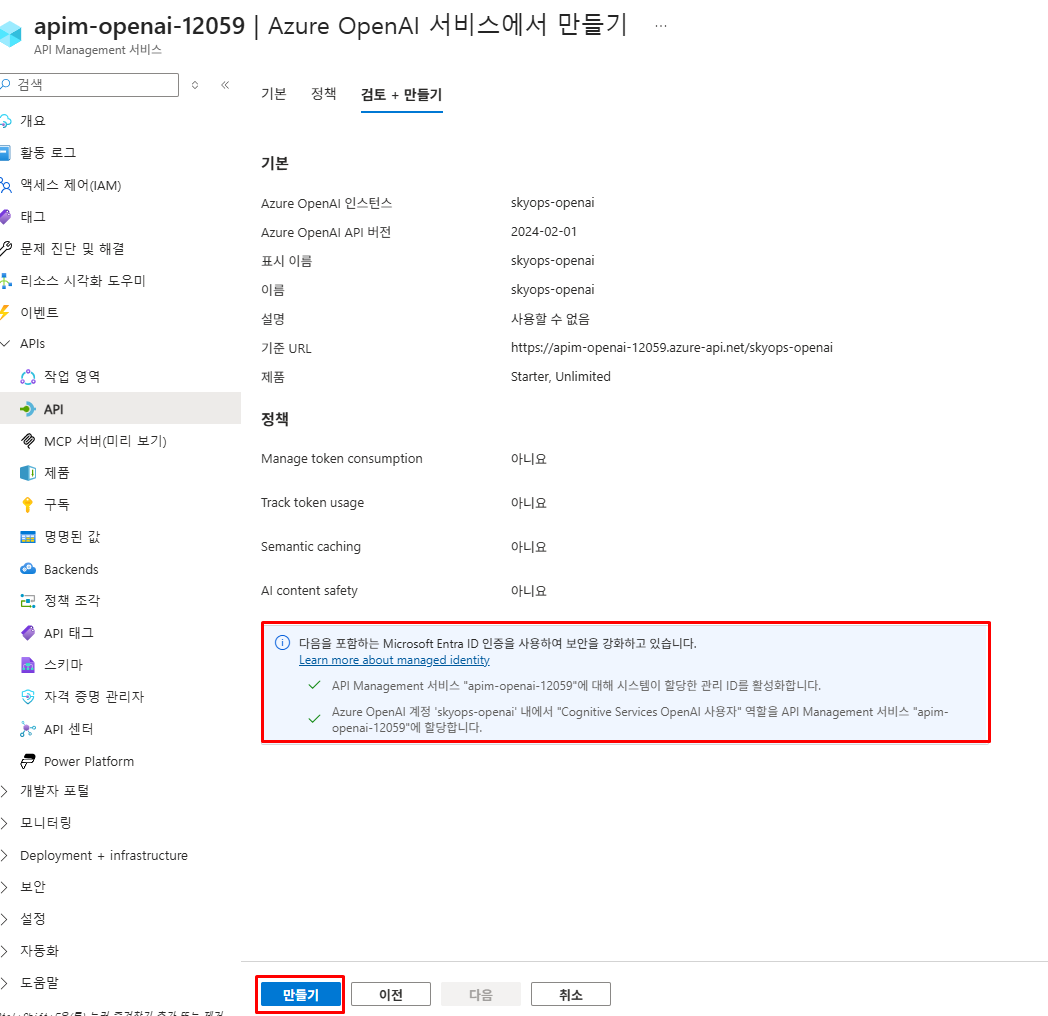
Azure OpenAI 템플릿을 사용하면 자동으로 Managed Identity 인증이 구성되고, 모든 필요한 엔드포인트와 파라미터가 정확하게 설정됩니다.
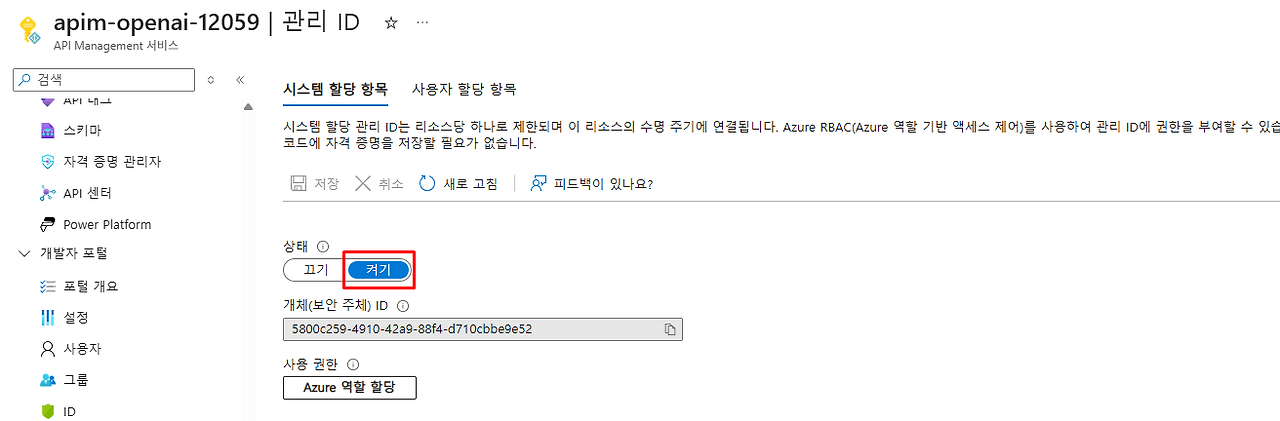
Managed Identity 권한 설정 및 IAM 확인
Azure OpenAI API 템플릿을 사용하면 자동으로 시스템 할당 관리 ID가 생성되고 권한이 설정됩니다. 이를 확인해보겠습니다.
1. API Management의 관리ID 활성화 상태 확인
2. Backend 권한 방식 확인


3. Azure OpenAI IAM 확인
1. Azure OpenAI 리소스 → 'Access control (IAM)' 메뉴
2. 'Role assignments' 탭 확인
3. API Management의 Managed Identity가 다음 역할을 가지고 있는지 확인:
- **Cognitive Services OpenAI User** 
만약 권한이 자동으로 설정되지 않았다면, Azure OpenAI 리소스에서 수동으로 API Management의 Managed Identity에 Cognitive Services OpenAI User 역할을 할당하세요.
인증 구조 이해
위에서 확인한 Managed Identity와 권한 설정은 APIM과 Azure OpenAI 간의 자동 인증을 위한 것입니다.
실제 클라이언트와의 통신 구조는 아래와 같습니다.
클라이언트는 Azure OpenAI의 실제 API 키를 알 필요가 없고, APIM 구독키만 사용합니다.
모든 Azure OpenAI 접근은 APIM에서 중앙 관리되며, 키 로테이션, 사용량 모니터링, 정책 적용이 한 곳에서 처리됩니다.
6. LLM 로깅 활성화
진단 설정 구성
먼저 API Management 전체 레벨에서 진단 로그를 Log Analytics Workspace로 전송하도록 설정합니다.
1. API Management 인스턴스 → '모니터링' → '진단 설정'
2. '+ 진단 설정 추가' 클릭
3. 설정 구성:
   - 진단 설정 이름: openai-logging
   - 로그 섹션에서 다음 선택:
     ☑️ Logs related to ApiManagement Gateway
     ☑️ Logs related to Websocket Connections
     ☑️ **Logs related to generative AI gateway** (가장 중요!)
   - 대상 세부 정보:
     ☑️ Log Analytics 작업 영역에 보내기
     - 구독: 본인 구독
     - Log Analytics workspace: 새로 만들기 또는 기존 선택
     - Destination table: **리소스별** 선택
4. 'Save' 클릭
진단 설정 완료 후 ApiManagementGatewayLlmLogs 테이블이 생성되고 로그가 적재되기까지 15-20분 정도 소요될 수 있습니다.
Log Analytics Workspace는 데이터 수집량과 보존 기간에 따라 비용이 발생합니다.
- Pay-as-you-go: GB당 $2.76 (변동 가능성 있음)
- 기본 보존 기간: 30일 (추가 보존 시 별도 요금)
- OpenAI 로그 특성: API 호출량이 많을 경우 상당한 로그 생성
권장 사항:
- 테스트/개발 환경에서는 짧은 보존 기간 설정 (7일)
- 프로덕션에서는 필수 로그만 수집 고려
- 일일 사용량 제한 설정으로 예상치 못한 요금 발생 방지 (Log Analytics Workspace → '사용량 및 예상 비용' → '일일 상한')
- 정확한 가격은 Azure 가격 계산기로 확인
API 설정에서 LLM 로그 활성화
먼저 생성한 Azure OpenAI API에서 LLM 로깅을 활성화해야 합니다.
1. API Management → 'APIs' → 생성한 'Azure OpenAI Service' 선택
2. 'Settings' 탭 클릭
3. 'Diagnostics Logs' - 'Azure Monitor' 섹션에서:
   - Override global: ✅ 체크
   - Log LLM Message: ✅ 체크 (중요!)
4. 'Save' 클릭

⚠️ 주의사항:
진단 설정 직후에는 'Override global' 활성화 옵션이 보이지 않을 수 있습니다.
이 경우 약 10~15분 정도 기다린 후 페이지를 새로고침하여 다시 확인하세요.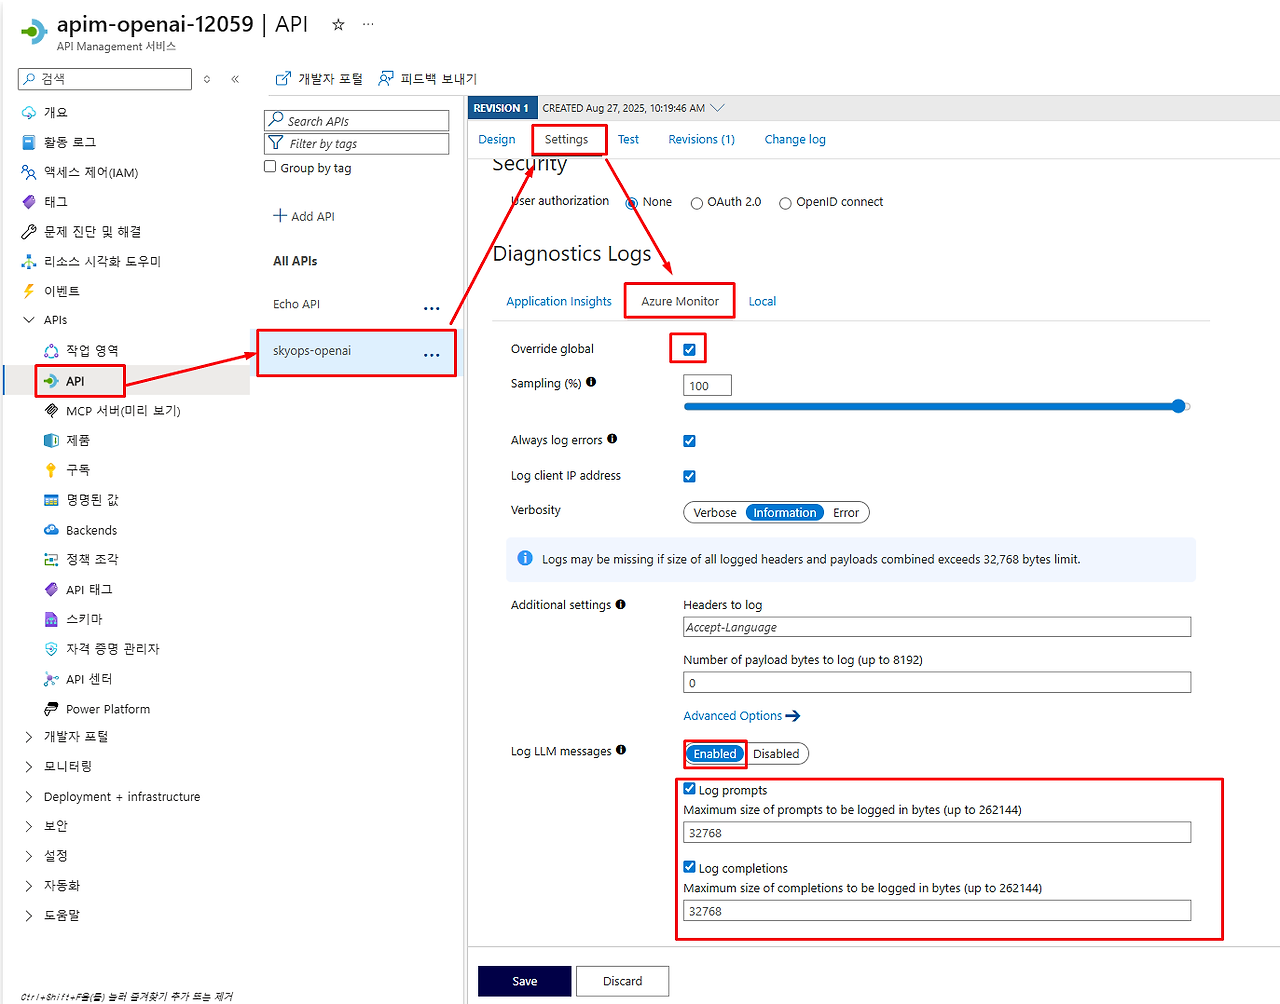
새로운 기능: 2025년 5월 업데이트가 된 LLM 로깅 기능은 스트리밍 시나리오를 포함하여 최대 2MB까지의 프롬프트와 응답을 32KB 청크 단위로 로깅할 수 있습니다.
참고 문서: API 로깅 설정에 대한 더 자세한 내용은 Microsoft 공식 문서를 참고하세요
→ API Management 모니터링 - API 로깅 설정 수정
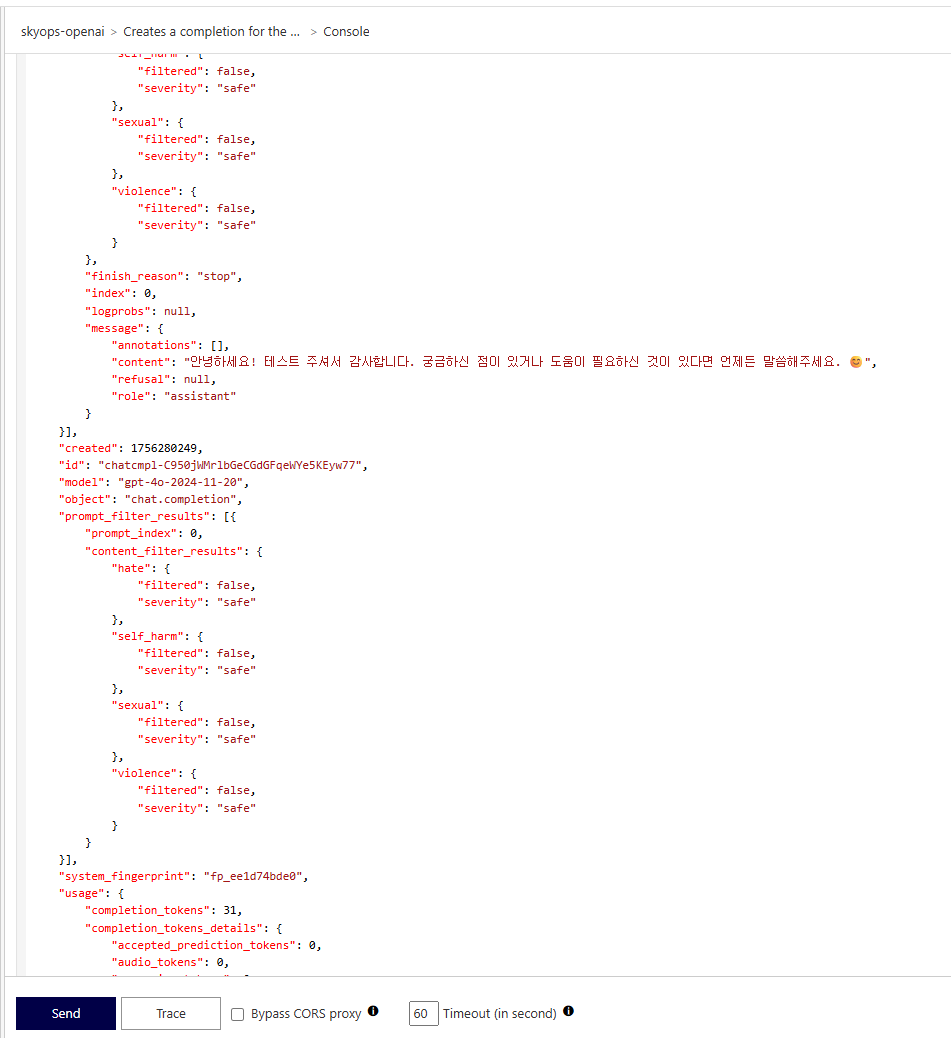
7. 연결 테스트 및 로그 확인
APIM 기본 테스트
API Management Portal에서 제공하는 테스트 기능을 사용하여 Azure OpenAI와의 연결을 확인합니다.
1. API Management → 'APIs' → 위에서 생성한 'Azure OpenAI Service' 선택
2. 'Test' 탭 클릭
3. 'Creates a completion for the chat message' 선택
4. 필수 파라미터 입력:
   - deployment-id: 배포한 모델명 (예: gpt-4o-deployment)
   - api-version: 2025-01-01-preview
5. Request body 예제:
   {
     "messages": [
       {"role": "user", "content": "안녕하세요, 테스트입니다."}
     ],
     "max_tokens": 100
   }
6. 'Send' 클릭
테스트 완료 화면
만약 deployment-id와 api-version을 모를 경우 Azure OpenAI 배포모델 메뉴에서 확인하시면 됩니다.
Log Analytics 로그 확인
API Management 진단 로그를 저장한 Log Analytics에서 ApiManagementGatewayLlmLog 테이블 선택 후 실행
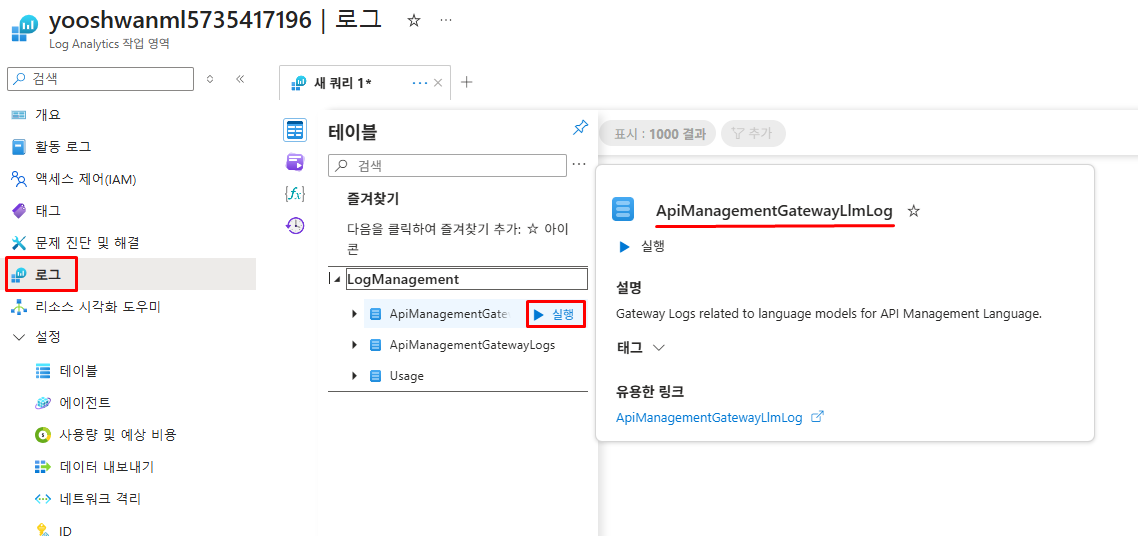
프롬프트/응답 메시지 확인

- 최초 로그가 나타나기까지 15-20분 소요
- ApiManagementGatewayLlmLog 테이블이 없다면 더 기다리거나 진단 설정 재확인 필요
- 로그가 보이지 않으면 API 설정에서 'LLM logging' 체크 상태 확인
일일 토큰 사용량 분석
프롬프트 로그 외에도 Kusto 쿼리를 통해 다양한 사용량 분석이 가능합니다. 아래는 일일 토큰 사용량을 집계하는 쿼리입니다.
ApiManagementGatewayLlmLog
| where TimeGenerated >= ago(1d)
| where coalesce(SequenceNumber, 0) == 0
| where tolong(TotalTokens) > 0
| summarize
  TotalRequests   = count(),
  PromptTokensSum = sum(tolong(PromptTokens)),
  CompletionTokensSum = sum(tolong(CompletionTokens)),
  TotalTokensSum  = sum(tolong(TotalTokens)),
  AvgTokensPerReq = avg(tolong(TotalTokens))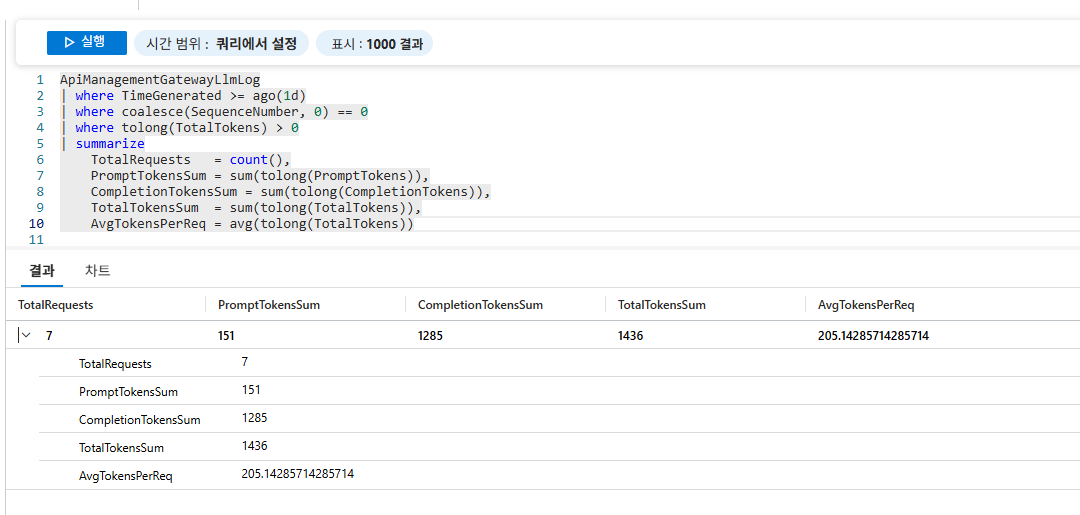
8. 외부 애플리케이션 연동 테스트
Python 클라이언트 구성 및 실행
이제 외부 애플리케이션에서 APIM을 통해 Azure OpenAI를 호출하는 테스트를 진행합니다.
import requests
import json
import os

def call_azure_openai_via_apim():
  """
  API Management를 통해 Azure OpenAI를 호출하는 함수
  """

  # APIM 및 Azure OpenAI 설정
  apim_url = "https://your-apim-instance.azure-api.net/openai"  # APIM Gateway URL 경로
  deployment_name = "gpt-4o-deployment"                         # 실제 배포 모델명
  api_version = "2025-01-01-preview"                            # LLM 로깅 지원 버전
  subscription_key = "your-apim-subscription-key"               # APIM 구독 키

  # 완전한 API 엔드포인트 URL 구성
  url = f"{apim_url}/deployments/{deployment_name}/chat/completions?api-version={api_version}"

  # 요청 헤더 설정
  headers = {
      "Content-Type": "application/json",
      "api-key": subscription_key  # APIM에서 구성한 인증 헤더
  }

  # 요청 본문 데이터
  payload = {
      "messages": [
          {
              "role": "system",
              "content": "You are an AI assistant that helps people find information."
          },
          {
              "role": "user",
              "content": "APIM을 거쳐 Azure OpenAI를 호출하는 구조를 간결하게 설명해 주세요."
          }
      ],
      "temperature": 0.7,      # 응답의 창의성 수준 (0.0-2.0)
      "top_p": 0.95,          # 어휘 다양성 제어 (0.0-1.0)
      "max_tokens": 800       # 응답 최대 길이 제한
  }

  try:
      # Azure OpenAI API 호출
      response = requests.post(url, headers=headers, json=payload, timeout=30)

      if response.status_code == 200:
          result = response.json()
          print("성공적으로 응답을 받았습니다.")
          print("응답 내용:")
          print(result['choices'][0]['message']['content'])

          # 토큰 사용량 정보 출력
          print("\n토큰 사용량:")
          usage = result.get('usage', {})
          print(f"  프롬프트 토큰: {usage.get('prompt_tokens', 'N/A')}")
          print(f"  완성 토큰: {usage.get('completion_tokens', 'N/A')}")
          print(f"  총 토큰: {usage.get('total_tokens', 'N/A')}")

          return result

      else:
          # HTTP 오류 상태 코드 처리
          print(f"HTTP 오류: {response.status_code}")
          print(f"오류 응답: {response.text}")
          return None

  except requests.exceptions.Timeout:
      print("요청 시간 초과 오류가 발생했습니다.")
      return None
  except requests.exceptions.RequestException as e:
      print(f"요청 중 오류가 발생했습니다: {e}")
      return None
  except json.JSONDecodeError:
      print("응답을 JSON으로 파싱하는 중 오류가 발생했습니다.")
      return None

# 메인 실행 부분
if __name__ == "__main__":
  print("APIM을 통한 Azure OpenAI 연결 테스트")
  print("=" * 60)

  # 기본 테스트
  print("\n기본 테스트:")
  result = call_azure_openai_via_apim()

  if result:
      print("\n테스트 완료! Log Analytics에서 로그를 확인하세요.")
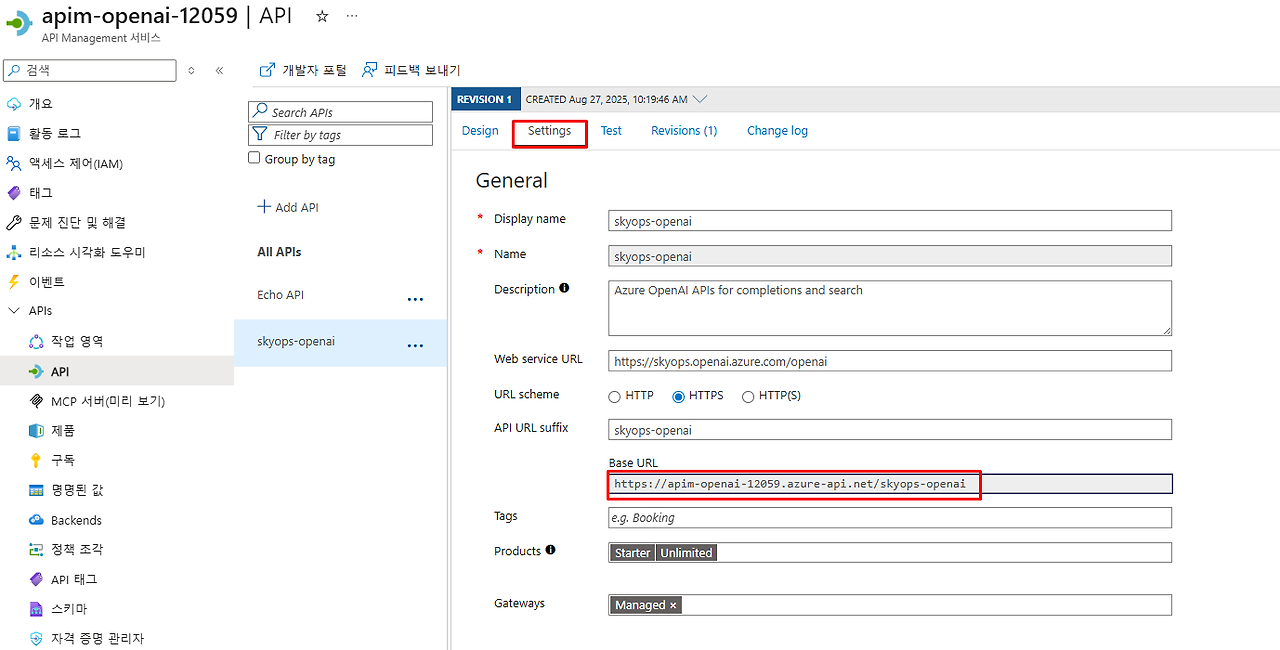
print("=" * 60)1. APIM Gateway URL 확인:
- API Management → 'API' → 'Settings' → Base URL 복사
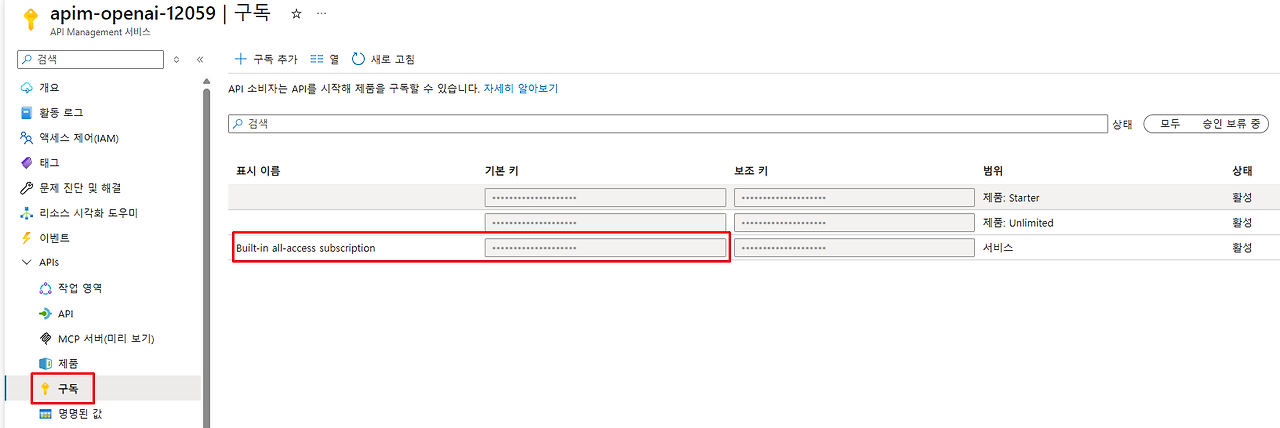
2. 구독키 확인:
- API Management → '구독' → 'Built-in all-access subscription'
- Primary key 또는 Secondary key 복사하여 코드에 사용
APIM Gateway URL 확인 화면
구독키 확인 화면
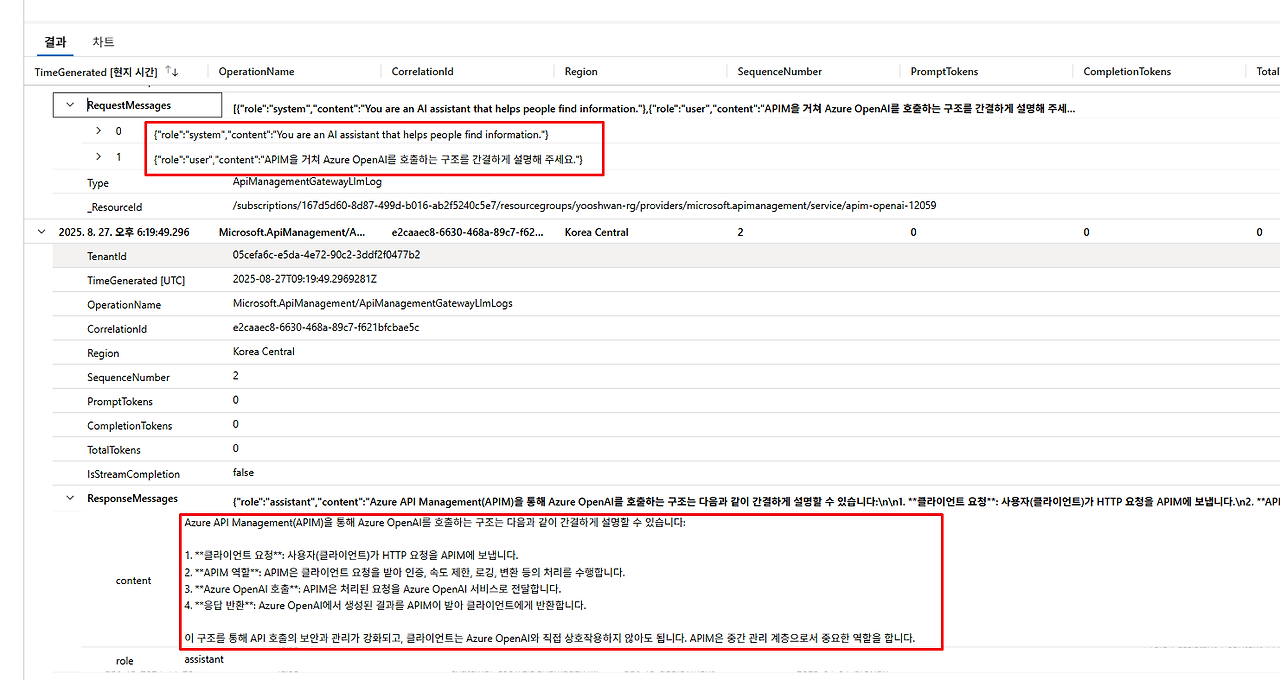
Python 스크립트 실행 결과 및 성공 응답

로그 확인
Python 애플리케이션 실행 후 Log Analytics에서 로그를 확인할 수 있습니다.
9. 보안 정책 테스트
Azure API Management는 위에서 다룬 로깅 기능 외에도 다양한 고급 기능을 제공합니다:
- 보안 정책: IP 필터링, 인증/권한 부여, CORS 정책
- 트래픽 관리: 속도 제한, 할당량 관리, 백엔드 라우팅
- 데이터 변환: 요청/응답 수정, 헤더 조작, JSON-XML 변환
- 캐싱: 응답 캐싱을 통한 성능 향상 및 비용 절감
본 섹션에서는 보안 정책 중 하나인 IP 필터링을 통해 Azure OpenAI 서비스 접근을 제한하는 방법을 실습해보겠습니다.
IP 제한 정책 구현
API Management에서 특정 IP 대역만 허용하는 보안 정책을 설정하고 테스트해보겠습니다.
1. API Management → 'APIs' → 'Azure OpenAI Service' 선택
2. 'Design' 탭 → 'Inbound processing' → '</> Code view' 클릭
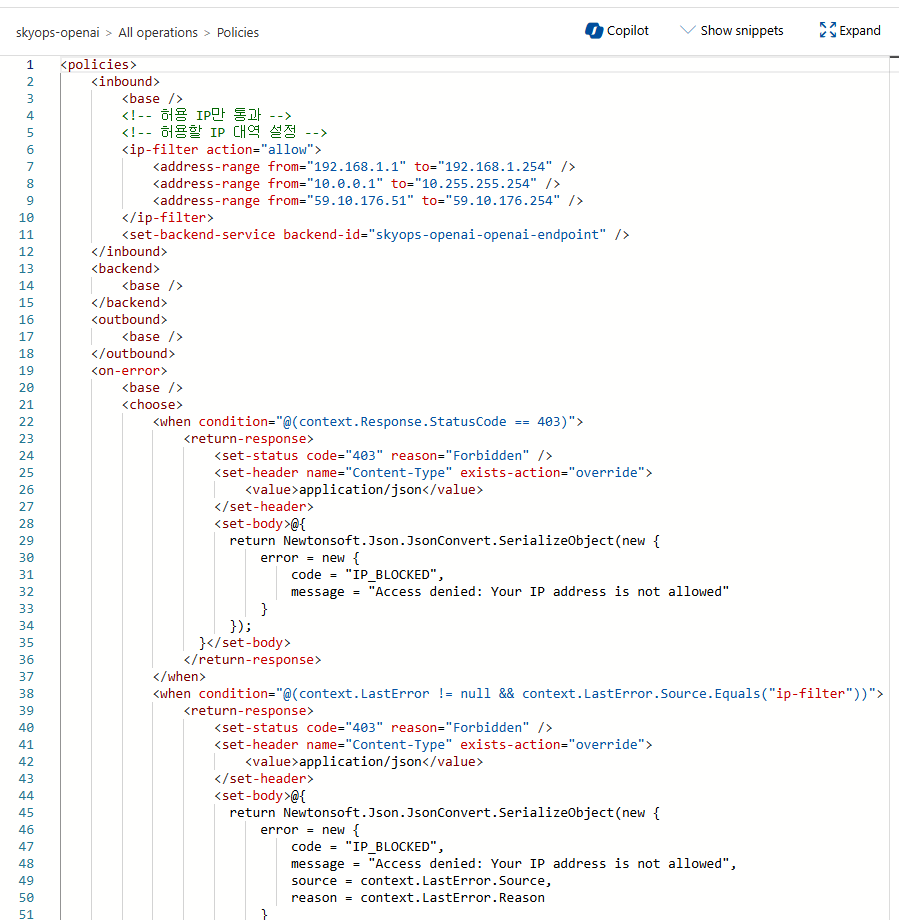
3. 정책 편집기에서 IP 필터 추가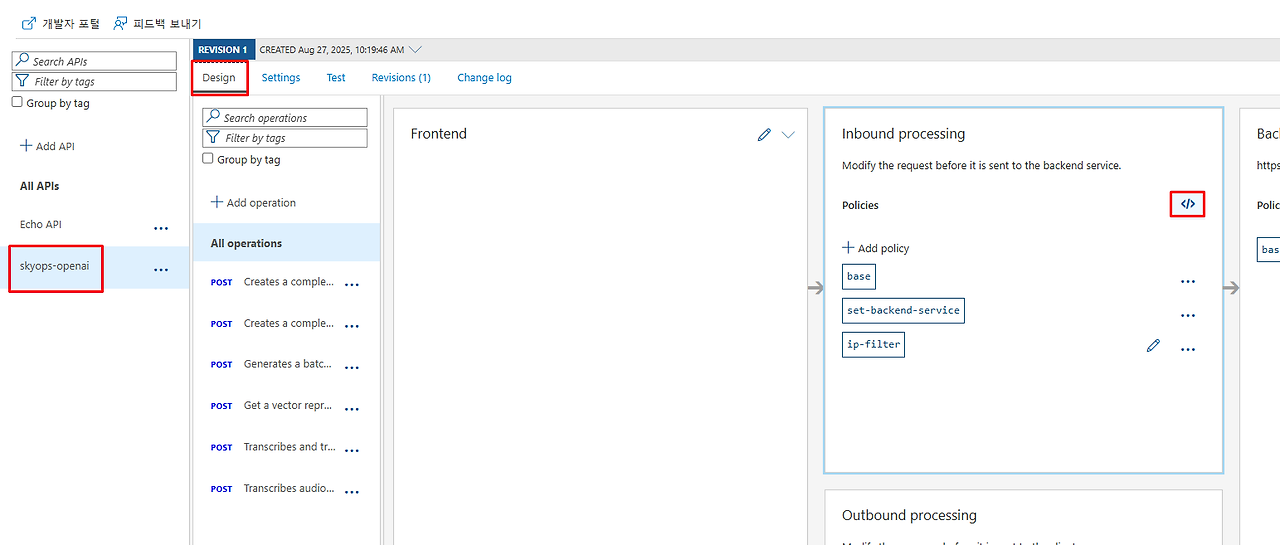
<policies>
  <inbound>
      <base />
      <!-- 허용 IP만 통과 -->
      <!-- 허용할 IP 대역 설정 -->
      <ip-filter action="allow">
          <address-range from="YOUR_OFFICE_IP_START" to="YOUR_OFFICE_IP_END" />
          <address-range from="YOUR_INTERNAL_NETWORK_START" to="YOUR_INTERNAL_NETWORK_END" />
          <!-- 예시: <address-range from="192.168.1.1" to="192.168.1.254" /> -->
          <!-- 예시: <address-range from="10.0.0.1" to="10.255.255.254" /> -->
      </ip-filter>
      <set-backend-service backend-id="YOUR_OPENAI_BACKEND_ID" />
  </inbound>

  <backend>
      <base />
  </backend>

  <outbound>
      <base />
  </outbound>

  <on-error>
      <base />
      <choose>
          <when condition="@(context.Response.StatusCode == 403)">
              <return-response>
                  <set-status code="403" reason="Forbidden" />
                  <set-header name="Content-Type" exists-action="override">
                      <value>application/json</value>
                  </set-header>
                  <set-body>@{
                      return Newtonsoft.Json.JsonConvert.SerializeObject(new {
                          error = new {
                              code = "IP_BLOCKED",
                              message = "Access denied: Your IP address is not allowed"
                          }
                      });
                  }</set-body>
              </return-response>
          </when>
          <when condition="@(context.LastError != null && context.LastError.Source.Equals("ip-filter"))">
              <return-response>
                  <set-status code="403" reason="Forbidden" />
                  <set-header name="Content-Type" exists-action="override">
                      <value>application/json</value>
                  </set-header>
                  <set-body>@{
                      return Newtonsoft.Json.JsonConvert.SerializeObject(new {
                          error = new {
                              code = "IP_BLOCKED",
                              message = "Access denied: Your IP address is not allowed",
                              source = context.LastError.Source,
                              reason = context.LastError.Reason
                          }
                      });
                  }</set-body>
              </return-response>
          </when>
      </choose>
  </on-error>
</policies>
정책 적용 예시 화면
접근 제한 테스트 및 차단 로그 분석
정책 적용 후 허용되지 않은 IP에서 접근을 시도하여 차단 기능을 테스트합니다.
허용 IP대역에서 접근했을 경우

허용 대역이 아닌 IP에서 접근했을 경우

Log Analytics에서 차단 로그 확인
ApiManagementGatewayLogs
| where TimeGenerated > ago(1h)
| where ResponseCode == 403
| project
  TimeGenerated,
  CallerIpAddress,
  RequestUrl = Url,
  ResponseCode,
  ResponseSize,
  RequestHeaders,
  OperationName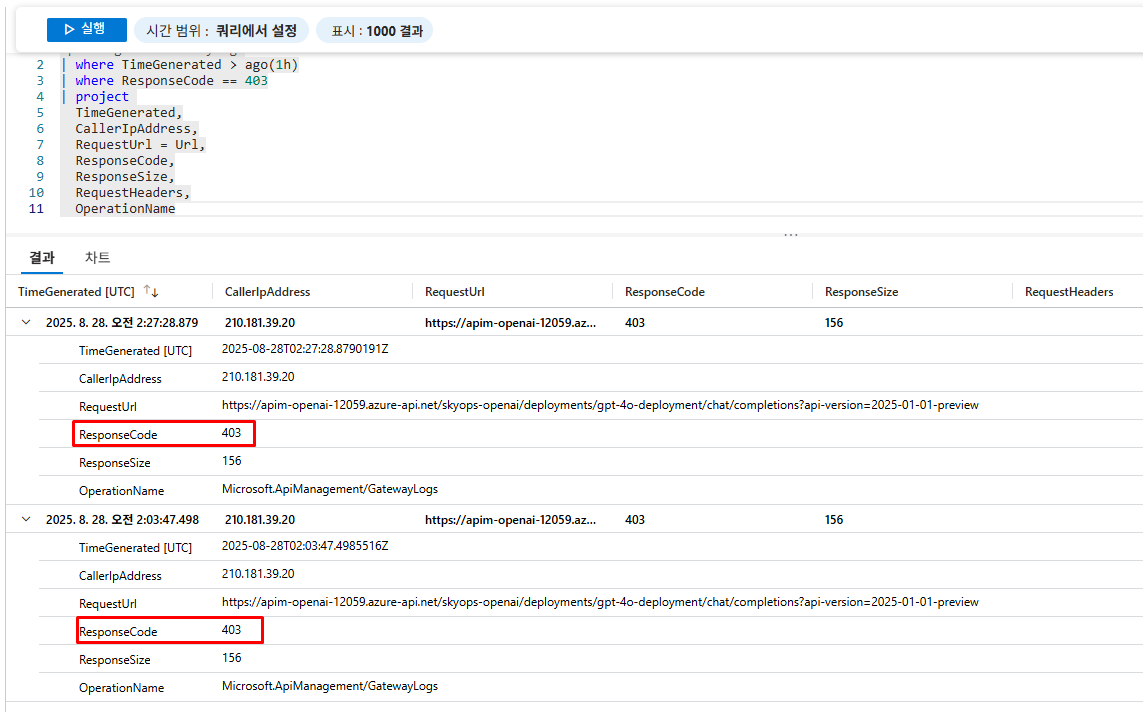
- ✅ 허용되지 않은 IP에서 403 Forbidden 응답 확인
- ✅ 사용자 정의 차단 메시지 정상 표시
- ✅ Log Analytics에서 차단 이벤트 정확히 기록
- 개발자 IP 확인: 자신의 현재 IP가 허용 목록에 포함되어 있는지 확인
- 프로덕션 준비: 운영 환경 적용 전 충분한 테스트 필요
- Azure 서비스 대역 허용 여부: Azure Portal의 API Management 테스트 기능도 Azure 서비스 IP 대역에서 실행
✨ 결론
Azure API Management를 통한 Azure OpenAI 프롬프트 로깅은 다음과 같은 핵심 이점을 제공합니다:
- 완전한 투명성: 모든 프롬프트와 응답의 상세 로깅
- 스트리밍 지원: 2025년 업데이트로 실시간 스트리밍 로깅 지원
- 사용량 추적: 구독키별 토큰 사용량 및 비용 분석
- 보안 강화: IP 제한, 구독 관리, 사용량 제한
- 확장성: 대용량 로그(최대 2MB)의 청크 단위 처리
프로덕션 환경에서는 비용 최적화를 위해 로그 보존 정책을 설정하고, 알람 규칙을 구성하여 이상 사용량을 모니터링하는 것을 권장합니다.
이 포스트는 2025년 8월 기준 최신 Azure 공식 문서를 바탕으로 작성되었습니다. 최신 정보는 Microsoft Learn - Azure API Management와 Azure OpenAI 문서에서 확인하실 수 있습니다.
'IT이야기 > Azure' 카테고리의 다른 글
| 컴퓨팅을 위한 Azure 절약 플랜과 Azure 예약을 위한 Azure 절약 플랜의 차이점은 무엇입니까? (1) | 2025.11.25 |
|---|---|
| Azure에서 합병, 인수 및 이동을 처리하는 방법 (4) | 2025.08.07 |
| 마이그레이션을 위해 Azure VMware Solution 노드의 크기를 조정하는 방법 (3) | 2025.08.07 |
| VMware HCX를 사용하여 Azure VMware 솔루션으로 워크로드 마이그레이션: 실용 가이드 (5) | 2025.07.02 |
| VMware HCX란 무엇이며 어떻게 작동합니까? (1) | 2025.06.10 |