728x90

이번엔 WMI(Windows Management Instrument) 를 이용해 SQL서버를 관리하는 방법에 대해 말씀드릴려고 합니다.

SQL를 관리를 위한 WMI Object 를 아래처럼 가져올 수 있습니다.

이 오브젝트는 클래스들의 인스턴스 집합이기 때문에 SQL를 위한 네임스페이스를 사용합니다.

Get-WmiObject -namespace root\Microsoft\SqlServer\ComputerManagement10 –list | Where-Object {-not ($_.Name -like ‘__*’)}

[2005] 의 경우 -namespace root\Microsoft\SqlServer\ComputerManagement


많은 클래스들이 있지만 우선 SQL Service 클래스를 살펴보면

Get-WmiObject -namespace root\Microsoft\SqlServer\ComputerManagement10 -class SqlService | Select-Object ServiceName, DisplayName, SQLServiceType, State, ProcessId | Format-Table -wrap


설치된 SQL 기본 인스턴스들을 확인할 수 있습니다.

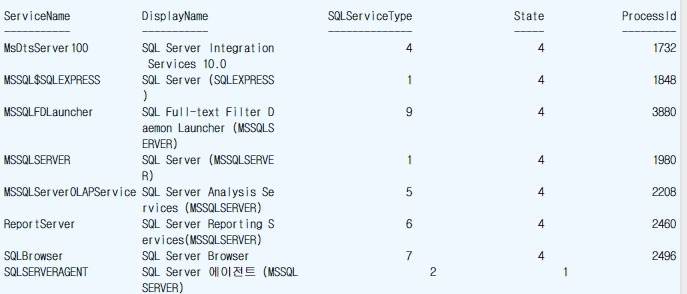
여기서 Service States 가 나타내는 숫자는 아래와 같은 의미를 가집니다.


1 Stopped. The service is stopped.

2 Start Pending. The service is waiting to start.

3 Stop Pending. The service is waiting to stop.

4 Running. The service is running.

5 Continue Pending. The service is waiting to continue.

6 Pause Pending. The service is waiting to pause.

7 Paused. The service is paused.


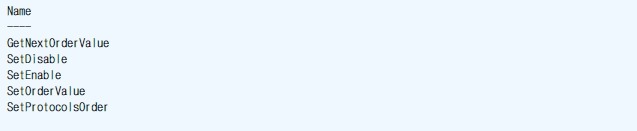
그럼 여기서 사용할 수 있는 메소드들을 확인해 볼까요

Get-WmiObject -namespace root\Microsoft\SqlServer\ComputerManagement10 –class SqlService | Get-Member -MemberType method


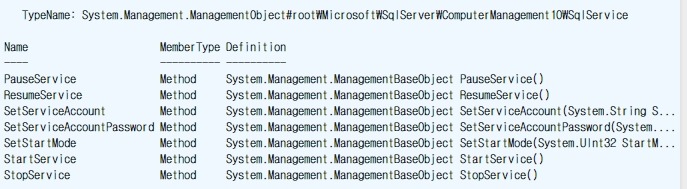
여기선 주로 서비스 계정을 설정 하거나 서비스를 시작 중지 시키는 메소드들 뿐이네요.


위의 메소드를 활용해서 MSSQL Server Instance 계정을 local system에서 도메인 계정으로 변경해 볼까요


$strUser = "DOMAIN\account"

$strPass= "비밀번호"

$wSqlservice = Get-WmiObject –namespace root\Microsoft\SqlServer\ComputerManagement10 -class SqlService –filter "ServiceName='MSSQLSERVER'"

$wSqlservice.SetServiceAccount($strUser, $strPass)

$wSqlservice.StopService()

$wSqlservice.StartService()


그럼 이번엔 SQL Agent Service를 자동으로 실행되게 변경해 볼까요

$sqlservice = Get-WmiObject –namespace root\Microsoft\SqlServer\ComputerManagement10 -class SqlService –filter "ServiceName='SQLSERVERAGENT'"

$sqlservice.SetStartMode(2)

#2 Service is started automatically

#3 Service is started manually

#4 Service is disabled


변경이 잘 되었네요 ^^


참고로 –computerName 이란 프로퍼티를 이용하면 원격지의 WMI Object를 가져올 수 있습니다.

Get-WmiObject .computerName 컴퓨터이름 -namespace

root\Microsoft\SqlServer\ComputerManagement10 -class SqlService -filter

"ServiceName=’MSSQL`$Instance’"


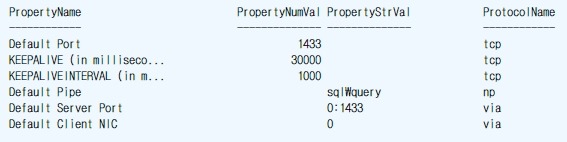
다음편엔 ServerNetworkProtocolProperty 클래스를 확인해 볼 예정입니다.

참고: SQL Server Administration with Windows PowerShell

원본: http://vstarmanv.tistory.com/entry/MSSQLWMI-for-SQL-Management1

728x90
728x90

ClientNetworkProtocol Client 의 네트워크 접속 프로토콜의 정의와 우선순위를 결정하는 클래스입니다.

지난번과 같이 WMIObject ClientNetworkProtocol 클래스를 가져와 볼까요

Get-WmiObject -namespace root\Microsoft\SqlServer\ComputerManagement10 -class ClientNetworkProtocol | Select-Object ProtocolName, ProtocolDisplayName, ProtocolOrder


저 같은 경우 로컬에 SQL이 깔려있기 때문에 우선순위 첫번째가 메모리로 나오네요
원격인 경우 TCP 1 로 보입니다. 참고로 ProtocolOrder 0은 비사용중임을 나타냅니다.


이 클래스의 메소드들은..

Get-WmiObject -namespace root\Microsoft\SqlServer\ComputerManagement10 -class ClientNetworkProtocol |
Get-Member -memberType Method | Select-Object Name


이와 같이 프로토콜의 사용여부와 우선순위를 설정하는 메소드들입니다.


위에 메소드를 이용한 아래의 간단한 스크립트는 Named Pipes 를 비사용으로 바꾸는 역할을 합니다.

$WClientNetProtol=Get-WmiObject –namespace root\Microsoft\SqlServer\ComputerManagement10 -class ClientNetworkProtocol -filter "ProtocolName='np'"
$WClientNetProtol.SetDisable()


Named Pipes가 비사용중으로 바뀌었네요


ClientNetworkProtocol의 속성 변경을 원할 경우 ClientNetworkProtocolProperty 클래스를 이용하시면 됩니다.

살짝 살펴보면 ..

Get-WmiObject -namespace root\Microsoft\SqlServer\ComputerManagement10 -class

ClientNetworkProtocolProperty | Select-Object PropertyName, PropertyNumVal, PropertyStrVal,ProtocolName


기본접속 포트가 1433으로 설정되어 있네요


아래는 TCP/IP 프로토콜의 기본접속 포트를 1433에서 15886로 변경하는 스크립트입니다.

$WClientNetProto=Get-WmiObject –namespace root\Microsoft\SqlServer\ComputerManagement10 –class
ClientNetworkProtocolProperty -filter "PropertyName='Default Port'"

$ WClientNetProto.SetNumericalValue(15886)


참고: SQL Server Administration with Windows PowerShell

원본: http://vstarmanv.tistory.com/entry/MSSQLWMI-for-SQL-Management2

728x90
728x90

PowerShell 을 이용해서 대량의 파일을 대상으로 내부 내용을 변경 하는 방법을 찾아 보았습니다.

PowerShell 에는 -replace 연산자가 존재하는데, 마치 리눅스의 sed 명령어 처럼 쓸 수 있습니다.

"wow nice olleh" | %{$_ -Replace ("nice","OLLEH")}


이 연산자를 사용해서 대량의 파일을 대상으로 내용을 변경 하는 것도 가능 한데요, 아래의 구조로 된 폴더를 예로 들겠습니다.


폴더의 내부에 존재하는 각 파일의 내용에는 nice 라는 문자열이 존재합니다.


만약, "MyDocument" 디렉터리및 하위 디렉터리의 모든 *.txt 파일을 대상으로 파일 내용 중 "nice" 를 "OLLEH" 라고 바꾸고 싶다면, 아래 명령어를 사용하면 됩니다.

dir -Path MyDocument -Include *.txt -Recurse | %{$tmp = Get-Content $_; $tmp=$tmp -Replace ("nice","OLLEH"); Set-Content $_ $tmp}


파일의 내용 중 nice 가 모두 OLLEH 로 변경 된 것을 확인 할 수 있습니다.

대량 변경 작업시에 유용하게 사용 할 수 있을 것 같네요. ^^


<참고 URL>
http://www.myitforum.com/articles/40/view.asp?id=11843
http://blogs.msdn.com/b/zainnab/archive/2007/07/09/grep-and-sed-with-powershell.aspx

<참고 도움말>
about_Comparison_Operators

감사합니다.

출처: https://svrstudy.tistory.com/81?category=352377 [Windows Server 공부방]

728x90
728x90

$sqlConnection = New-Object system.data.sqlclient.sqlconnection "server=서버명또는IP;database=DatabaseName;user=계정;비밀번호;trusted_connection=true"
$sqlConnection.Open()
$sqlCommand = $sqlConnection.CreateCommand()
$sqlCommand.CommandText = "Select ResourceId, UserAtHost cnt FROM Resource"
$sqlReader = $sqlCommand.ExecuteReader()
while($sqlReader.Read())
{
$sqlReader["ResourceId"]
$sqlReader["UserAtHost"]
}
$sqlConnection.Close()

728x90
728x90

$message = '<META HTTP-EQUIV="Content-Type" CONTENT="text/html; charset=UTF-8"><html><head></head><body lang=FR-CA>This is the body of the message 사랑한다요~~~</body></html>'

send-MailMessage -to "test001@contoso.com" -Encoding ([System.Text.Encoding]::UTF8) -subject "PowerShell Rocs" -from "test001@contoso.com"  -bodyasHTML -body $message -smtpserver "메일서버주소"


If you want to send your mail to multiple recipients, use the following syntax for the -to  parameter :

@("bozo@domain.com","toto@domain.com")


728x90
728x90

$date=Get-Date

$date=$date.AddDays(-30)

Get-MailboxStatistics | Where {$_.LastLogonTime -lt $date} | where{$_.DisplayName –notlike “system*”} | where{$_.DisplayName –notlike “CAS_*”}|disable-Mailbox –confirm:$false

위 내용이 파워셀에서 라인 by 라인으로 실행 해서 잘 동작하면,

http://bbs.freechal.com/ComService/Activity/BBS/CsBBSContent.asp?GrpId=231318&ObjSeq=20&PageNo=2&DocId=133236629 를 참고해서, 위 내용을

PS1 저장한 뒤

http://bbs.freechal.com/ComService/Activity/BBS/CsBBSContent.asp?GrpId=231318&ObjSeq=20&PageNo=2&DocId=133266729

위 내용을 보고, 스케줄러로 등록해서 하시면 됩니다.


단, 위 내용은 로컬에서 충분히 테스트 해 보시고 검토하시기 바랍니다.

이 파워셀로 인한 어떤 피해도 책임지지 않습니다. :)

728x90
728x90

서비스 재시작

#Get List of Microsoft Exchange Services

$services = Get-Service | ? { $_.name -like "MSExchange*" -and $_.Status -eq "Running"}


#Restart each service

foreach ($service in $services)

{

Restart-Service $service.name -Force

} 


중지 된 서비스 시작

#Get List of Microsoft Exchange Services

$services = Get-Service | ? { $_.name -like "MSExchange*" -and $_.Status -eq "Stopped"}


#Restart each service

foreach ($service in $services)

{

Restart-Service $service.name -Force

} 


728x90
728x90

아래를 잘 할용해서 Mail까지 보낼수 있을 듯하다.

코드

 $freespace = Get-WmiObject -Class Win32_logicalDisk | ? {$_.DriveType -eq '3'}

$drive = ($FreeSpace.DeviceID).Split("=")
#"Your $drive Free Space Percentage is {0:P2}" -f ($freespace.FreeSpace / $freespace.Size)
 
[String]::Format("Your $Drive Free Space Percentage is {0:P2}" -f ($freespace.FreeSpace / $freespace.Size))


728x90
728x90
Install-windowsfeature -name AD-Domain-Services –IncludeManagementTools


728x90
728x90

1.  c:\user.csv 생성한다

   user.csv 편집하에 첫줄에 username 두번째 줄에는 smtp계정( 예- test001)을 줄 단위로 넣어준다

   username

   test001

   test002

   test003

   .

   .

   .


2. 파워쉘 실행

$user = import-csv c:\user.csv

Foreach($userall in $user)

{

$temp = $userall.username

For ($i=1;$i -lt 100; $i++)

{

Send-MailMessage –From test001@contoso.com –To $temp@contoso.com –Subject “Test Email 00$i” –Body “Test E-mail (body) $i” -SmtpServer mail.contoso.com

}

}

엔터


=================================================================================================================================
FYI...

Powershell에서 For, While, Swich를 이용해서 반복문을 작성할 수 있습니다.


Step 1 : For


For문을 이용해서 i변수에 1부터 입력해서 10까지 합계를 계산을 합니다첫번째 인자는 변수 초기화두번째 인자는 조건문세번째 인자는 증감을 설정을 합니다.


$sum = 0

For ($i=1;$i -lt 11; $i++)

{

    $sum += $i

}


$sum


Step 2 : While


While문을 이용해서 i변수를 이용해서 1부터 10까지 합계를 계산을 합니다.


$sum = 0

$i = 0

while($i -lt 11)

{   

    $sum += $i

    $i++

}


$sum


아래의 Script For문을 While문처럼 사용한 예입니다.


$sum = 0

$i = 0

for(;$i -lt 11;)

{   

    $sum += $i

    $i++

}


$sum


Step 3 : Swtich


Powershell에서 Swtich를 이용해서 반복문을 작성할 수 있습니다아래의 Script문은 배열 변수를 인자로 받아서1~10까지 반복을 합니다. Switch블락에서 변수는 $_기호를 이용해서 사용할 수 있습니다.


$sum = 0

$array = 1..10

switch($array)

{

    Default {

    if($_ -gt 11)

    {

        break;

    }


    $sum += $_  


    }   

}


$sum


참고 자료


about_Do

http://technet.microsoft.com/ko-kr/library/dd315317.aspx

about_For

http://technet.microsoft.com/ko-kr/library/dd347609.aspx


about_Switch

http://technet.microsoft.com/ko-kr/library/dd347715.aspx

끝.


728x90

+ Recent posts