윈도우7 지원 종료가 2020년 1월14일 끝났지만, 피치 못할 환경으로 윈도우7/윈도우2008 업데이트 지원을 받을 수 있습니다.
물론 계약을 해야 가능 하므로 비용 발생이 됩니다.
MS ESU(Extended Security Updates) 계약이 있는 것을 알았습니다.
최대 3년간 받을 수 있다고 하네요.
연장된 보안 업데이트(ESU) 프로그램이란 무엇인가요?
연장된 보안 업데이트(ESU) 프로그램은 지원이 종료된 후에 특정 레거시 Microsoft 제품을 실행해야 하는 고객을 위해 마지막 수단으로 제공되는 옵션입니다. 제품의 추가 지원 날짜가 종료된 후 최대 3년 동안 필수* 및/또는 중요* 보안 업데이트를 포함합니다.
사용 가능한 경우 연장된 보안 업데이트가 배포됩니다. ESU에는 새로운 기능, 고객 요청 비보안 업데이트 또는 디자인 변경 요청은 포함되지 않습니다.
운영 체제가 그때까지 지원되므로 모든 Windows 7 및 Windows Server 2008/R2 고객은 2020 년 1월 14일에 업데이트를 받게 됩니다. 2020년 1월 14일 이후에 이 운영 체제에 대한 업데이트는 ESU 고객에게만 해당합니다.
Windows 7 ESU(확장 보안 업데이트)에는 무엇이 포함되어 있습니까?
Windows 7 ESU에는 MSRC(Microsoft 보안 대응 센터)에서 정의한 중요한 문제에 대한 2020년 1월 14일 이후 최장 3년 간의 보안 업데이트가 포함되어 있습니다. 2020년 1월 14일 이후에 PC에서 Windows 7을 실행하고 있으나 확장 보안 업데이트는 구입되어 있지 않은 경우 컴퓨터는 더 이상 보안 업데이트를 받지 않습니다.
보안 업데이트만이 필요한 경우 고객은 무료로 다음 제품에 대한 연장된 보안 업데이트를 받을 수 있습니다.
SQL 및 Windows Server 2008/R2: 워크로드를 “있는 그대로” Azure 가상 머신(IaaS)으로 이동하려는 고객은 지원이 종료된 후 3년 동안 SQL Server와 Windows Server 2008 및 2008 R2 모두에 대해 연장된 보안 업데이트에 무료로 액세스할 수 있습니다.
.NET 3.5 SP1, .NET 4.5.2 및 .NET 4.6은 Windows Server 2008 ESU 동안 지원됩니다.
.NET 3.5 SP1 및 .NET 4.5.2부터 .NET 4.8까지는 Windows Server 2008 R2 및 Windows 7 ESU 단계 동안 지원됩니다.
Windows Server와 SQL Server 2008, 2008 R2에 대한 보안 연장 업데이트 비용은 어떻게 되나요?
Azure:
Azure에서 Windows Server 또는 SQL Server 2008, 2008 R2를 실행하는 고객은 가상 머신을 실행하는 요금 외에 추가 비용 없이 보안 연장 업데이트를 받을 수 있습니다. Azure SQL Database Managed Instance (PaaS)로 이동하는 고객은 보안 연장 업데이트가 필요치 않습니다. 완벽한 관리형 솔루션이기 때문에 Microsoft가 항상 업데이트하고 패치합니다.
사내 데이터센터(on-Premises):
활성 Software Assurance 또는 구독 라이선스를 보유한 고객은 온-프레미스 라이선스 연간 비용의 약 75%에 해당하는 가격으로 보안 연장 업데이트를 구입할 수 있습니다. 가격은 게시된 가격표에서 확인할 수 있습니다. 자세한 내용은 해당 지역의 Microsoft 파트너 또는 영업 팀에 문의하세요.
호스팅 환경:
SPLA 공인 호스팅 업체에서 Windows Server 또는 SQL Server 2008/2008 R2를 구입한 고객은 Enterprise 또는 Server 및 Cloud Enrollment에서 보안 연장 업데이트를 별도로 구입해야 합니다. 온-프레미스 라이선스 연간 비용의 약 75% 가격으로 Microsoft에서 직접 구입하거나 Microsoft 리셀러를 통해 구입합니다. Microsoft 리셀러를 통해 판매되는 보안 연장 업데이트의 가격은 리셀러가 책정합니다. Windows Server 보안 연장 업데이트의 가격은 Windows Server Standard의 코어당 가격을 기준으로 책정됩니다. 호스팅된 가상 머신의 가상 코어 수를 기반으로 하며 인스턴스당 최소 16개의 라이선스가 적용됩니다. SQL Server 보안 연장 업데이트의 가격은 SQL Server의 코어당 가격을 기준으로 책정됩니다. 호스팅된 가상 머신의 가상 코어 수를 기반으로 하며 인스턴스당 최소 4개의 라이선스가 적용됩니다. Software Assurance는 필요하지 않습니다. 자세한 내용은 해당 지역의 Microsoft 리셀러 또는 영업 팀에 문의하세요.
ProcDump is a command-line utility whose primary purpose is monitoring an application for CPU spikes and generating crash dumps during a spike that an administrator or developer can use to determine the cause of the spike. ProcDump also includes hung window monitoring (using the same definition of a window hang that Windows and Task Manager use), unhandled exception monitoring and can generate dumps based on the values of system performance counters. It also can serve as a general process dump utility that you can embed in other scripts.
Using ProcDump
usage: procdump [-a] [[-c|-cl CPU usage] [-u] [-s seconds]] [-n exceeds] [-e [1 [-b]] [-f ] [-g] [-h] [-l] [-m|-ml commit usage] [-ma | -mp] [-o] [-p|-pl counter threshold] [-r] [-t] [-d ] [-64] <[-w]< process name or service name or PID> [dump file] | -i | -u | -x
[arguments]> ] [-? [ -e]
ParameterDescription
-a
Avoid outage. Requires -r. If the trigger will cause the target to suspend for a prolonged time due to an exceeded concurrent dump limit, the trigger will be skipped.
-at
Avoid outage at Timeout. Cancel the trigger's collection at N seconds.
-b
Treat debug breakpoints as exceptions (otherwise ignore them).
-c
CPU threshold at which to create a dump of the process.
-cl
CPU threshold below which to create a dump of the process.
-d
Invoke the minidump callback routine named MiniDumpCallbackRoutine of the specified DLL.
-e
Write a dump when the process encounters an unhandled exception. Include the 1 to create dump on first chance exceptions.
-f
Filter the first chance exceptions. Wildcards (*) are supported. To just display the names without dumping, use a blank ("") filter.
-fx
Filter (exclude) on the content of exceptions and debug logging. Wildcards are supported.
-g
Run as a native debugger in a managed process (no interop).
-h
Write dump if process has a hung window (does not respond to window messages for at least 5 seconds).
-i
Install ProcDump as the AeDebug postmortem debugger. Only -ma, -mp, -d and -r are supported as additional options.
-k
Kill the process after cloning (-r), or at the end of dump collection
-l
Display the debug logging of the process.
-m
Memory commit threshold in MB at which to create a dump.
-ma
Write a dump file with all process memory. The default dump format only includes thread and handle information.
-mc
Write a custom dump file. Include memory defined by the specified MINIDUMP_TYPE mask (Hex).
-md
Write a Callback dump file. Include memory defined by the MiniDumpWriteDump callback routine named MiniDumpCallbackRoutine of the specified DLL.
-mk
Also write a Kernel dump file. Includes the kernel stacks of the threads in the process. OS doesn't support a kernel dump (-mk) when using a clone (-r). When using multiple dump sizes, a kernel dump is taken for each dump size.
-ml
Trigger when memory commit drops below specified MB value.
-mm
Write a mini dump file (default).
-mp
Write a dump file with thread and handle information, and all read/write process memory. To minimize dump size, memory areas larger than 512MB are searched for, and if found, the largest area is excluded. A memory area is the collection of same sized memory allocation areas. The removal of this (cache) memory reduces Exchange and SQL Server dumps by over 90%.
-n
Number of dumps to write before exiting.
-o
Overwrite an existing dump file.
-p
Trigger on the specified performance counter when the threshold is exceeded. Note: to specify a process counter when there are multiple instances of the process running, use the process ID with the following syntax: "\Process(_)\counter"
-pl
Trigger when performance counter falls below the specified value.
-r
Dump using a clone. Concurrent limit is optional (default 1, max 5). CAUTION: a high concurrency value may impact system performance. - Windows 7 : Uses Reflection. OS doesn't support -e. - Windows 8.0 : Uses Reflection. OS doesn't support -e. - Windows 8.1+: Uses PSS. All trigger types are supported.
-s
Consecutive seconds before dump is written (default is 10).
-t
Write a dump when the process terminates.
-u
Treat CPU usage relative to a single core (used with -c). As the only option, Uninstalls ProcDump as the postmortem debugger.
-w
Wait for the specified process to launch if it's not running.
-wer
Queue the (largest) dump to Windows Error Reporting.
-x
Launch the specified image with optional arguments. If it is a Store Application or Package, ProcDump will start on the next activation (only).
-64
By default ProcDump will capture a 32-bit dump of a 32-bit process when running on 64-bit Windows. This option overrides to create a 64-bit dump. Only use for WOW64 subsystem debugging.
-?
Use -? -e to see example command lines.
If you omit the dump file name, it defaults to< processname>_.dmp.
Use the -accepteula command line option to automatically accept the Sysinternals license agreement.
Automated Termination: Setting an event with name "procdump-" is the same as typing Ctrl+C to gracefully terminate ProcDump
Filename: Default dump filename: PROCESSNAME_YYMMDD_HHMMSS.dmp The following substitutions are supported: PROCESSNAME Process Name Process ID PID EXCEPTIONCODE Exception Code YYMMDD Year/Month/Day HHMMSS Hour/Minute/Second
Examples
Write a mini dump of a process named 'notepad' (only one match can exist):
C:\>procdump notepad
Write a full dump of a process with PID '4572':
C:\>procdump -ma 4572
Write 3 mini dumps 5 seconds apart of a process named 'notepad':
C:\>procdump -s 5 -n 3 notepad
Write up to 3 mini dumps of a process named 'consume' when it exceeds 20% CPU usage for five seconds:
C:\>procdump -c 20 -s 5 -n 3 consume
Write a mini dump for a process named 'hang.exe' when one of it's Windows is unresponsive for more than 5 seconds:
C:\>procdump -h hang.exe hungwindow.dmp
Write a mini dump of a process named 'outlook' when total system CPU usage exceeds 20% for 10 seconds:
C:\>procdump outlook -p "\Processor(_Total)\% Processor Time" 20
Write a full dump of a process named 'outlook' when Outlook's handle count exceeds 10,000:
C:\>procdump -ma outlook -p "\Process(Outlook)\Handle Count" 10000
Write a MiniPlus dump of the Microsoft Exchange Information Store when it has an unhandled exception:
C:\>procdump -mp -e store.exe
Display without writing a dump, the exception codes/names of w3wp.exe:
C:\>procdump -e 1 -f "" w3wp.exe
Write a mini dump of w3wp.exe if an exception's code/name contains 'NotFound':
C:\>procdump -e 1 -f NotFound w3wp.exe
Launch a process and then monitor it for exceptions:
C:\>procdump -e 1 -f "" -x c:\dumps consume.exe
Register for launch, and attempt to activate, a modern 'application'. A new ProcDump instance will start when it activated to monitor for exceptions:
Register as the Just-in-Time (AeDebug) debugger. Makes full dumps in c:\dumps.
C:\>procdump -ma -i c:\dumps
See a list of example command lines (the examples are listed above):
C:\>procdump -? -e
Related Links
Windows Internals Book The official updates and errata page for the definitive book on Windows internals, by Mark Russinovich and David Solomon.
Windows Sysinternals Administrator's Reference The official guide to the Sysinternals utilities by Mark Russinovich and Aaron Margosis, including descriptions of all the tools, their features, how to use them for troubleshooting, and example real-world cases of their use.
When I am attempting to investigate a setup-related failure, I typically end up looking at verbose log files. These log files can contain information about a wide variety of failures, and the failures will typically include some detailed error information (such as the information reported by the GetLastError and FormatMessage APIs or something equivalent to them). In the case of verbose Windows Installer log files, I find the error information in most cases by searching for the text "return value 3" as described in this blog post.
Once I find the error information, I can often recognize the error codes from my past experience. However, there are also a lot of cases where I run into error codes that I do not recognize from past experience. When that happens, I use a tool that helps me translate error codes (normally HRESULT values from function calls) into more readable information. Doing this can help me better understand what the error means, which in turn can help give ideas for what might be causing the error and what types of fixes might help eliminate the error.
Recently, I discovered that the tool that I've been using to do error code translation is available on the Microsoft Download Center so that anyone can get a copy and use it themselves. You can find the tool, called Err.exe, at http://www.microsoft.com/downloads/details.aspx?familyid=be596899-7bb8-4208-b7fc-09e02a13696c. This site describes the tool as an Exchange Server Error Code Look-up, but this tool actually aggregates information from 172 sources (header files, etc) from Windows and various other products around Microsoft and is not only useful for Exchange Server issues.
For example, it includes information from corerror.h (a header file that ships with the .NET Framework SDK and Windows SDK) so it can report error information for some types of .NET Framework errors. Here are a couple of specific examples of the output produced by err.exe:
For error code 0x8002802F (described in more detail here):
Err.exe 0x8002802F # for hex 0x8002802f / decimal -2147319761 : TYPE_E_DLLFUNCTIONNOTFOUND winerror.h # Function not defined in specified DLL. # 1 matches found for "0x8002802F"
For error code 0x80070005 (described in more detail here):
Err.exe 0x80070005 # for hex 0x80070005 / decimal -2147024891 : COR_E_UNAUTHORIZEDACCESS corerror.h # MessageText: # Access is denied. DIERR_OTHERAPPHASPRIO dinput.h DIERR_READONLY dinput.h DIERR_HANDLEEXISTS dinput.h DSERR_ACCESSDENIED dsound.h ecAccessDenied ec.h ecPropSecurityViolation ec.h MAPI_E_NO_ACCESS mapicode.h STIERR_READONLY stierr.h STIERR_NOTINITIALIZED stierr.h E_ACCESSDENIED winerror.h # General access denied error # 11 matches found for "0x80070005"
In some cases, as shown above for error code 0x80070005, the same error code can map to different meanings in different header files. In those cases, it is sometimes necessary to make an educated guess about which one is the actual error code being generated by a setup error. For example, in most cases, if an error code from winerror.h is listed in the output from err.exe, that one is the actual error code.
It is important to note that Err.exe is not intended to be a diagnostic tool on its own. In other words, it will not be able to tell you how to fix a problem just based on what the error code is. However, in my experience, Err.exe is very useful as a step along the path of attempting to solve a problem because it provides additional information about what an error code means. Once you have a better idea about what an error code means, you can often use this additional information to perform some additional Web searches to learn about possible causes of and workarounds for specific types of errors.
Windows XP 또는 Vista PC를 사용하지 않는 한 TRIM 기능은 기본적으로 활성화되어 있어야합니다. TRIM 명령을 사용하면 더 이상 사용하지 않는 블록의 데이터를 지우도록 SSD에 알릴 수 있습니다. 이러한 블록을 지우면 쓰기 속도가 감소하고 수명이 다할 때까지 최적의 성능을 유지합니다.
기본적으로 TRIM 기능은 Windows 7, 8, 8.1 및 10에서 활성화해야하지만 때로는 발생하지 않을 수도 있습니다. TRIM이 올바르게 구성되었는지 확인하는 방법은 다음과 같습니다:
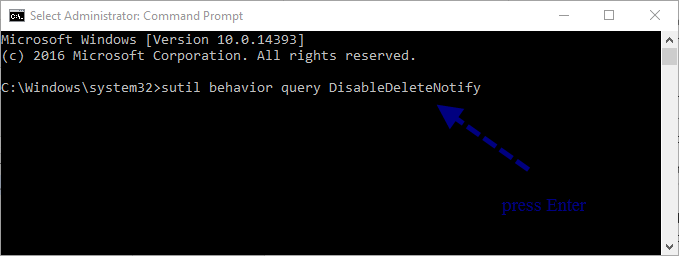
“Windows 키 + X“를 사용하여 고급 사용자 메뉴를 열고 “명령 프롬프트 (관리자)“를 선택하십시오.
다음 명령을 입력하고박히다키를 누릅니다.
sutil behavior query DisableDeleteNotify
명령을 실행 한 후에 “제로(0)“결과를 얻어야합니다. 동일한 것을 볼 수 있으면 TRIM이 활성화되었음을 의미합니다. 결과가 “하나(1)“로 표시되면 TRIM이 비활성화되었음을 의미합니다. 시스템에서 TRIM이 비활성화되면 다음을 수행해야합니다.
“명령프롬프트“를 연 후, 다음을 입력하십시오.
sutil behavior query DisableDeleteNotify 0
TRIM을 활성화해야하며 “DisableDeleteNotify = 0”
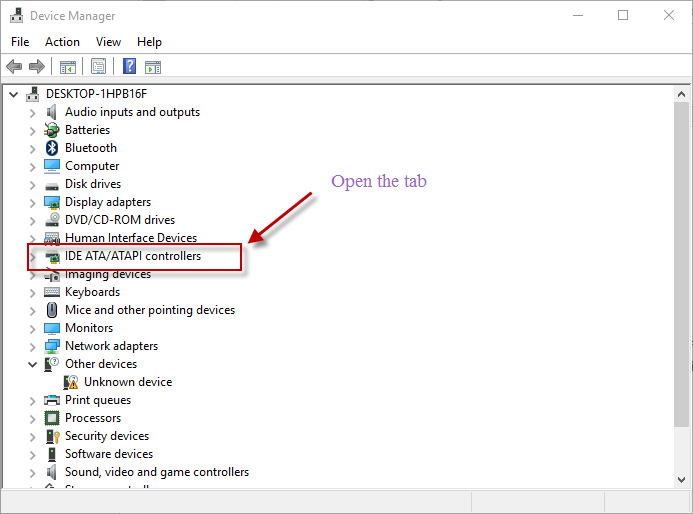
SATA 컨트롤러를 AHCI 모드로 설정하십시오.
SSD는 AHCI (고급 호스트 컨트롤러 인터페이스) 모드에서 더 잘 작동합니다. 최신 마더 보드 SATA 컨트롤러의 대부분은 기본적으로 AHCI로 설정되어 있습니다 “장치관리자 >> IDE ATA/ ATAPI 컨트롤러”.
IDE에서 SATA 컨트롤러 모드가 보이면 다음을 수행하여 IDE에서 AHCI로 변경하십시오.
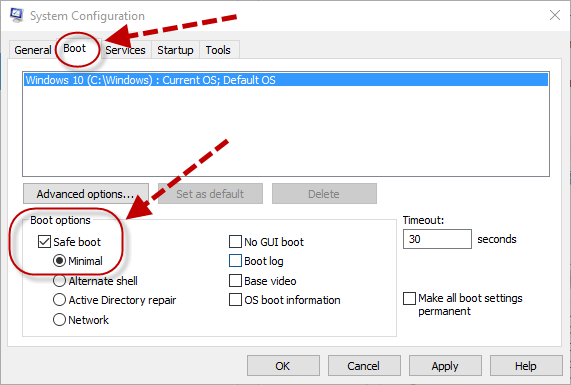
“Windows + R“바로 가기 키를 사용하고 “msconfig“를 입력하여 “시스템 구성“을 엽니 다.
“부팅“탭에서 “안전 부팅“을 선택하고 “적용“
변경 사항을 적용한 후 컴퓨터를 재부팅하십시오.
컴퓨터가 다시 시작하기 전에 BIOS 구성으로 가서 디스크 모드를 AHCI로 변경하십시오.
새 구성을 저장하고 다시 시작하십시오.
1. 최대절전모드 종료
일단 이 기능을 제거하면 절전모드가 작동하지 않습니다. 데스크탑에서는 보통 잘 사용하지 않는 기능이기 때문에 꺼주셔도 되고 랩탑이나 태블릿의 경우엔 각자 필요에 따라 기능을 켜거나 끄시면 됩니다. 최대 절전모드는 보통 PC에 설치된 메모리의 용량만큼을 확보하기 때문에 설치된 램용량이 클수록 효과가 좋습니다.
윈7이하에서는 시작버튼을 누른후 cmd라고 치고 명령프롬프트를 반드시 관리자모드로 실행합니다.
윈8 이상에서는 윈도우키+Q를 눌러서 cmd라고 친후 마우스 오른쪽 버튼을 눌러서 역시 관리자모드로 실행합니다.
그룹 정책을 사용하여 클라이언트 컴퓨터의 공유 폴더를 해제하고, 접근을 차단하는 방법을 소개합니다.
참고 1 - 공유 폴더 생성을 막지는 못합니다. 생성하더라도 곧 해제되거나 접근을 차단할 수는 있습니다. 참고 2 - 컴퓨터 정책이므로 컴퓨터가 속한 OU에 적용하셔야 합니다.
참고 3 - 테스트 환경에서 충분한 테스트를 거친 후 실제 환경에 적용하셔야 합니다.
1. 그룹 정책 개체를 새로 만들고 편집합니다.
2. 컴퓨터 구성 – 기본 설정 – 네트워크 공유 – 새로 만들기 – 네트워크 공유 선택
3. 작업 – 삭제 선택 작업 한정자에서 적절히 체크 후 확인 (굳이 설명 드리지 않아도 무슨 뜻인지 아실 듯 하여 각 항목에 대한 설명은 생략합니다.)
4. 컴퓨터 구성 – 정책 – 관리 템플릿 – 네트워크 – 네트워크 연결 – 도메인 프로필 – Windows 방화벽 : 인바운드 파일 및 프린터 공유 예외 허용을 사용 안 함으로 설정
5. 컴퓨터 구성 – 정책 – 관리 템플릿 – 네트워크 – 네트워크 연결 – 표준 프로필 – Windows 방화벽 : 인바운드 파일 및 프린터 공유 예외 허용을 사용 안 함으로 설정
위 정책을 클라이언트 컴퓨터가 속한 OU에 적용하시면 됩니다.
참고로, 위 절차에서 3단계까지만 적용하면, 클라이언트 컴퓨터의 공유 폴더들이 해제됩니다. 하지만 사용자가 다시 공유 폴더를 생성하면 다음 정책이 적용될 때까지(약 60분) 다른 사용자들이 공유 폴더에 접속할 수 있습니다. 4~5단계를 적용하면 파일 공유에 관련된 포트를 차단함으로써, 사용자가 새로운 공유를 생성하더라도 다른 사용자들이 접속할 수 없습니다.
위 정책은 테스트 환경에서 충분한 테스트를 거친 후 실제 환경에 적용하셔야 합니다.
특히 관리 드라이브 공유까지 제거하는 경우에는 더 신경 쓰셔야 합니다. 만약 관리 드라이브 공유를 사용하는 솔루션을 사용 중이라면 문제가 발생할 수도 있습니다.


 Windows Update Clean Tool.zip


