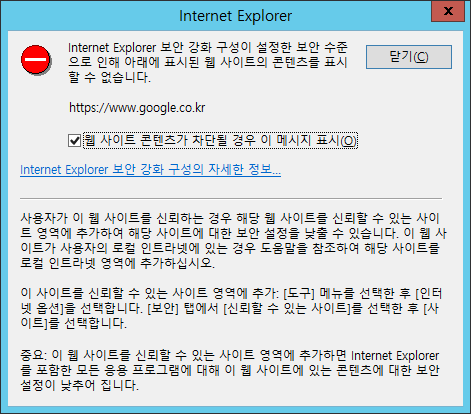
Internet Explorer Enhanced Security Configuration (ESC)
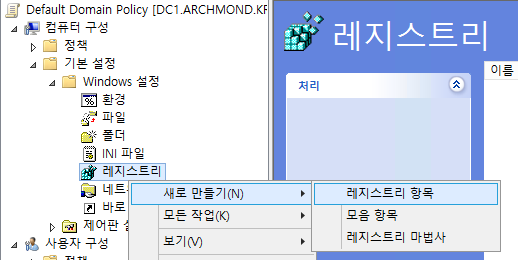
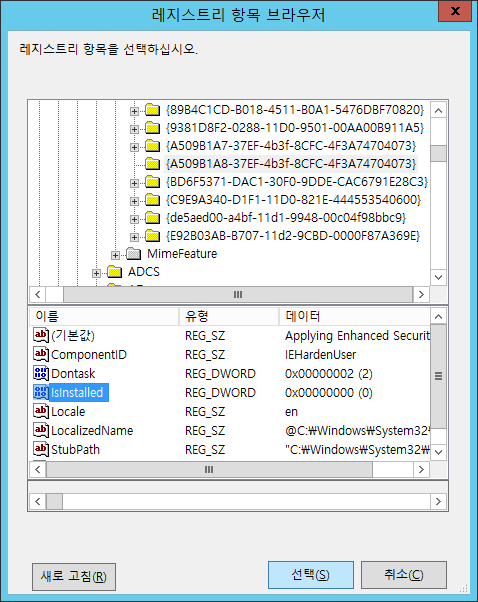
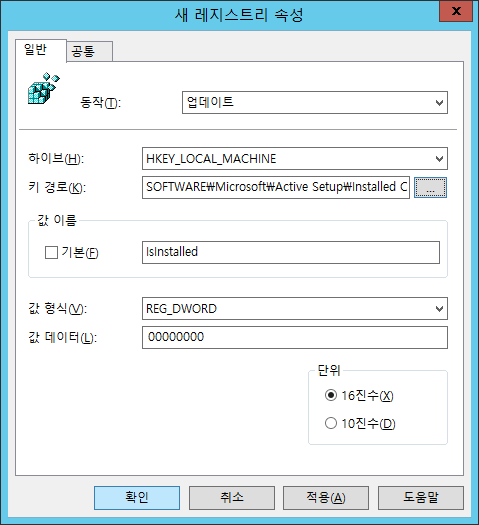
테스트 환경에서 매번 직접 IE ESC를 끄는 불편함을 해소. 운영 환경에서는 서버에서 웹 브라우징을 하지 않아야 하겠지만.
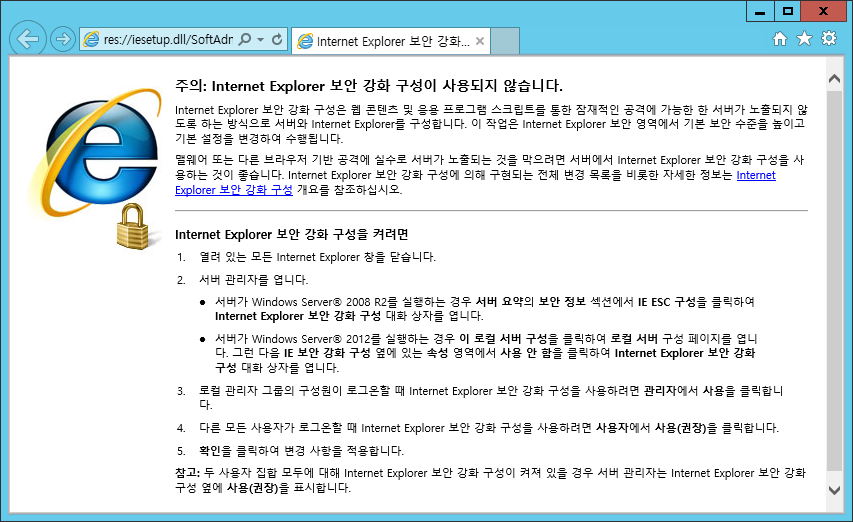
IE 보안 강화 구성은 기본으로 [사용]으로 되어 있다.
IE 보안 강화 구성에 관하여…
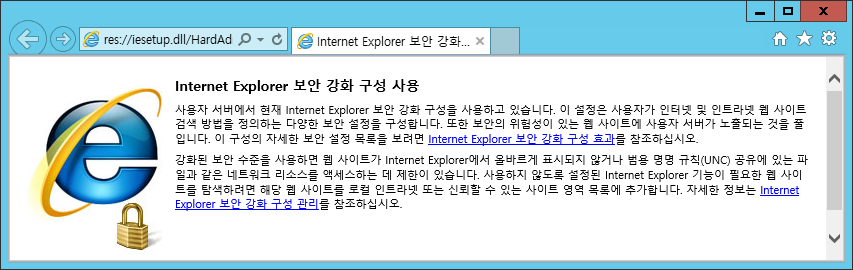
Internet Explorer 보안 강화 구성 사용 사용자 서버에서 현재 Internet Explorer 보안 강화 구성을 사용하고 있습니다. 이 설정은 사용자가 인터넷 및 인트라넷 웹 사이트 검색 방법을 정의하는 다양한 보안 설정을 구성합니다. 또한 보안의 위험성이 있는 웹 사이트에 사용자 서버가 노출되는 것을 줄입니다. 이 구성의 자세한 보안 설정 목록을 보려면 Internet Explorer 보안 강화 구성 효과를 참조하십시오.
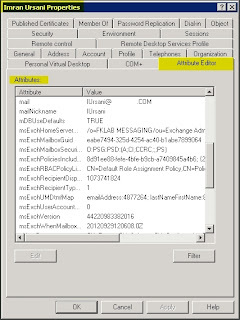
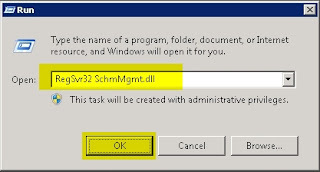
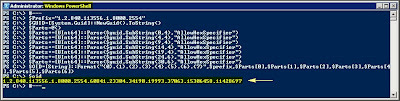
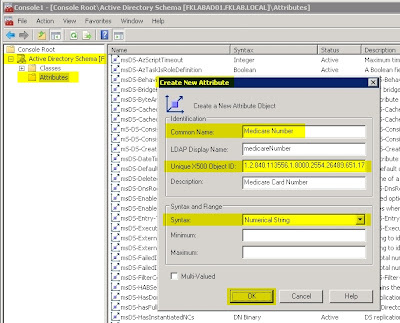
C: 드라이브에 "OIDGen.vbs"(큰따옴표로 묶음, 그렇지 않으면 접미사 .txt .vbs 뒤에 접미사) 이름으로 메모장 파일 저장명령 프롬프트를 열고이 스크립트를 실행하십시오.시작 > cmd.exe >>CScript.exe C:\OIDGen.vbs OID 문자열(점으로 구분된 숫자 문자열)을 복사하여고유한 X500 개체 ID 필드에붙여넣습니다.
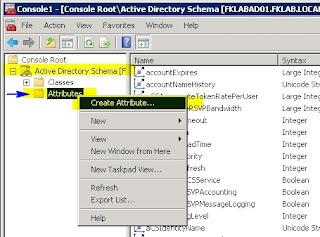
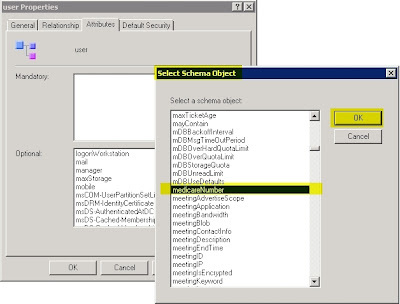
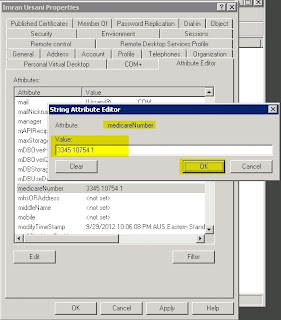
새 속성 만들기대화 상자에일반 이름(이 경우 메디케어 번호)을 입력합니다.
LDAP 표시이름 필드는일반 이름(공백 없음)에서 자동으로 채워집니다.
이전 단계에서 생성한 OID 문자열을고유 X500 개체 ID필드에 붙여넣습니다.
텍스트 상자에 설명을 씁니다.
드롭다운 목록에서 적절한 구문을 선택하여 속성 유형(이 경우 Medicare 번호는 숫자 값)을 선택합니다. 이것은 다른 유형일 수 있으며 각 특성의 사용법에 따라 다릅니다)
확인을 클릭합니다.
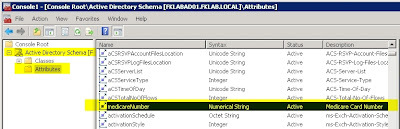
사용자 지정 속성medicareNumber가 생성됩니다.
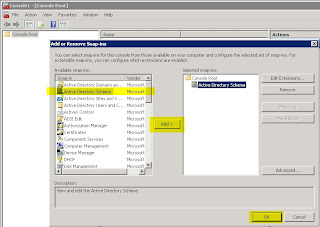
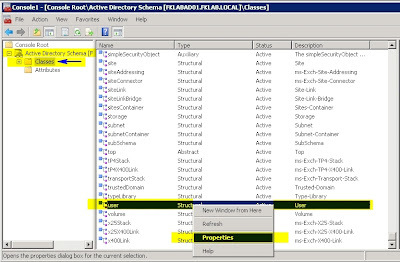
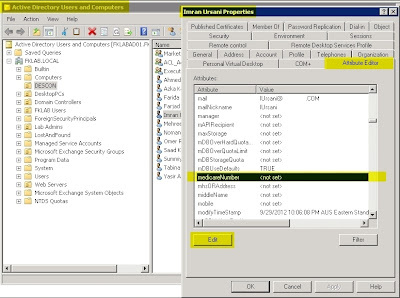
이제 이 새 특성을User클래스에 추가/연결합니다.클래스리프로 이동하여사용자클래스를 선택합니다.
사용자를 마우스 오른쪽 버튼으로 클릭하고속성을클릭합니다.
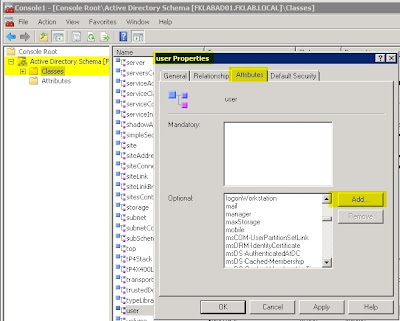
속성탭으로 이동합니다.추가를클릭합니다.
메디케어넘버속성을 찾아 확인을 클릭한 후 다시확인을클릭합니다.
특성이 User와 연결되었는지 확인하려면 User, 속성을 마우스 오른쪽 단추로 클릭하고속성탭으로 이동합니다.medicareNumber속성은 선택적 속성 목록에 있어야 합니다.
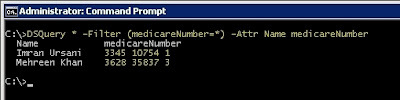
1. 보안 이벤트에서 이벤트 ID 5061과 로그인 사용자가 gmkim 혹은 mani4u 값으로 조회, 24시간 이내 값만
<QueryList> <Query Id="0" Path="Security"> <Select Path="Security"> *[System[(EventID=5061) and TimeCreated[timediff(@SystemTime) <= 86400000]]] and *[EventData[Data[@Name='SubjectUserName'] and (Data='gmkim' or Data='test9')]] </Select> </Query> </QueryList>
2. 모든 스키마에서 검색 데이터 값이 있으면 모두 쿼리
<QueryList> <Query Id="0" Path="Security"> <Select Path="Security"> *[EventData[Data and (Data="gmkim" or Data="mani4u")]] </Select> </Query> </QueryList>
Recreates the default Group Policy Objects (GPOs) for a domain. To get to the Group Policy Management Console (GPMC), you must install Group Policy Management as a feature through Server Manager.
Important
As a best practice, you should configure the Default Domain Policy GPO only to manage the defaultAccount Policiessettings, Password Policy, Account Lockout Policy, and Kerberos Policy. Additionally, you should configure the Default Domain Controllers Policy GPO only to set user rights and audit policies.
Syntax
Copy
dcgpofix [/ignoreschema] [/target: {domain | dc | both}] [/?]
Parameters
ParameterDescription
/ignoreschema
Ignores the version of the Active Directory schema when you run this command. Otherwise, the command only works on the same schema version as the Windows version in which the command was shipped.
/target {domain | dc | both
Specifies whether to target the Default Domain policy, the Default Domain Controllers policy, or both types of policies.
/?
Displays Help at the command prompt.
Examples
To manage the defaultAccount Policiessettings, Password Policy, Account Lockout Policy, and Kerberos Policy, while ignoring the Active Directory schema version, type:
Copy
dcgpofix /ignoreschema /target:domain
To configure the Default Domain Controllers Policy GPO only to set user rights and audit policies, while ignoring the Active Directory schema version, type:
I am writing this blog and others to explain how things work and some ways deployment and operational tasks can be handled. In other words, these postings are for demonstration purposes only. Since I am not familiar with your organization or environment I do not know if these steps are applicable to your environment or are even safe to perform in your environment. It is recommended that you contact Microsoft Support prior to making changes in your environment to ensure that these steps are applicable to your environment, and are safe to perform in your environment. By writing this blog I am in no way recommending that you perform these steps in your own environment. If you choose to follow the steps outlined in this or other blog postings on this site, you are assuming the risk for your actions.
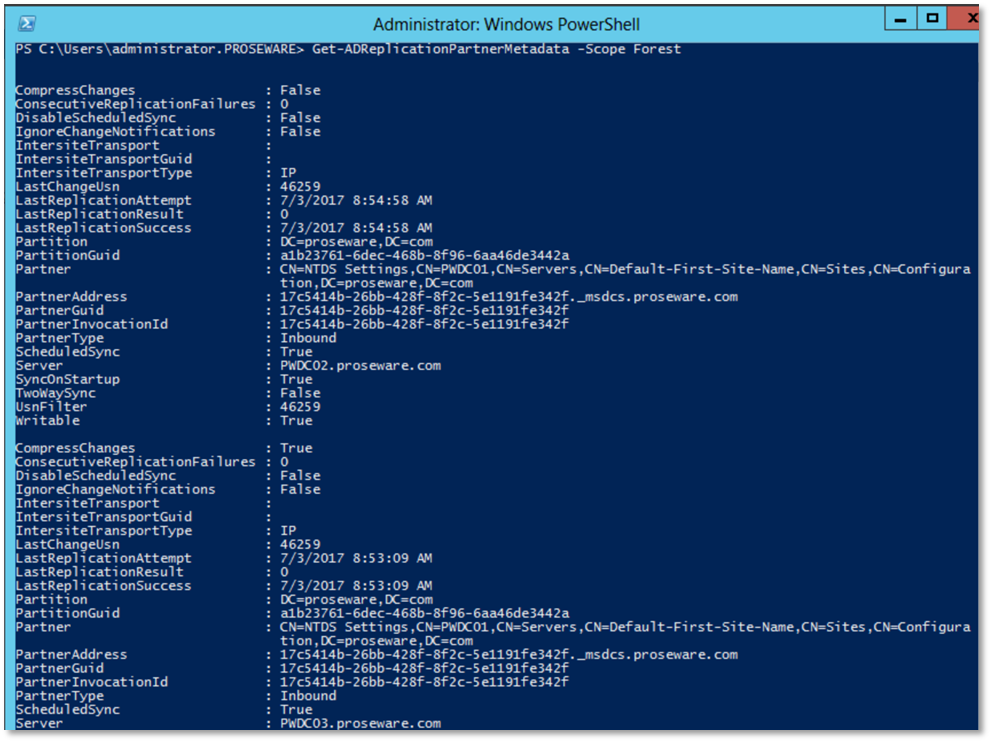
Repadmin is a tool for checking replication status and troubleshooting replication issue. Below is a table highlighting commonly used syntax of the repadmin tool.
Syntax
Usage
Repadmin /replsummary
Thereplsummaryoperation quickly and concisely summarizes the replication state and relative health of a forest.
Repadmin /replsummary /bysrc /bydest /sort: delta
Thereplsummaryoperation quickly and concisely summarizes the replication state and relative health of a forest.
Repadmin /showrepl <DC Name>
Displays the replication partners for each directory partition on the specified domain controller. Helps the administrator build a visual representation of the replication topology and see the role of each domain controller in the replication process.
Repadmin /showutdvec
Displays the highest Update Sequence Number (USN) for the specified domain controller. This information shows how up-to-date a replica is with its replication partners.
Repadmin /showobjmeta <DC> <DN of object>
Displays the replication metadata for a specified object stored in Active Directory, such as attribute ID, version number, originating and local Update Sequence Number (USN), and originating server’s GUID and Date and Time stamp. By comparing the replication metadata for the same object on different domain controllers, an administrator can determine whether replication has taken place.
Repadmin /showconn
Displays the connection objects for a specified domain controller. Default is local site.
Replicates a single object between any two domain controllers that have partitions in common. The two domain controllers do not have a replication agreement. Replication agreements can be shown by using the Repadmin/showreplcommand.
Starts a replication event for the specified directory partition between the source and destination domain controllers. The source UUID can be determined when viewing the replication partners by using the Repadmin showrepl operation.
Repadmin /syncall <DC>
Synchronizes a specified domain controller with all replication partners.
Repadmin /queue
Displays tasks waiting in the replication queue.
Repadmin /showmsg <Error>
Displays the error message for a given error number.
Repadmin /viewlist <DC_List>
Displays a list of domain controllers.
Repadmin /showctx <DC_List>
Displays a list of computers that have opened sessions with a specified domain controller.
Repadmin /showcert
Displays the server certificates loaded on a specified domain controller.
Repadmin /removelingeringobjects <Dest_DC_List> <Source DC GUID> <NC> [/ADVISORY_MODE]
Uses an authoritative domain controller to compare the directory of a domain controller (destination) that is suspected of having lingering objects against the directory of a domain controller (source) that is designated as a reference source for up-to-date values for the domain of the destination. When the advisory mode parameter is used, this command provides a list of found lingering objects. When the advisory mode parameter is not used, this command removes lingering objects from the destination domain controller.
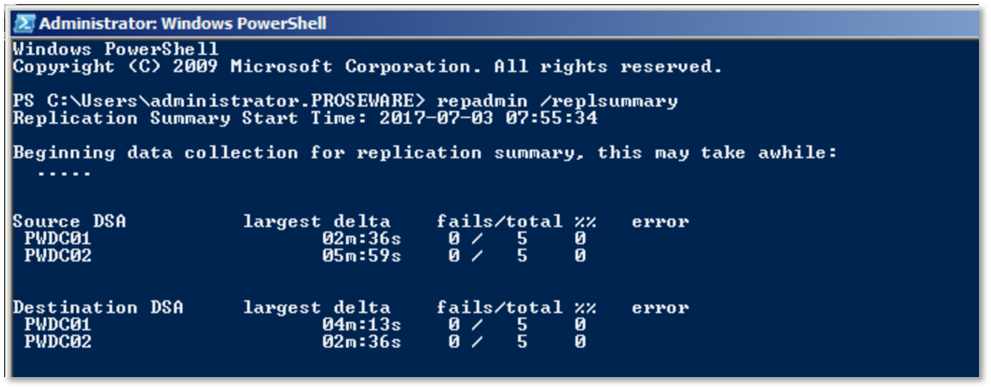
As seen in the screenshot belowrepadmin /replsummarywill give statistics for replication with replication partners. The output also lists any errors that were encountered with replication. This is useful for getting an overview of any replication issues the DC is having.
You can also sort the output. In the example below, the output is sorted by the largest delta since last replication.
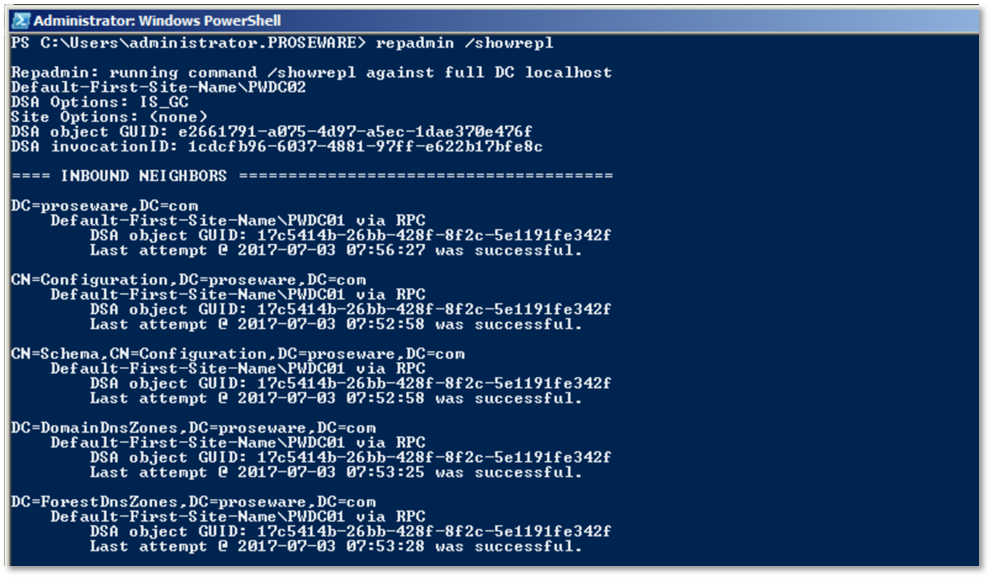
As seen belowrepadmin /showreplshows the replication status with all of the DCs replication partners and is sorted by the Naming Context that is being replicated.
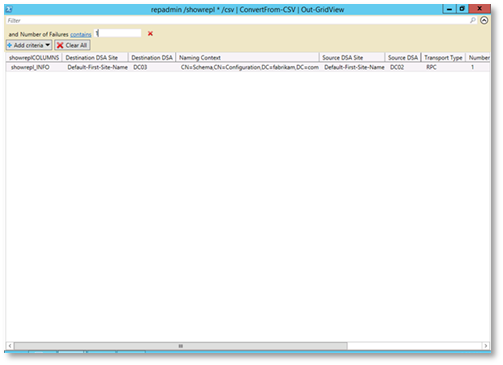
One trick that can be used to get a more manageable output is to use repadmin to send its output to a CSV and the use PowerShell to convert the CSV to a GridView. The command to do this isrepadmin /showrepl * /csv | ConvertFrom-CSV | Out-GridView
The resulting output is in a manageable GUI.
In GridView you can sort and filter. Below is an example of filtering onNumber of Failures, so that I can easily see what failed.
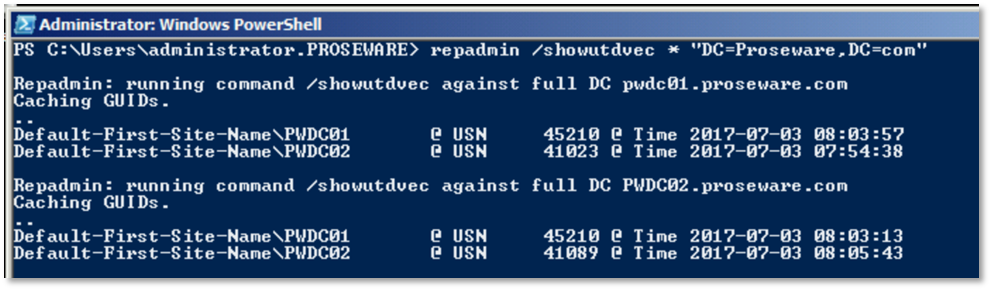
Replications changes are tracked through incrementing numbers called USNs. There are times where you will want to know what knowledge each DC has about other DCs current state. The up-to-dateness vector is the knowledge that a DC as about the current state of other DCs. This information can be useful when trying to troubleshoot replication issues such as USN Rollback. USN Rollback is when a DC is restored from an unsupported method such as a snapshot. In that case the up-to-dateness vector would be much larger than the actual USN of the DC. Since, there is going to be some delay in replication you will notice some differences but the numbers should be relatively close. For example, if you compare the up-to-dateness vector for DC01 across DCs you will notice the following: for itself DC01 has USN of 17347, DC02 has a USN of 17346 for DC01, and DC03 has a USN of 17346 for DC01. So, we can see the numbers are relatively close and that DC01 potentially has one change that it needs to replicate to DC02 and DC03.
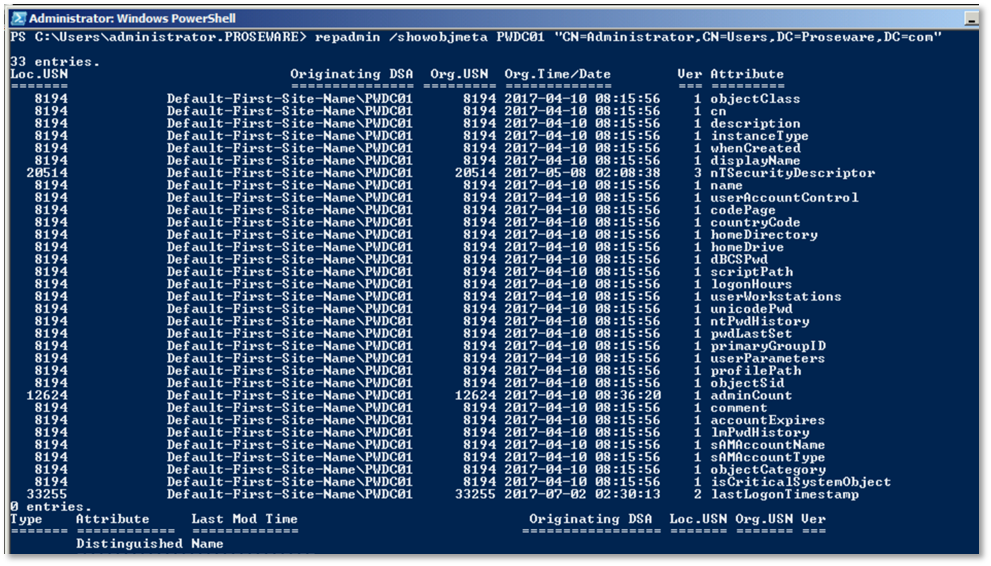
The /showobjmeta switch shows detailed information for attributes of an object. It is most commonly used when comparing the output of the command from 2 DCs to see if they are in sync and the current status of the attributes. Differences can be used to identify replication problems.
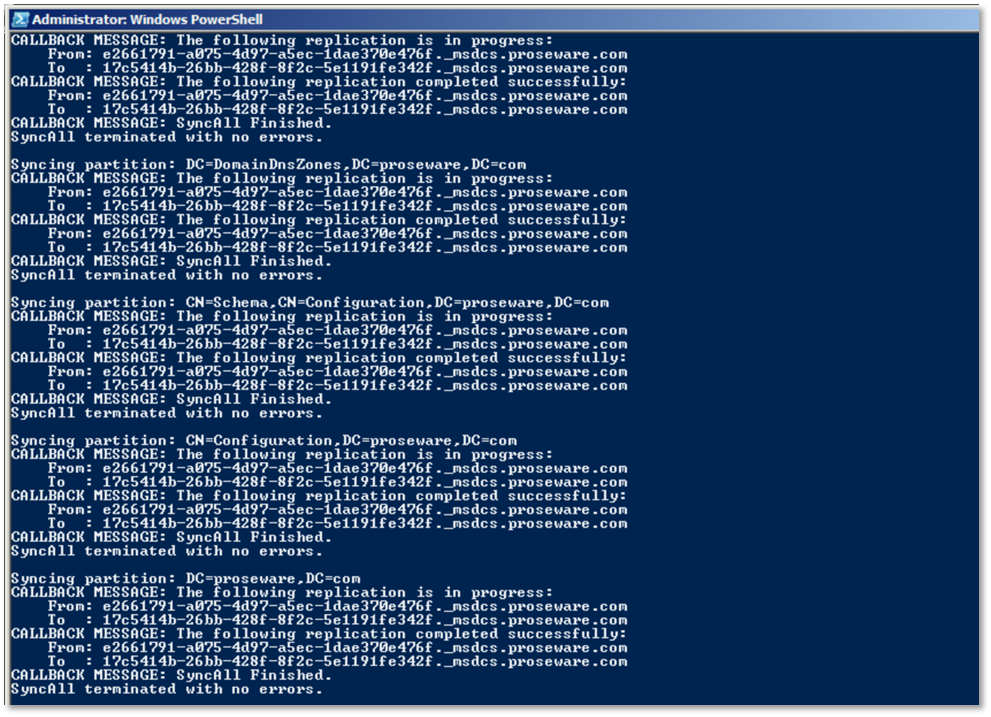
Repadmin /syncall is used to force replication between domain controllers. You can easily view options for the /syncall switch with the following command:repadmin /syncall /?
A normal use ofrepadmin /syncallis with the/AePswitch
PowerShell is an object oriented scripting language that allows enterprises to automate IT tasks.
Below is a conversion table that shows the PowerShell command that can be used in place of the Repadmin command. So, why would you choose to use PowerShell? The output of PowerShell commands are objects those objects can be filtered with properties, piped through other PowerShell commands and manipulated to many useful things including great control in how the data is presented to the user.
Command
PowerShell Cmdlet
Repadmin /FailCache
Get-ADReplicationFailure
Repadmin /Queue
Get-ADReplicationQueueOperation
Repadmin /ReplSingleObj
Sync-ADObject
Repadmin /ShowConn
Get-ADReplicationConnection
Repadmin /ShowObjMeta
Get-ADReplicationAttributeMetadata
Repadmin /ReplSummary
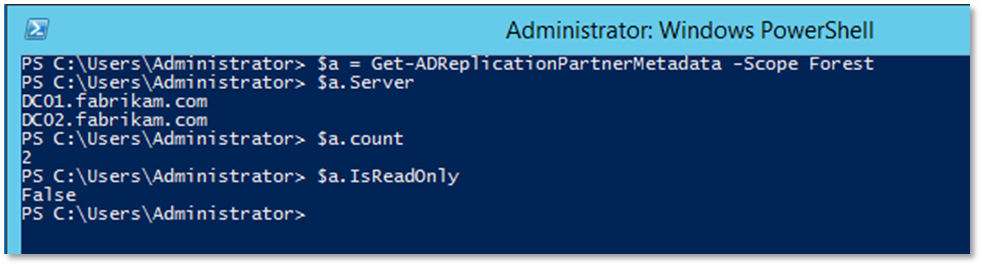
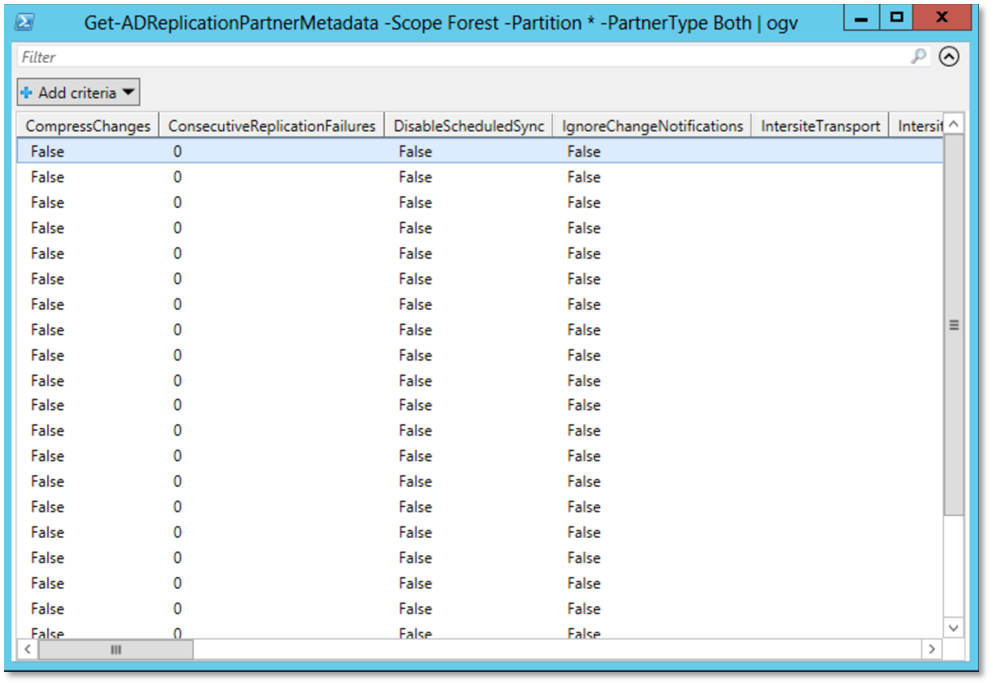
Get-ADReplicationPartnerMetadata
Repadmin /Showutdvec
Get-ADReplicationUpToDatenessVectorTable
Repadmin /SiteOptions
Set-ADReplicationSite
Repadmin /ShowAttr
Get-ADObject
Repadmin /Set Attr
Set-ADObject
Get-ADReplicationParnerMetadatais very similar to runningrepadmin /showrepl. Without passing the output through another cmdlet the formatting is a bit different then to what you get with repadmin.
However, the advantage is that the output of the command are objects. You can constrain your views to certain properties.
The other advantage is that you can pass objects through other cmdlets. As seen here I am passing the output ofGet-ADReplicationPartnerMetadatathroughOutput-GridView.
Once in GridView you have the ability to sort and filter the data.
Here is another example of the usefulness of using PowerShell overrepadmin. In this example I take the output ofGet-ADReplicationPartnerMetadatathen passing it throughSelect-Objectso that we can then limit what objects are presented in GridView.
These issues are caused by lingering objects. Lingering objects can be caused when a domain controller is taken offline for an extended period of time, does not replicate for longer than the tombstone lifetime, or is restored from a backup that is older than the tombstone lifetime.
When an object is deleted it is put in a tombstone state. After the tombstone lifetime passes (typically 180 days), DC run garbage collection and those tombstone objects are deleted. If a DC was offline for the entire TSL and then were brought back online they may have objects that have since been deleted, tombstoned, and garbage collected. Any objects that were deleted will still exist on that DC. These objects go unnoticed until a change is made to that object then the DC attempts to replicate that object, and at that point that is where it is either re-introduced into the environment or if strict replication consistency is enabled, blocked.
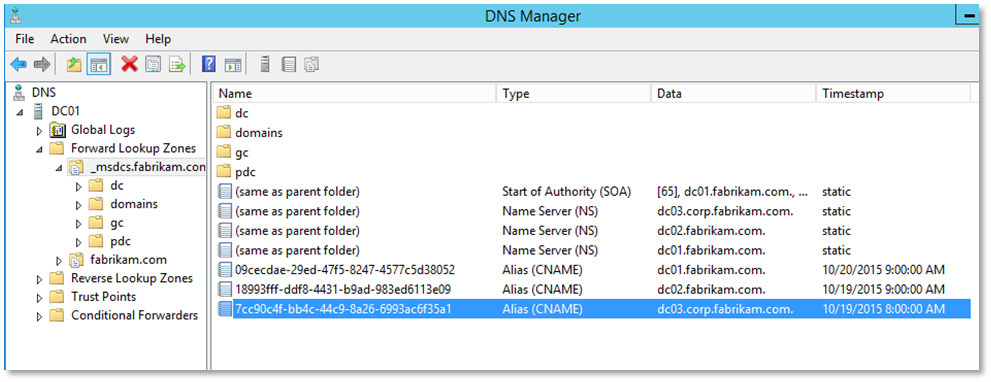
One way to remove lingering objects is to userrepadminwith the/removelingeringobjectsswitch. First you must identify a clean source of the partition. The syntax of the command isrepadmin /removelingeringobjects<Dest DC Name> <Source DC Guid> <Naming Context>. So, in other words you need to identify the source DCs guid and the Naming Context you want to clean. The naming context will be available in the Event 1388 or 1988 you receive in the event long. Once you find a clean source you can obtain the guid by opening DNS Manager and opening up the _msdcs Zone and obtaining the CName record for the DC in question.
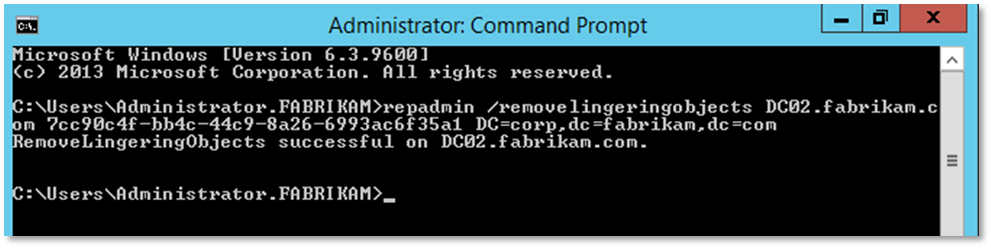
Below is an example of running therepadmin /removelingeringobjectscommand
You will receive an Event1937when the removal of lingering objects begins.
You will then receive an Event1939when removal completes.
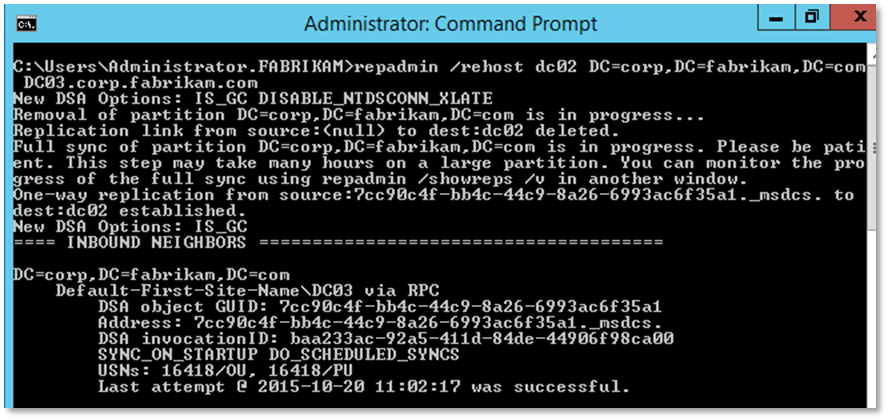
2.2.2.2 Repadmin /rehost
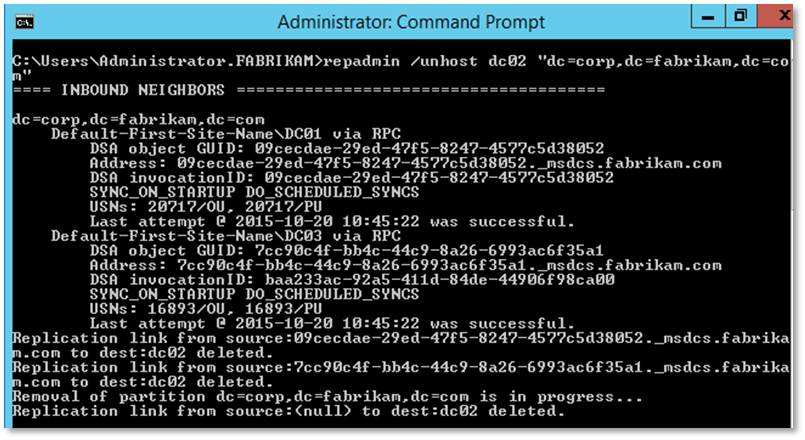
An alternative to usingrepadmin /removelingeringobjectscommand is to unhost the partition so that the domain controller no longer has that partition and then rehosting the entire partition with a good source.
The repadmin syntax for unhosting the partition isrepadmin /unhost<DC Name> <Partition Name>
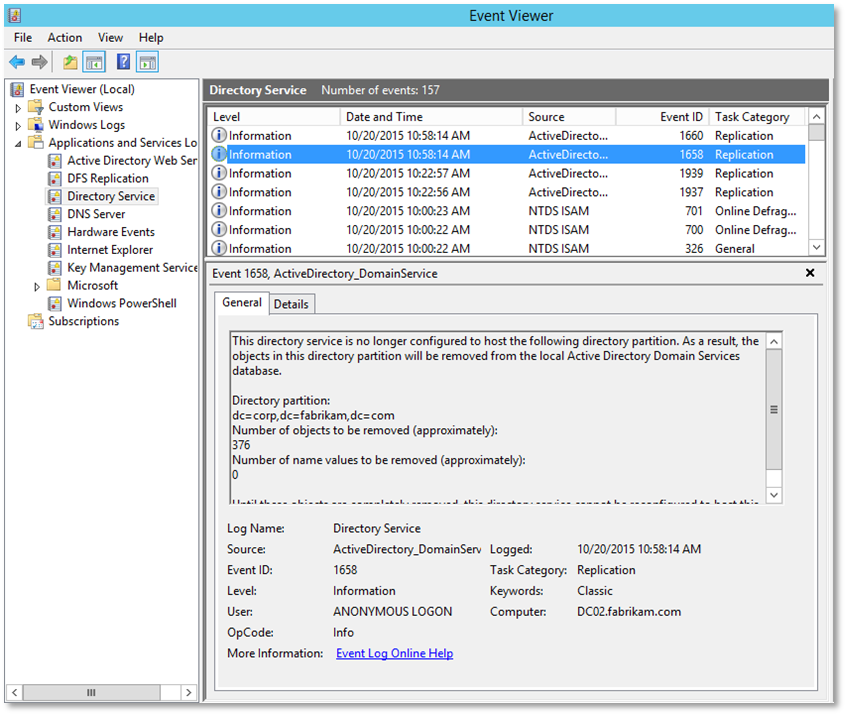
You will receive an event an event 1658 when the removal begins.
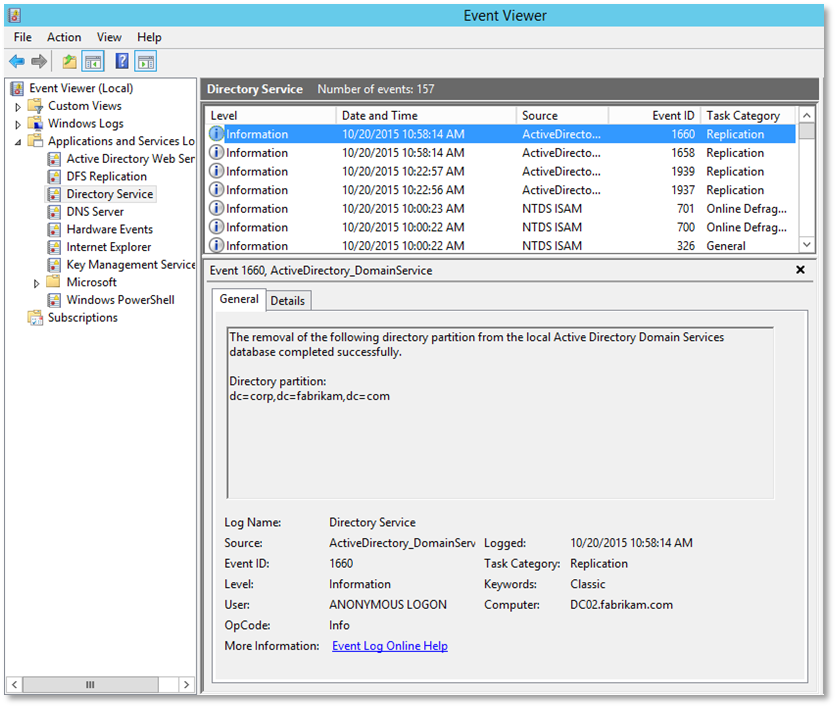
You will receive an event 1660 when the removal completes
The syntax for rehosting the partition is:repadmin /rehost<Dest DC Name> <Partition> <Source DC Name>
Review event log for any 1988 or 1388 errors. If found use the previous section to remove the lingering objects from the domain controller.
Option 1: Re-hosting the partition that has not replicated
If the partition is a GC partition consider unhosting and rehosting the partition. Instructions for unhosting and rehosting are in the previous section calledRepadmin /rehost
Option 2: Removing and then re-adding the domain controller to Active Directory
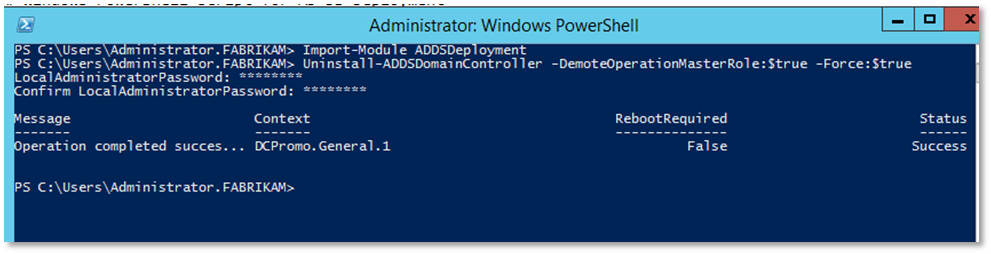
Another option is removing the DC from Active Directory and Re-promoting the Domain Controller
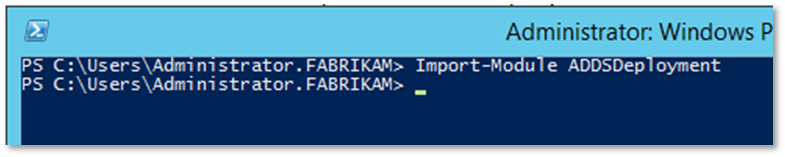
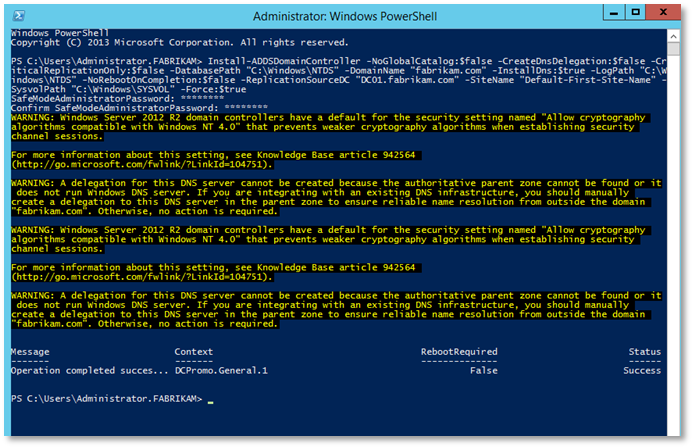
Step 4: Next you will need to run the Install –ADDSDomainController cmdlet. Below is a sample that you can use. You will need to modify the template to meet the requirements of your environment.
Option 3: Enabling Replication with Divergent and Corrupt Partner
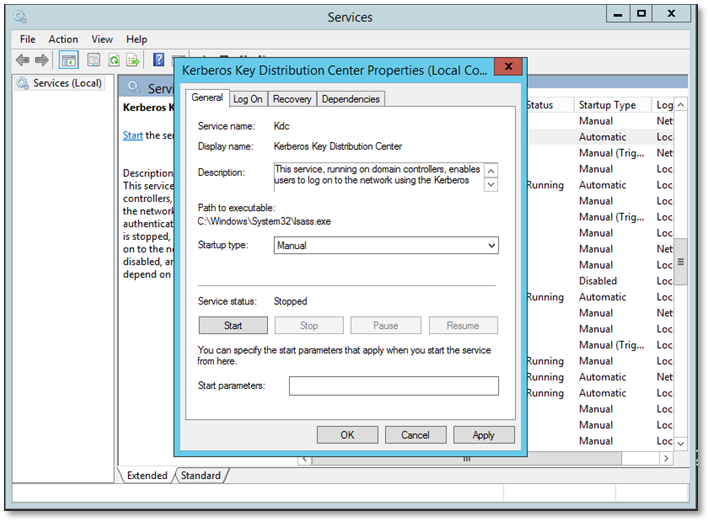
Due to the risk of adding lingering objects to Active Directory the final consideration should be enabling the following setting: Allow Replication With Divergent and Corrupt Partner.
Step 1: To enable this setting run the following command on the domain controller:
repadmin /regkey <hostname> +allowDivergent
Step 2: Let replication complete
Step 3: Disable the setting with the following command: repadmin /regkey <hostname> -allowDivergent
Event 1311 is caused when there is not complete connectivity between domain controllers. There are a number of reasons there may not be complete connectivity.
The Inter-Site Topology Generator (ITSG) is responsible for building the replication topology. So to determine what the scope of the connectivity issues it is important to identify the ISTGs that are logging 1311.
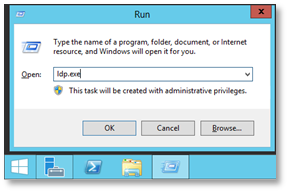
To find the ISTGs in your environment you need to use ldp.exe
Below are the steps for locating the ISTGs:
Step 1: Launchldp.exe
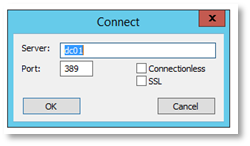
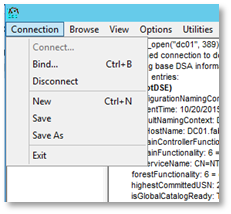
Step 2: When LDP opens, selectConnectionand thenConnect…
Step 3: In theConnectdialog box, enter the name of a Domain Controller for theServeryou want to connect to and then clickOK
Step 4: Click onConnectionand then clickBind…
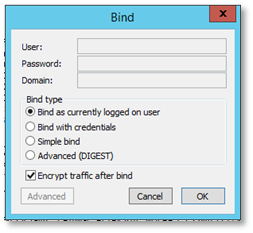
Step 5: In theBinddialog box, clickOK
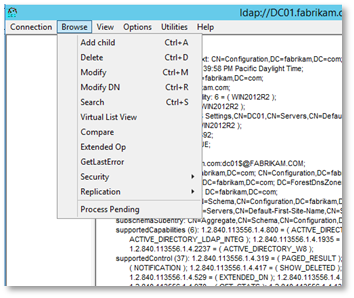
Step 6: Select theBrowsemenu and then selectSearch
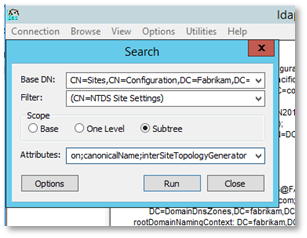
Step 7: In the search enter the following:
Base DN:CN=Sites,CN=Configuration,<DN of Forest Root> (example: CN=Sites,CN=Configuration,DC=fabrikam,DC=com)
Filter:(CN=NTDS Site Settings)
Scope:Subtree
Attributes: Append the following to the attributes that are already listed:;interSiteTopologyGenerator
Step 8: ClickRun
Step 9: For each site you will then need to look for interSiteTopologyGenerator to determine the ITSG for each site.
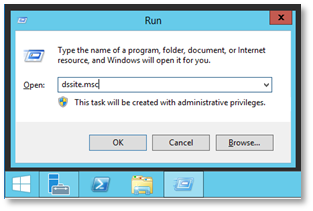
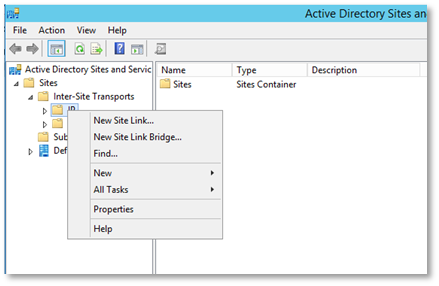
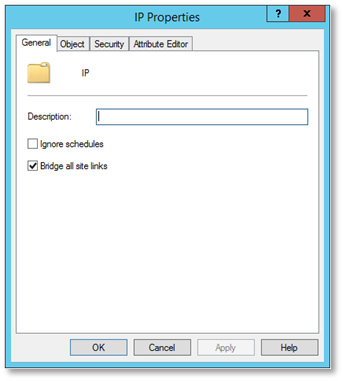
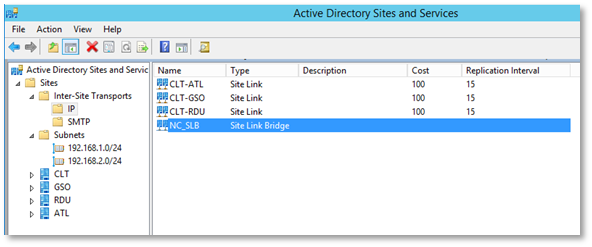
By default, Bridge All Site Links (BASL) is enabled in Active Directory. If your environment is not fully routed, then you will want to disable BASL. By fully routed we mean each site can contact every other site. If BASL is configured on a network which is not fully routed, the KCC will generate site bridges that cannot actually be reached. To determine if BASL is enabled launchActive Directory Sites and Services(dssite.msc).
ExpandSites, thenInter-site Transports.
Right-click onIPand selectPropertiesfrom the context menu
If Bridge all site links is enabled, there will be a check box next to it. To disable BASL, uncheck the checkbox and click OK.
If you disable BASL you can still bridge site links. You would do that if you wanted two spoke sites to communicate directly if they could not communicate with the hub site. In a hub and spoke configuration the cost of crossing to site links (bridging a site link) will typically be a higher then just connecting directly to the hub site. So, ordinarily you would not have to worry about the Site Link Bridge being used instead of a direct site link. That being said, there are not a whole lot of scenarios where you would need to create Site Link bridges.
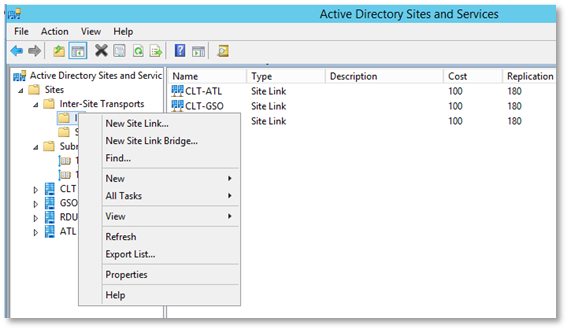
The following steps will allow you to bridge two site links.
Step 1: Open the Active Directory Sites and Services MMC.
Step 2: ExpandSitesand then expandInter-site Transports
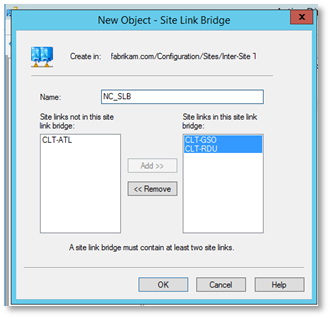
Step 3: Select New Site Link Bridge… from the context menu
Add at least two sites to theSite Link Bridge, give it aName, and clickOK
Step 1: Run the following command in a PowerShell Console:Get-ADObject –LDAPFilter ‘(objectClass=site)’ –SearchBase (Get-ADRootDSE).ConfigurationNamingContext –Property Name | Format-Table Name
Step 2: In another PowerShell Console run:Get-ADObject –LDAPFilter ‘(objectClass=sitelink)’ –SearchBase (Get-ADRootDSE).ConfigurationNamingContext –Property Name, Cost, Description, Sitelist | Format-List Name, Sitelist
Step 3: Verify that each site that was listed inStep 1exists in one of the site lists returned inStep 2
If not all sites are contained in a site link that you need to determine what site link that site needs to be added to or if a new site link needs to be created.
And that is all I have for replication troubleshooting for today.
We can easily export Active Directory users to CSV file using Powershell cmdlets Get-ADUser and Export-CSV. In this article, I am going to write Powershell script samples to Export AD Users to CSV file and Export AD Users from Specific OU to CSV file using Powershell Script.
The following command export the selected properties of all Active Directory users to CSV file. You can add more attributes as per your wish, refer this article:Get-ADUser Default and Extended Properties to know more supported AD attributes.
Export AD Users to CSV with Filter using Powershell
This command export the selected properties to CSV file of AD users whose City contains the text 'Austin'. Note: Refer this article:Get-ADUser Default and Extended Properties to know more supported AD attributes.
Instead of SQL Like Filter, you can also use LDAP Filter to select only required users. Refer this article (AD LDAP Filter Examples) to get more LDAP filter examples. The below command exports all the users who are belongs to Admin department.
Export AD Users from specific OU to CSV using Powershell
We can set target OU scope by using the parameter SearchBase. This following command select all the AD users from the Organization Unit 'Austin' and export it to CSV file.


