728x90

Azure 가상 네트워크에 Azure Firewall을 배포하고, 가상 네트워크 간 라우팅, DNAT, 네트워크 필터링 규칙을 구성하는 방법을 설명합니다.

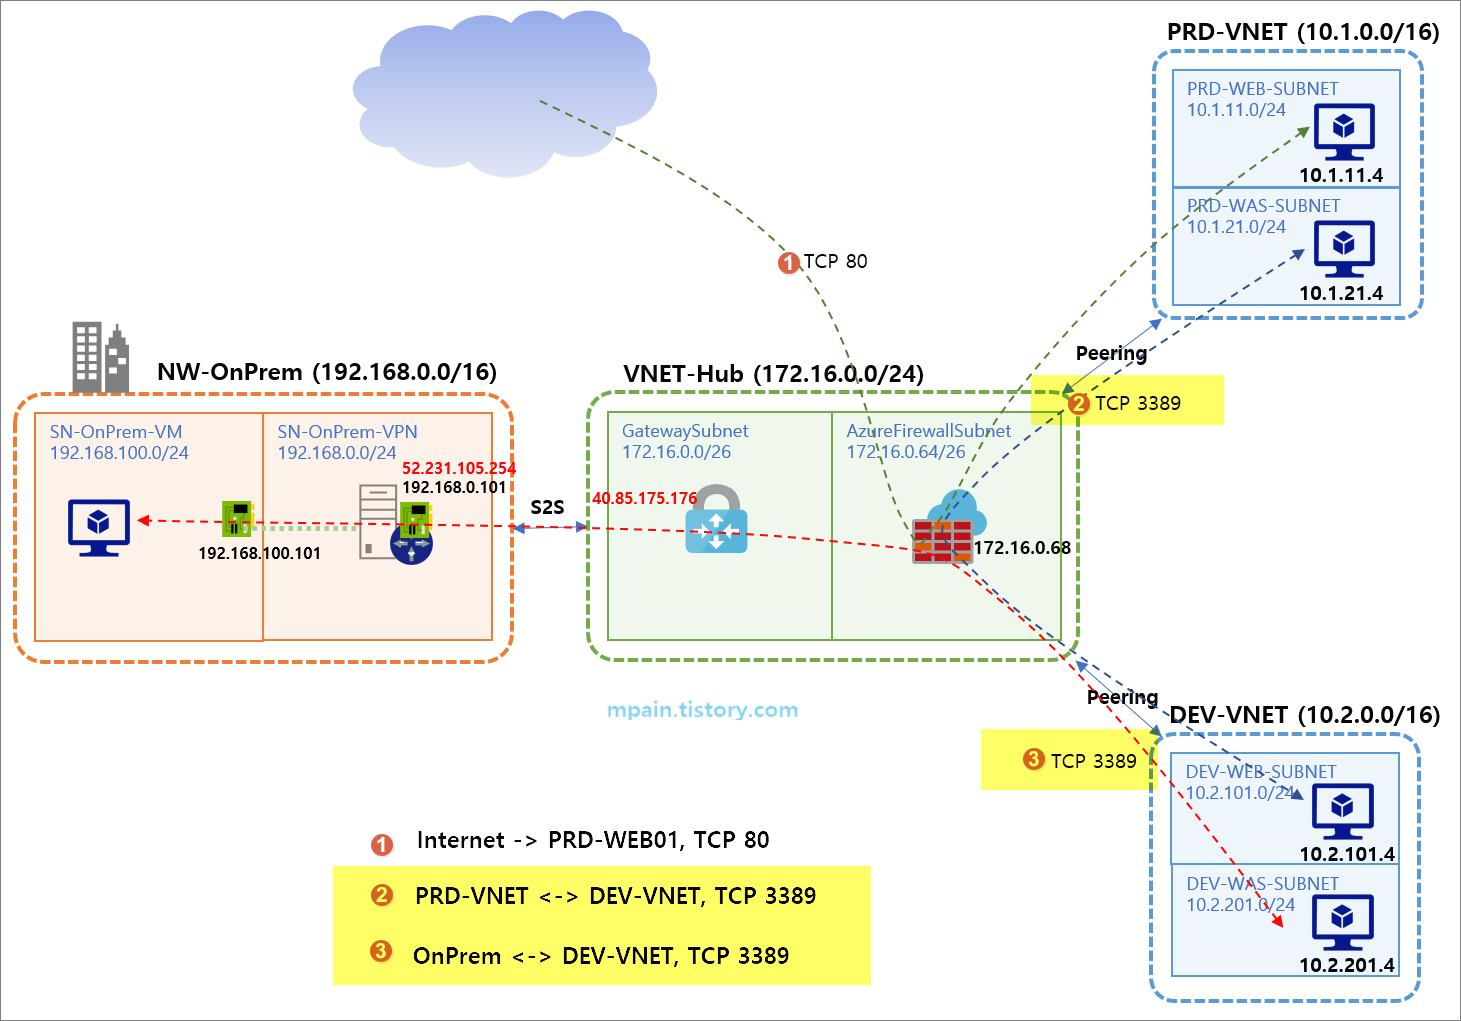
아래와 같은 테스트 환경을 구성하고 Azure Firewall을 테스트하였습니다.

  • 허브(Hub) 네트워크에 Azure Firewall을 배치하여 스포크(Spoke) 네트워크 간 라우팅 처리
  • Azure Firewall의 DNAT 규칙으로 인터넷 인바운드 처리
  • Azure Firewall의 네트워크 규칙(Network rule)으로 스포크 네트워크 간 RDP 연결 처리


Azure Firewall 테스트 구성도


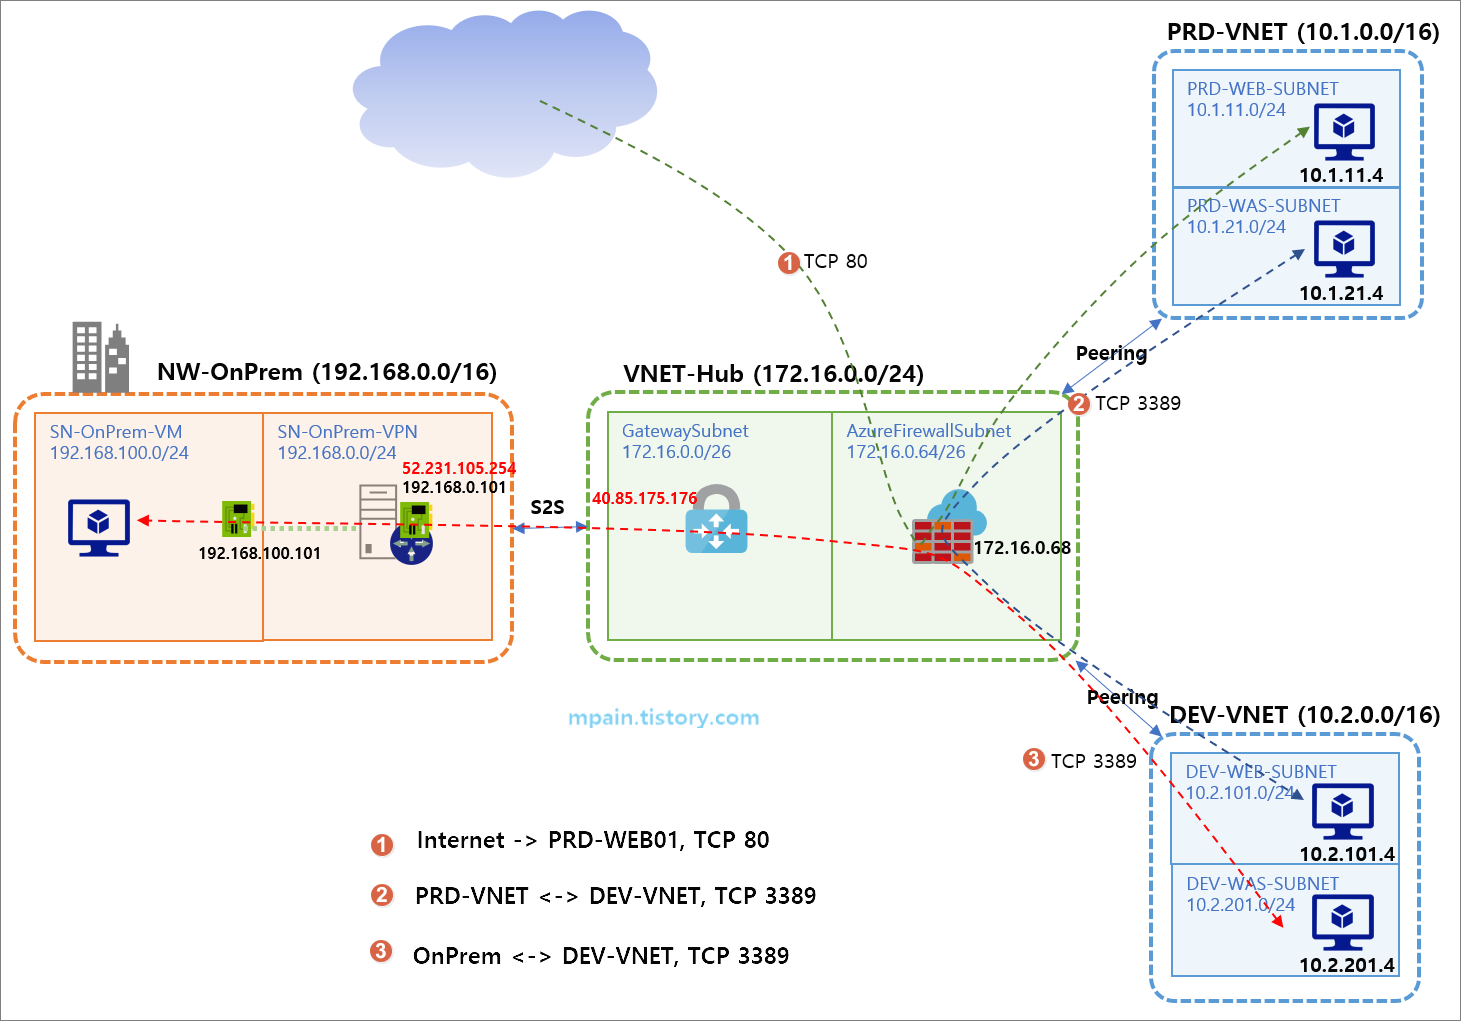
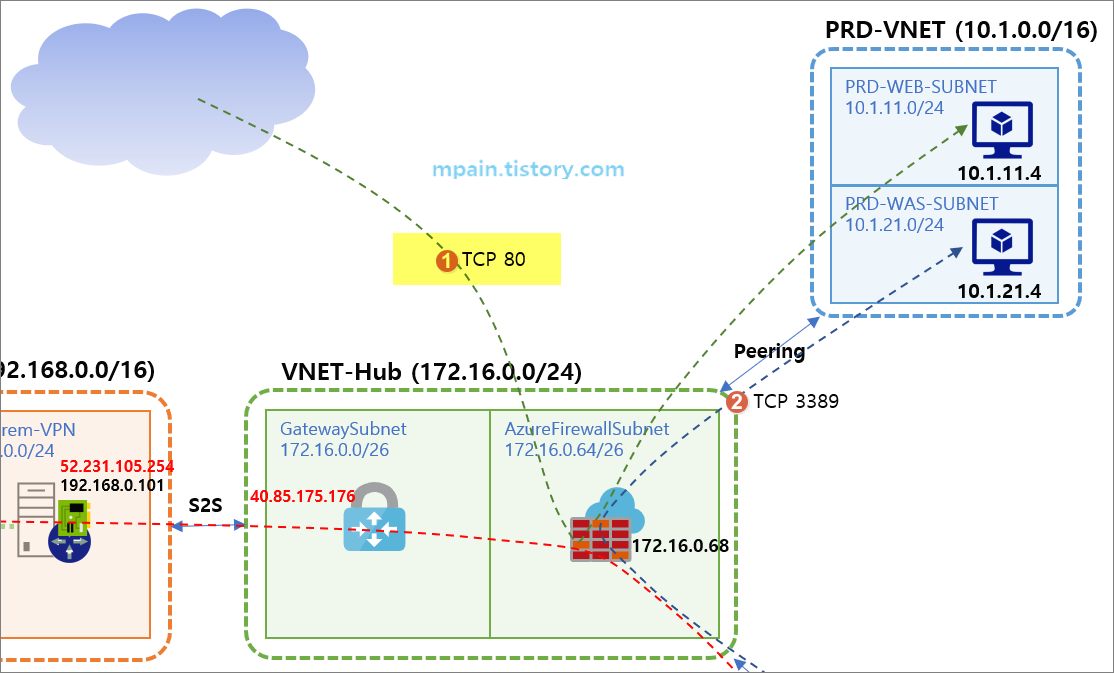
위 테스트 환경 구성은 일반적인 허브-스포크(Hub-Spoke) 구성입니다.

허브 네트워크에 Azure VPN Gateway와 Azure Firewall을 배치하고, 온프레미스와는 S2S VPN으로 연결하고, 다른 Azure 가상 네트워크는 Peering으로 연결합니다.

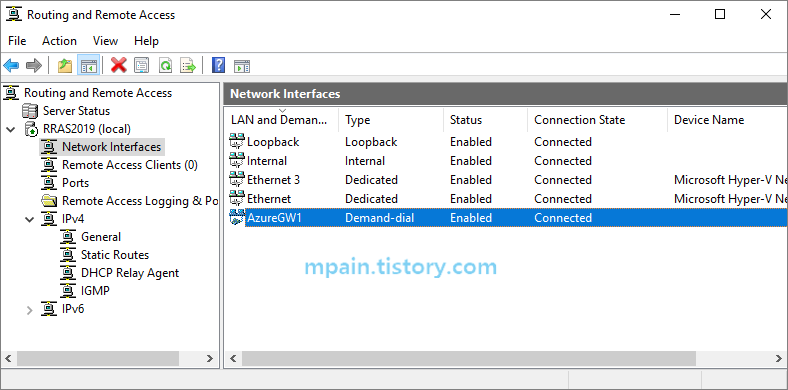
테스트에서는 온프레미스의 Windows Server 2019에 RRAS(Routing and Remote Access Service) 역할을 구성하여 Azure VPN Gateway와 S2S로 연결하였습니다.


Windows Server 2019 RRAS


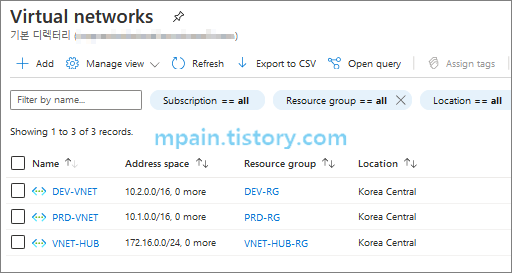
1. 가상 네트워크 생성 및 Peering으로 연결

Azure에 아래와 같이 3개의 가상 네트워크를 만듭니다.


3개의 Virtual network 준비


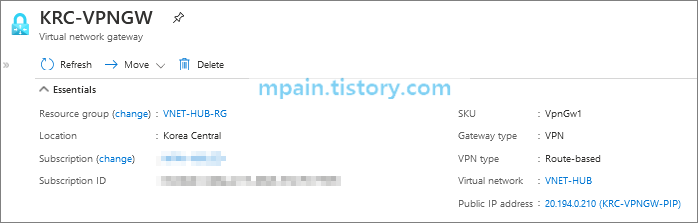
허브 네트워크(VNET-Hub)에 VPN Gateway를 배포하고, 온프레미스와 S2S VPN을 연결합니다. (온프레미스와 S2S VPN 연결에 대한 설명은 생략합니다.)


VPN Gateway


허브 네트워크(VNET-Hub)와 스포크 네트워크들(PRD-VNET, DEV-VNET)은 Peering으로 연결하였습니다.


VNET Peering


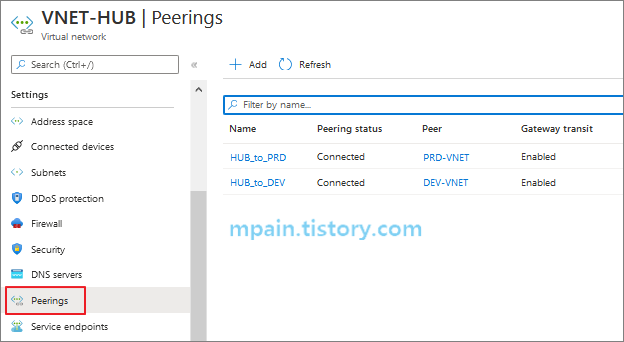
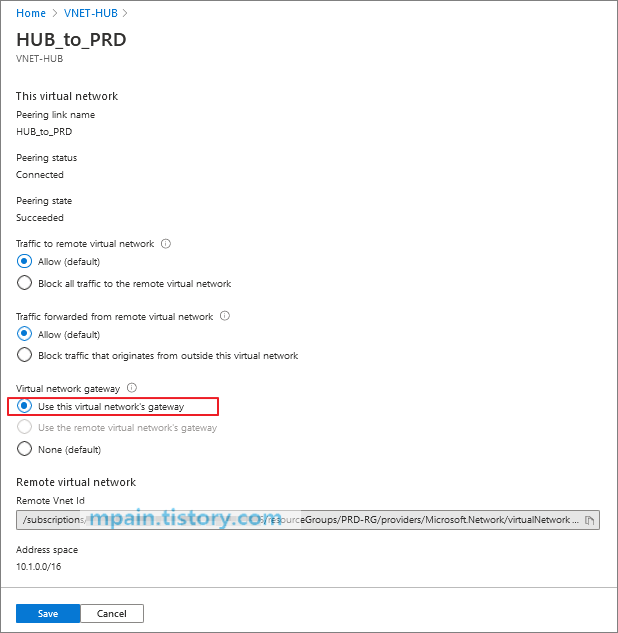
참고로, Peering 옵션에서 Gateway transit을 사용하도록 설정하였습니다.


VPN Gateway transit


가상 네트워크 구성이 완료된 후 가상 머신을 배포합니다.


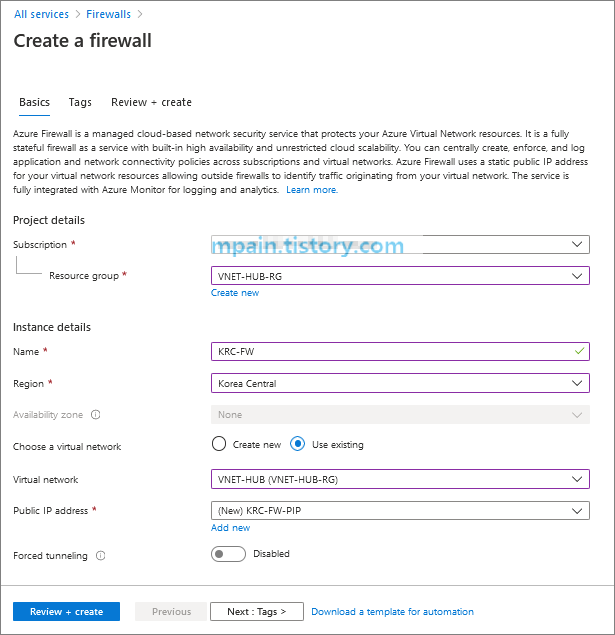
2. Azure Firewall 배포

허브 네트워크(VNET-Hub)에 Azure Firewall을 배포합니다. Azure Firewall은 AzureFirewallSubnet이라는 이름의 전용 서브넷에 배포되어야 합니다. 서브넷 사이즈는 /26으로 만듭니다.

Azure Firewall 배포


Azure Firewall 배포


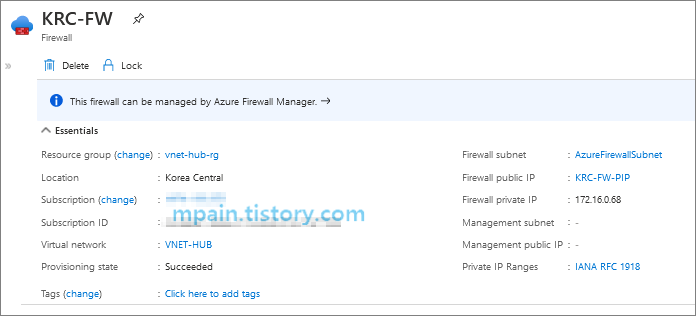
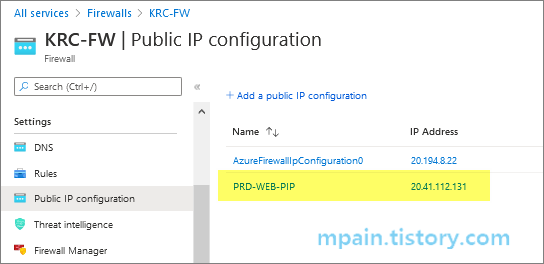
Azure Firewall 배포가 완료되면 Azure Firewall의 Private IP 주소를 확인합니다.


Azure Firewall - Private IP


3. 라우팅 테이블 구성 (UDR)

네트워크 간 트래픽이 Azure Firewall을 거치도록 라우팅 테이블을 구성합니다.


Azure Firewall - UDR


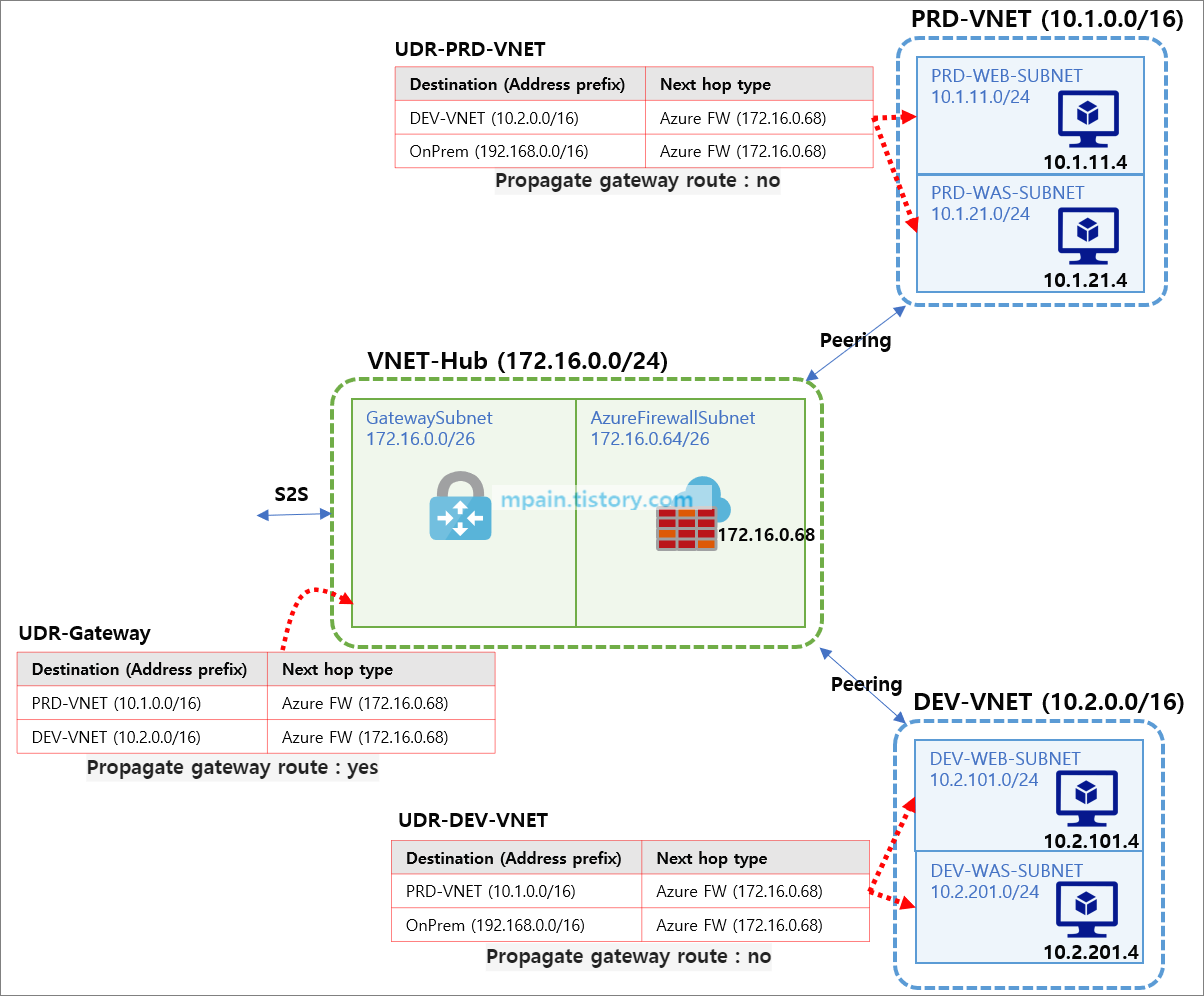
스포크 네트워크들(PRD-VNET, DEV-VNET)은 Next hop을 Azure Firewall로 지정합니다.

GatewaySubnet은 Next hop으로  Azure Firewall을 지정합니다.
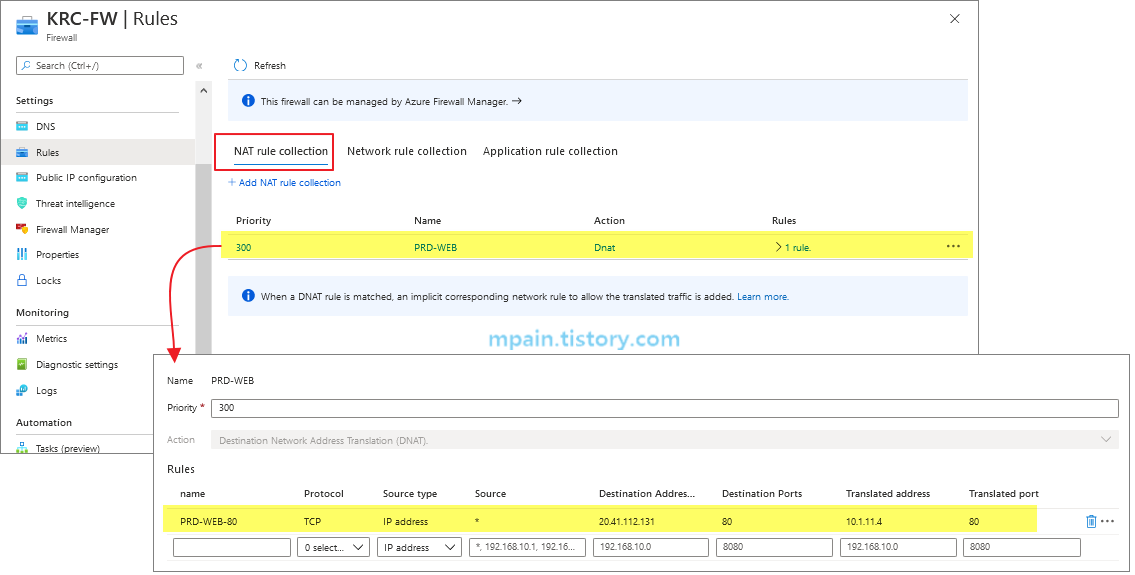


4. DNAT 규칙 추가

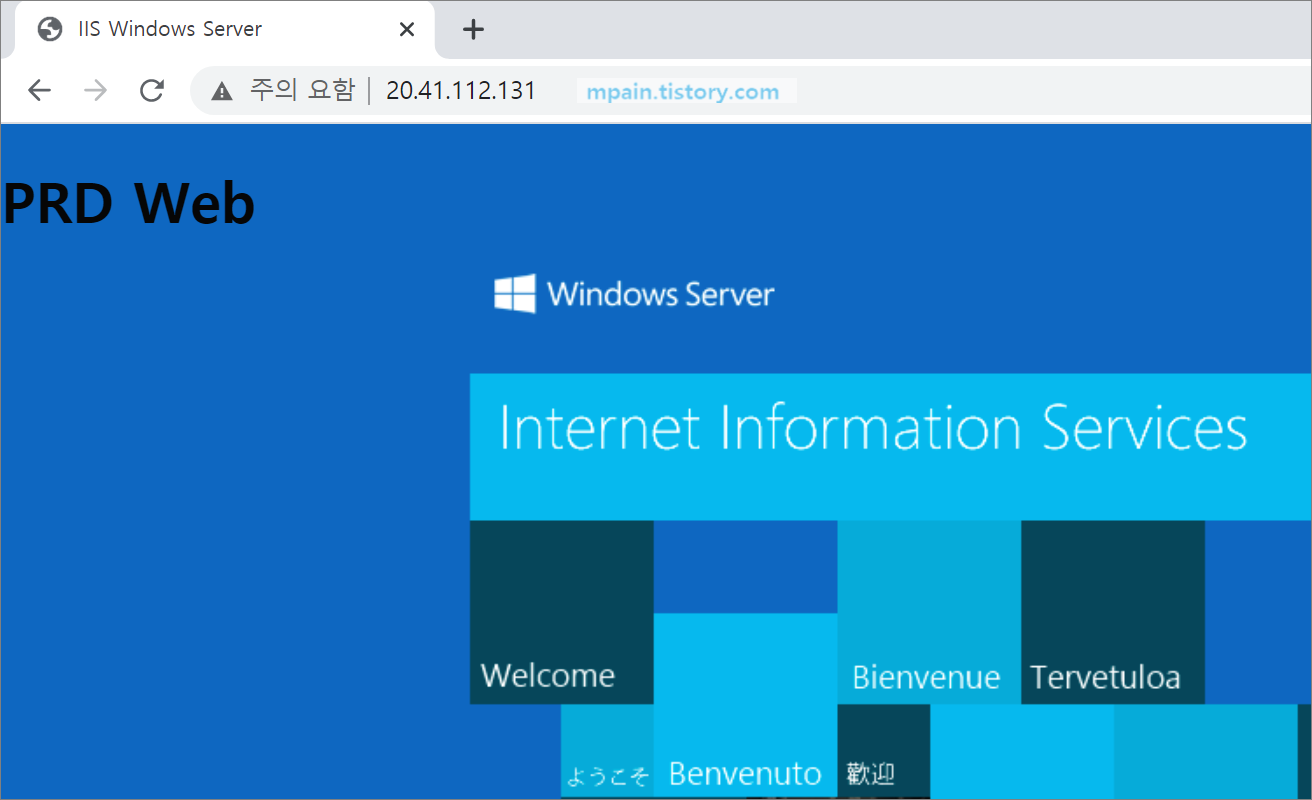
인터넷에서 PRD-VNET의 WEB VM으로 HTTP (TCP 80) 접속을 허용하는 DNAT 규칙을 Azure Firewall에 추가합니다.

DNAT(Destination NAT) 규칙을 사용하면, 인터넷에서 Azure 가상 네트워크의 VM으로의 직접적인 연결은 차단하고, Azure Firewall의 공인 IP 주소를 통해 Azure VM으로 연결될 수 있도록 구성할 수 있습니다.


Azure Firewall DNAT


우선 Azure Firewall에 Public IP 주소를 하나 추가합니다.


Azure Firewall - Add Public IP Address


Azure Firewall의 Rule - NAT rule collection에 아래와 같이 DNAT 규칙을 추가합니다.


Azure Firewall - NAT Rule collection


브라우저에서 DNAT 규칙의 공인 IP 주소로 접속해봅니다.
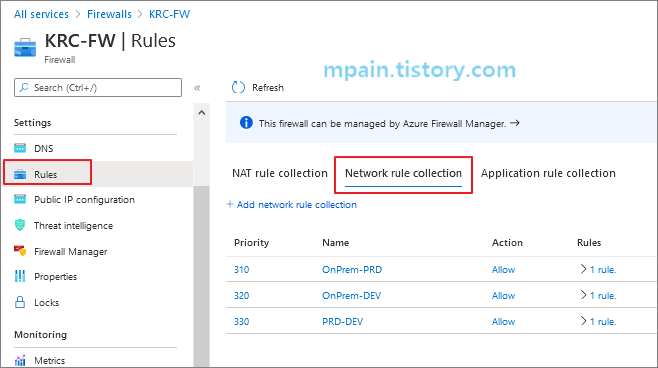


5. 네트워크 규칙 추가

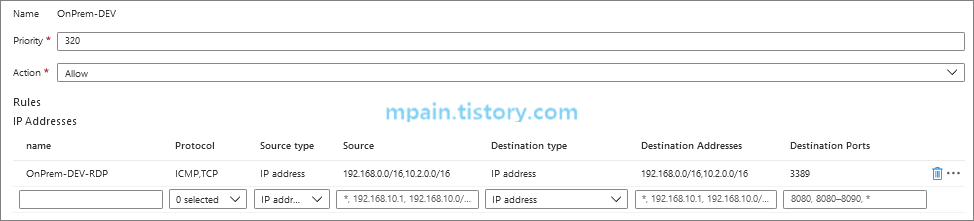
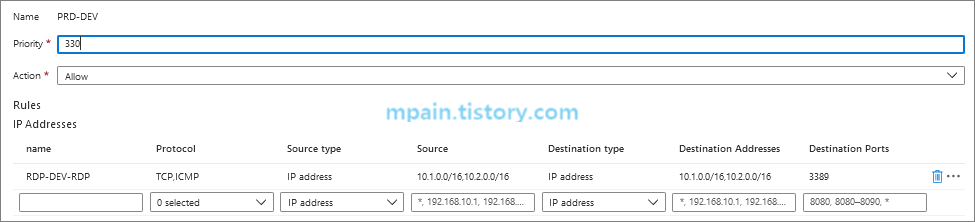
Azure Firewall에 온프레미스와 Azure PRD, DEV 네트워크간 RDP 연결을 허용하는 규칙을 생성합니다. 

네트워크 규칙(Network rule)으로 Azure VM으로 들어오고 나가는 네트워크 연결을 허용하거나 차단할 수 있습니다.


Azure Firewall - Network Rule


Azure Firwall - Rules - Network rule collection에 RDP 허용 규칙을 추가합니다.


Azure Firewall - Network Rule collection


OnPrem-PRD


OnPrem-DEV


PRD-DEV


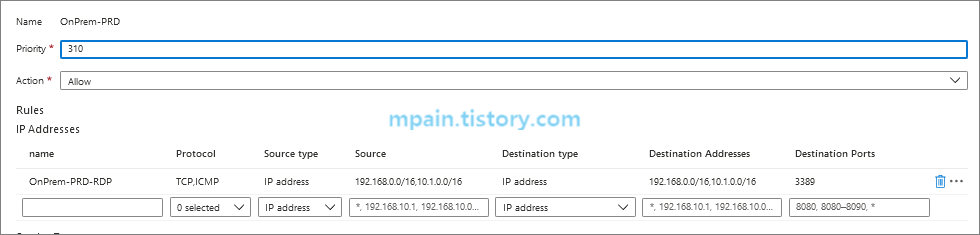
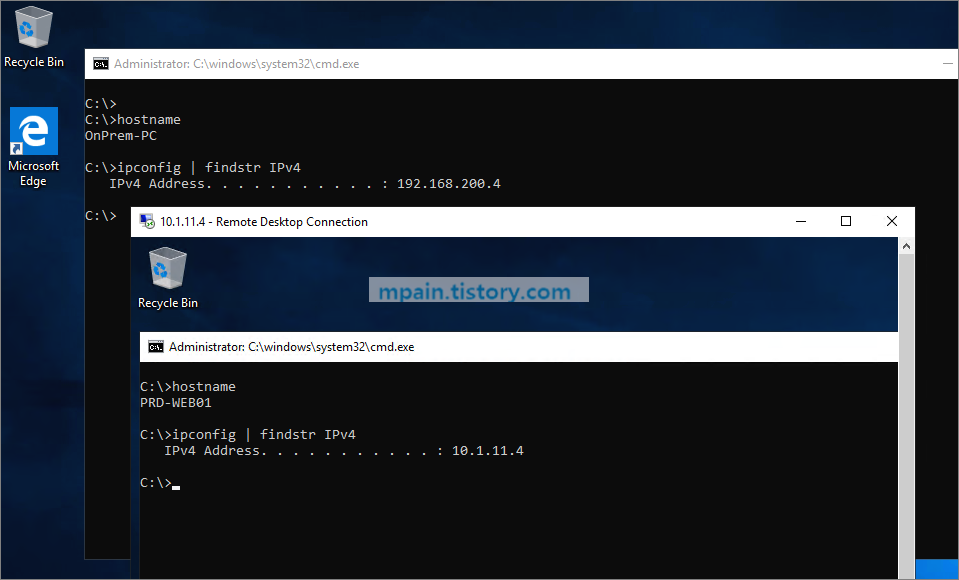
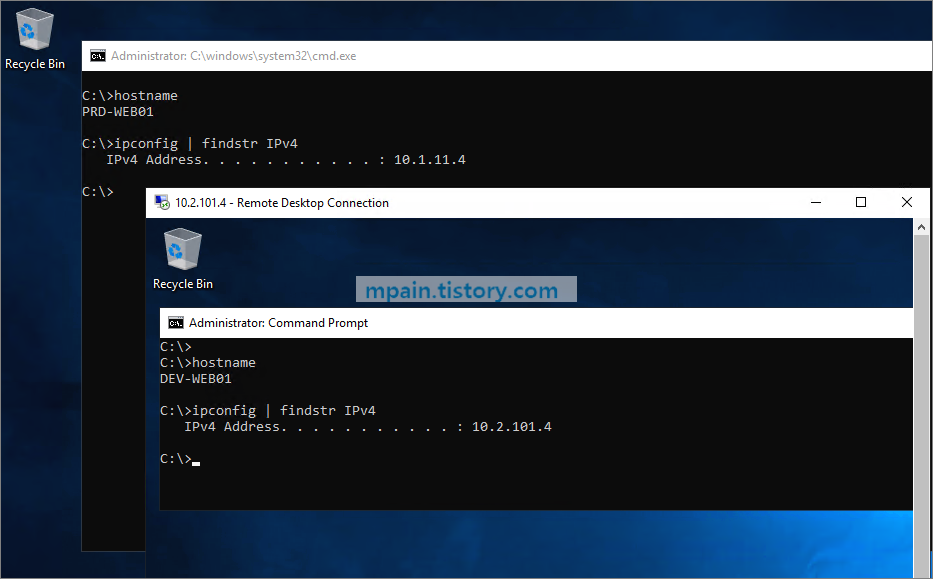
RDP 허용 규칙 추가 후 각 네트워크 간 RDP 연결이 되는지 확인해봅니다.

온프레미스 -> PRD-VNET의 VM으로 RDP 연결


OnPrem to PRD VM


PRD-VNET의 VM에서 DEV-VNET VM으로 RDP 연결


PRD VM to DEV VM


-끝

728x90
728x90

Windows Server 2003 Active Directory에서 Windows Server 2008 이상 버전 (Windows Server 2008, 2008 R2, 2012, 2012 R2) 으로 마이그레이션 한 후에는 SYSVOL 복제 방식을 변경하는 것을 권장합니다.


도메인 기능 수준과 포리스트 기능 수준을 최소 Windows Server 2008 이상으로 올린 후, SYSVOL 복제 방식을 기존 File Replication Service에서 DFS-R 로 변경합니다.


작업이 완료되면 SYSVOL 폴더가 SYSVOL_DFSR 폴더로 대체됩니다.


1. 작업 전 확인


1. 현재 공유 중인 SYSVOL 정보 확인 (net share)


2. ADSIEDIT에서 복제 설정 확인 (NTFRS 로 표시됨)


3. 서비스 확인 – 파일복제 서비스와 DFS Replication 서비스 모두 실행 중


2. 복제 설정 변경


1. powershell 실행 후 아래 명령 실행
dfsrmig.exe /GetGlobalState


2. dfsrmig.exe /CreateGlobalObjects


3. dfsrmig.exe /GetGlobalState


4. dfsrmig.exe /GetMigrationState


5. dfsrmig.exe /SetGlobalState 0


6. dfsrmig.exe /SetGlobalState 1


7. dfsrmig.exe /GetMigrationState


8. 위 명령을 계속 수행하여, 아래와 같은 결과가 나올 때 까지 대기


9. 탐색기에서 SYSVOL_DFSR 폴더가 생성되었는지 확인


10. ADSIEDIT에서 Domain Controller 아래에 아래와 같이 DFSR-LocalSettings 가 표시되는지 확인


11. dfsrmig.exe /SetGlobalState 2


12. dfsrmig.exe /GetMigrationState (결과가 아래와 같이 나올 때까지 대기)


13. Registry 편집기에서 SYSVOL 경로가 변경되었는지 확인


14. dfsrmig.exe /SetGlobalState 3


15. dfsrmig.exe /GetMigrationState (결과가 아래와 같이 나올 때까지 대기)


16. dfsrmig.exe /GetGlobalState


17. 탐색기에서 SYSVOL 폴더가 삭제되었는지 확인


18. ADSIEDIT에서 NTFRS Subscriptions 가 삭제되었는지 확인


3. 작업 후 확인


1 DFS 관리 콘솔에서 확인
복제에 Domain System Volume 이 생성되었습니다.


2 서비스 확인
File Replication Service가 중지되고 사용 안 함으로 변경된 것을 확인.


3 SYSVOL 공유 확인
net share 


끝.

728x90
728x90

Update 2021-12-18 – This looks like a much more competent script for detecting this vulnerability and there is a python version for Linux: https://github.com/CERTCC/CVE-2021-44228_scanner

Updated 2021-12-17 – Script is v1.4 and looks for .war files now too

Original post below

Inspired by the one-liner here: https://gist.github.com/Neo23x0/e4c8b03ff8cdf1fa63b7d15db6e3860b#find-vulnerable-software-windows

gci 'C:\' -rec -force -include *.jar -ea 0 | foreach {select-string "JndiLookup.class" $_} | select -exp Path

I wrote a script to expand on the command, support Windows Server 2008 onward and to be more automated.

This script is basically the one liner with a bit of logic to get all the local fixed disks on a server and iterate through them all looking for Log4j jar file:

<#
.Synopsis
Checks the local system for Log4Shell Vulnerability [CVE-2021-44228]
.DESCRIPTION
Gets a list of all volumes on the server, loops through searching each disk for Log4j stuff
 
Version History
1.0 - Initial release
1.1 - Changed ErrorAction to "Continue" instead of stopping the script
1.2 - Went back to SilentlyContinue, so much noise
Replace attribute -Include by -Filter (prevent unauthorized access exception stopping scan)
Remove duplicate path with Get-Unique cmdlet
.EXAMPLE
.\check_CVE-2021-44228.ps1
.NOTES
Created by Eric Schewe 2021-12-13
Modified by Cedric BARBOTIN 2021-12-14
#>
 
# Get Windows Version string
$windowsVersion = (Get-WmiObject -class Win32_OperatingSystem).Caption
 
# Server 2008 (R2)
if ($windowsVersion -like "*2008*") {
 
$disks = [System.IO.DriveInfo]::getdrives() | Where-Object {$_.DriveType -eq "Fixed"}
 
}
# Everything else
else {
 
$disks = Get-Volume | Where-Object {$_.DriveType -eq "Fixed"}
 
}
 
# I have no idea why I had to write it this way and why .Count didn't just work
$diskCount = $disks | Measure-Object | Select-Object Count -ExpandProperty Count
 
Write-Host -ForegroundColor Green "$(Get-Date -Format "yyyy-MM-dd H:mm:ss") - Starting the search of $($diskCount) disks"
 
foreach ($disk in $disks) {
 
# gci 'C:\' -rec -force -include *.jar -ea 0 | foreach {select-string "JndiLookup.class" $_} | select -exp Path
 
# Server 2008 (R2)
if ($windowsVersion -like "*2008*") {
 
Write-Host -ForegroundColor Yellow " $(Get-Date -Format "yyyy-MM-dd H:mm:ss") - Checking $($disk.Name): - $($disk.VolumeLabel)"
Get-ChildItem "$($disk.Name)" -Recurse -Force -Include @("*.jar","*.war") -ErrorAction SilentlyContinue | ForEach-Object { Select-String "JndiLookup.class" $_ } | Select-Object -ExpandProperty Path | Get-Unique
 
}
# Everything else
else {
 
Write-Host -ForegroundColor Yellow " $(Get-Date -Format "yyyy-MM-dd H:mm:ss") - Checking $($disk.DriveLetter): - $($disk.VolumeLabel)"
Get-ChildItem "$($disk.DriveLetter):\" -Recurse -Force -Include @("*.jar","*.war") -ErrorAction SilentlyContinue | ForEach-Object { Select-String "JndiLookup.class" $_ } | Select-Object -ExpandProperty Path | Get-Unique
 
}
 
}
 
Write-Host -ForegroundColor Green "$(Get-Date -Format "yyyy-MM-dd H:mm:ss") - Done checking all drives"

Sample output with nothing found:

Sample output with something found:

Good luck everyone.

728x90

+ Recent posts