만료가 다가오고 있는지 어떻게 알 수 있습니까? Hyper-V-VMMS 이벤트 로그에 다음 경고가 표시됩니다.
로그 이름: 마이크로소프트-윈도우-하이퍼-V-VMMS-관리 원본: 마이크로소프트-윈도우-하이퍼-V-VMMS 이벤트 ID: 12510 작업 범주: 없음 수준: 경고 사용자: 시스템 설명: 서버 인증에 사용되는 인증서는 30일 이내에 만료됩니다. 인증서가 만료된 후에는 가상 컴퓨터에 대한 원격 액세스를 사용할 수 없습니다. 인증서를 갱신하거나 다시 만드십시오.
4. 연결 확인 Get-SCVMMManagedComputer | ft Name, StateString, RoleString,State,VersionStateString,AgentVersion,UpdatedDate,IsFullyCached,MostRecentTaskIfLocal
Its been a while with no updates and it's not that I haven't been working hard, it's that I have been doing a lot of stuff directly with the API of systems like WHMCS or NetBox, which have an extremely low appeal to anyone not working in the service provider space, so haven't been adding it all to the blog. If anyone wants me to add this stuff please just get in touch and I will put it on.
I was recently asked to create a function that would allow you to set the IP address of a virtual machine from the host in a Hyper-V environment.
I can't really claim this as all being my own work, I used a blog post from a Microsoft employee, head of product dev or something or other. Unfortunately, I can't seem to source the link right now to give proper credit. You dont really need to see it though. His post was pretty hardcore and mine is much easier, I promise.
This topic describes how to add servers or drives to Storage Spaces Direct.
Adding servers
Adding servers, often called scaling out, adds storage capacity and can improve storage performance and unlock better storage efficiency. If your deployment is hyper-converged, adding servers also provides more compute resources for your workload.
Typical deployments are simple to scale out by adding servers. There are just two steps:
Run thecluster validation wizardusing the Failover Cluster snap-in or with theTest-Clustercmdlet in PowerShell (run as Administrator). Include the new server<NewNode>you wish to add.
This confirms that the new server is running Windows Server 2016 Datacenter Edition, has joined the same Active Directory Domain Services domain as the existing servers, has all the required roles and features, and has networking properly configured.
Important
If you are re-using drives that contain old data or metadata you no longer need, clear them usingDisk Managementor theReset-PhysicalDiskcmdlet. If old data or metadata is detected, the drives aren't pooled.
PowerShellCopy
Run the following cmdlet on the cluster to finish adding the server:
Copy
Add-ClusterNode -Name NewNode
Note
Automatic pooling depends on you having only one pool. If you've circumvented the standard configuration to create multiple pools, you will need to add new drives to your preferred pool yourself usingAdd-PhysicalDisk.
From 2 to 3 servers: unlocking three-way mirroring
With two servers, you can only create two-way mirrored volumes (compare with distributed RAID-1). With three servers, you can create three-way mirrored volumes for better fault tolerance. We recommend using three-way mirroring whenever possible.
Two-way mirrored volumes cannot be upgraded in-place to three-way mirroring. Instead, you can create a new volume and migrate (copy, such as by usingStorage Replica) your data to it, and then remove the old volume.
To begin creating three-way mirrored volumes, you have several good options. You can use whichever you prefer.
Option 1
SpecifyPhysicalDiskRedundancy = 2on each new volume upon creation.
Instead, you can setPhysicalDiskRedundancyDefault = 2on the pool'sResiliencySettingobject namedMirror. Then, any new mirrored volumes will automatically usethree-waymirroring even if you don't specify it.
With four servers, you can use dual parity, also commonly called erasure coding (compare to distributed RAID-6). This provides the same fault tolerance as three-way mirroring, but with better storage efficiency. To learn more, seeFault tolerance and storage efficiency.
If you're coming from a smaller deployment, you have several good options to begin creating dual parity volumes. You can use whichever you prefer.
Option 1
SpecifyPhysicalDiskRedundancy = 2andResiliencySettingName = Parityon each new volume upon creation.
SetPhysicalDiskRedundancy = 2on the pool'sResiliencySettingobject namedParity. Then, any new parity volumes will automatically usedualparity even if you don't specify it
With four servers, you can also begin using mirror-accelerated parity, where an individual volume is part mirror and part parity.
For this, you will need to update yourStorageTiertemplates to have bothPerformanceandCapacitytiers, as they would be created if you had first runEnable-ClusterS2Dat four servers. Specifically, both tiers should have theMediaTypeof your capacity devices (such as SSD or HDD) andPhysicalDiskRedundancy = 2. ThePerformancetier should beResiliencySettingName = Mirror, and theCapacitytier should beResiliencySettingName = Parity.
Option 3
You may find it easiest to simply remove the existing tier template and create the two new ones. This will not affect any pre-existing volumes which were created by referring the tier template: it's just a template.
As you scale beyond four servers, new volumes can benefit from ever-greater parity encoding efficiency. For example, between six and seven servers, efficiency improves from 50.0% to 66.7% as it becomes possible to use Reed-Solomon 4+2 (rather than 2+2). There are no steps you need to take to begin enjoying this new efficiency; the best possible encoding is determined automatically each time you create a volume.
However, any pre-existing volumes willnotbe "converted" to the new, wider encoding. One good reason is that to do so would require a massive calculation affecting literallyevery single bitin the entire deployment. If you would like pre-existing data to become encoded at the higher efficiency, you can migrate it to new volume(s).
Adding servers when using chassis or rack fault tolerance
If your deployment uses chassis or rack fault tolerance, you must specify the chassis or rack of new servers before adding them to the cluster. This tells Storage Spaces Direct how best to distribute data to maximize fault tolerance.
Create a temporary fault domain for the node by opening an elevated PowerShell session and then using the following command, where<NewNode>is the name of the new cluster node:
New-ClusterFaultDomain -Type Node -Name <NewNode>
PowerShellCopy
Move this temporary fault-domain into the chassis or rack where the new server is located in the real world, as specified by<ParentName>:
Add the server to the cluster as described inAdding servers. When the new server joins the cluster, it's automatically associated (using its name) with the placeholder fault domain.
Adding drives
Adding drives, also known as scaling up, adds storage capacity and can improve performance. If you have available slots, you can add drives to each server to expand your storage capacity without adding servers. You can add cache drives or capacity drives independently at any time.
Important
We strongly recommend that all servers have identical storage configurations.
To scale up, connect the drives and verify that Windows discovers them. They should appear in the output of theGet-PhysicalDiskcmdlet in PowerShell with theirCanPoolproperty set toTrue. If they show asCanPool = False, you can see why by checking theirCannotPoolReasonproperty.
If the drives don't appear, manually scan for hardware changes. This can be done usingDevice Manager, under theActionmenu. If they contain old data or metadata, consider reformatting them. This can be done usingDisk Managementor with theReset-PhysicalDiskcmdlet.
Note
Automatic pooling depends on you having only one pool. If you've circumvented the standard configuration to create multiple pools, you will need to add new drives to your preferred pool yourself usingAdd-PhysicalDisk.
Optimizing drive usage after adding drives or servers
Over time, as drives are added or removed, the distribution of data among the drives in the pool can become uneven. In some cases, this can result in certain drives becoming full while other drives in pool have much lower consumption.
To help keep drive allocation even across the pool, Storage Spaces Direct automatically optimizes drive usage after you add drives or servers to the pool (this is a manual process for Storage Spaces systems that use Shared SAS enclosures). Optimization starts 15 minutes after you add a new drive to the pool. Pool optimization runs as a low-priority background operation, so it can take hours or days to complete, especially if you're using large hard drives.
Optimization uses two jobs - one calledOptimizeand one calledRebalance- and you can monitor their progress with the following command:
PowerShellCopy
Get-StorageJob
You can manually optimize a storage pool with theOptimize-StoragePoolcmdlet. Here's an example:
When taking an S2D server offline for patching or other reasons, it is not only taking away the compute and memory for that server but also a portion of the storage pool. Care must be taken to keep your data safe and ensure quick resumption of production-level readiness to your cluster.
9. A storage job will initiate in the background to repair and resync the data. To check on the status, run (as Admin)Get-StorageJob If it returns to a command prompt that means there are no jobs running.Do not reboot the next node until all of the jobs have been completed.
10. RunGet-VirtualDiskto verify the virtual disks are healthy after storage jobs complete.Wait until steps 9 and 10 have been completed before live migrating VMs back to this node as storage jobs will consume system resources potentially affecting the response time of your applications.
11. RunResume-ClusterNode -Failback Immediateto put the cluster node back into production to handle VM workloads.
Alternative:
The steps to reboot each servers can take some time especially with post storage resync and repair. If you have the ability to shutdown the entire cluster this link will walk through the steps to make the entire process faster.
Right click on the cluster or select ‘More Action’ on the Actions panel on the right
Select ‘Configure Cluster Quorum Setting’
This will open the Quorum Wizard and select ‘Next’ to continue
Select the second options. ‘Select the quorum witness’
Next select the last options to disable the quorum witness. ‘Do not configure a quorum witness’
Once the witness is removed. Check the Failover Cluster Manager to make sure it is removed in the 'Cluster Core Resources’
How to Enable Cluster Quorum:
Open Failover Cluster Manager
Select the cluster
Right click on the cluster or select ‘More Action’ on the Actions panel on the right
Select ‘Configure Cluster Quorum Setting’
This will open the Quorum Wizard and select ‘Next’ to continue.
Select the second options. ‘Select the quorum witness’
Here you can select 3 different Quorum Witness:
Disk Witness: will create a witness on a disk. This is not an option for Storage Space Direct (S2D) because it does not work. The option is there for Storage Space. It not recommended by DataON.
File Share Witness: Will create a small file which will act as the witness. Recommend having the witness on another cluster, server, or workstation that is not on the cluster itself.
Cloud Witness: will create a witness on the cloud. This requires a Azure account and subscription. This also require having constant internet connection for the witness to be active.
Once you select the Witness, select the path where the witness will lie.
Confirm the witness and select ‘Next
Once it is configure, you will reach the summary page and select ‘Finish’ to exit.
There are three high-level steps for migration of VMs from an existing cluster to a new cluster.
Setup new servers and storage and configure iSCSI access to new storage.
Setup Hyper-V and failover clustering.
Setup the CSV storage for the new cluster.
There are two methods by which you can migrate VMs from an existing cluster to a new cluster:
Option 1 You could transfer roles to the new cluster, but this does not move any of the actual data for the VMs. If you are using iSCSI with different LUNs and mount points, the process is more involved for migrating the roles and VMs. The easier process is to simply remove each of the Hyper-V VM roles from the failover cluster manager and use the native Hyper-V Manager to “move” the actual VM’s to the new cluster. Both processes can be done while the VMs are running.
Option 2 Use the built-in Microsoft “Shared Nothing Live Migration” to migrate VMs to new cluster. For the live migration to work between servers you must initiate the move from the source server. Otherwise you need to employ Kerberos authentication for the Hyper-V settings > Live Migration > Advanced settings and the Delegation > Trust properties of the computer object. It is highly recommended to start this process on non-production VMs at first to ensure the process works smoothly!!
Here are the simple step-by-step instructions how to perform this migration.
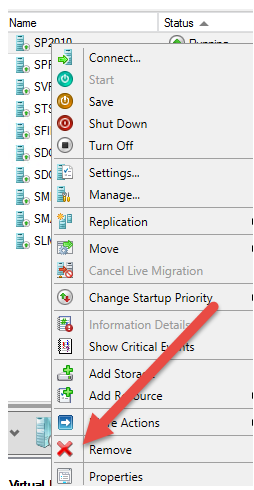
Step 1: Remove Role
Open Failover Cluster Manager and remove the virtual machine role for the VM you want to move. This does not remove the VM, it simply removes it from the cluster manager and thus is no longer highly available.
Step 2: Hyper-V Manager Move
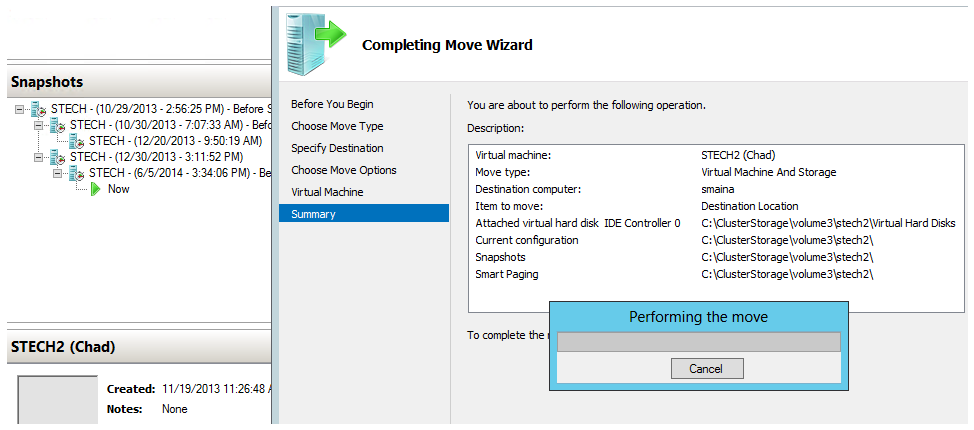
Open Hyper-V Manager on the server where the VM resides. Right-click the VM and select Move.
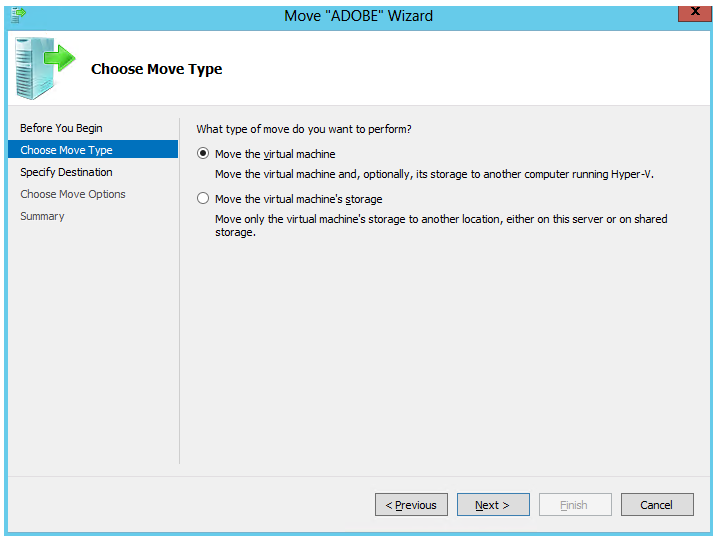
Step 3: Select Type of Move
Select the type of move you want to perform. The top option allows you to move the entire VM (config, snapshots, VHDs, etc.).
Step 4: Destination Server Name
Specify the name of your destination server. This is not the cluster name but one of the nodes in the cluster.
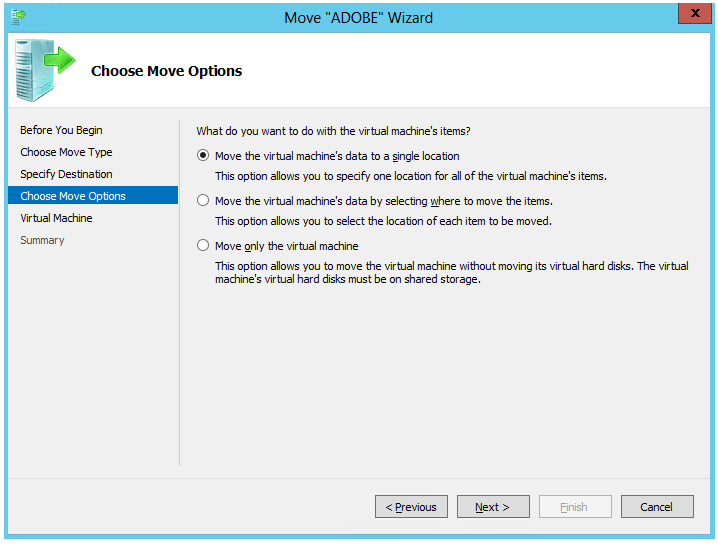
Step 5: What to Move
Now select what you want to move. Again, the top option moves all the VM files necessary to run the VM on a different server.
Step 6: Choose folder and move
Browse and select the CSV volume (already created as part of the cluster setup process). We recommend creating a folder with the name of the server inside the CSV for easier identification. Click Next to perform the move.
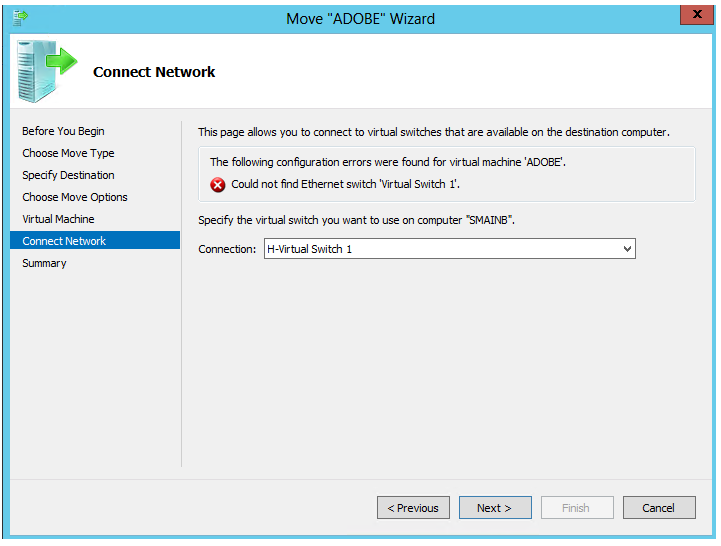
Step 7: Network Check
When the move initially begins, it pre-checks a variety of things to make sure the move will be successful. One of those items is the virtual switch the VM is connected to. If your virtual switches have the same name between your clusters, then you will not receive this prompt. In this example, there was a prompt for the virtual switch for the VM to connect with due to the name change as shown here. If you have snapshots of the VM, these will also move but you will be prompted for the switch to connect with, if the names are different.
Step 8: Finishing up
The tool will move and preserve the snapshots which you cannot do with the export option. This is one of the main reasons the Move feature is recommended.
Below is a step-by-step guide on how to add a third node to an existing 2-node Storage Spaces Direct (S2D) cluster with the production workload still running.
1.) Ensure that the cluster is configured with a witness.
2.) Pause/Drain a node in the cluster.
3.) Place the paused node's drives into a storage maintenance mode.
4.) Physically add the 3rd node into the 2-node cluster configuration by cabling the three servers like the image below:
DataON2UPlatforms:
DataON1UPlatform:
5.) Make sure the node that is being added to the cluster has the same firmware and drivers installed as the two servers in the existing 2-node cluster. Also install the necessary Windows features and configure the network correctly. Before adding the third node to the cluster, run a cluster validation.
8.) By adding a third node to the S2D cluster, 3-way-mirror resiliency is unlocked; Run the following command to configure this setting on the existing storage pool.